Why Propagate Your Rubber Plant?
Propagating a rubber plant is a great way to share plants with friends and family, create new plants for your home or office, and preserve the genetic material of a particularly desirable plant. By learning how to propagate a rubber plant, you can enjoy the many benefits of plant parenthood, including the satisfaction of watching your plants thrive and the joy of sharing your green thumb with others.

Click Image to Find Garden Products
Rubber plants are popular for their large, dark green leaves and ability to purify the air, making them a great addition to any indoor space. However, they can be expensive to purchase, and propagation offers a cost-effective way to multiply your plants. Additionally, propagation allows you to control the growing conditions and ensure that your new plants are healthy and free of pests.
Whether you’re a seasoned gardener or a beginner, propagating a rubber plant is a relatively simple process that requires minimal equipment and care. With the right techniques and a little patience, you can successfully propagate your rubber plant and enjoy the many rewards of plant propagation.
So, why propagate your rubber plant? Not only will you be able to share plants with others, but you’ll also be able to create new plants that are tailored to your specific growing conditions. By learning how to propagate a rubber plant, you’ll be able to enjoy the many benefits of plant parenthood and take your gardening skills to the next level.

Choosing the Right Method: Leaf, Stem, or Air-Layering?
When it comes to propagating a rubber plant, there are several methods to choose from, each with its own advantages and disadvantages. The three most common methods are leaf, stem, and air-layering. Understanding the pros and cons of each method will help you decide which one is best suited for your needs.
Leaf propagation involves taking individual leaves from the mother plant and rooting them in soil or water. This method is ideal for plants with large, thick leaves, like rubber plants. The advantages of leaf propagation include high success rates and the ability to produce multiple new plants from a single leaf. However, this method can be time-consuming, and the new plants may not grow as quickly as those produced through stem or air-layering.
Stem propagation involves taking cuttings from the stem of the mother plant and rooting them in soil or water. This method is ideal for plants with long, woody stems, like rubber plants. The advantages of stem propagation include faster growth rates and the ability to produce more robust new plants. However, this method can be more challenging than leaf propagation, and the success rates may be lower.
Air-layering involves making a small incision in the stem of the mother plant and allowing roots to develop in the air before cutting the stem below the roots. This method is ideal for plants with thick, woody stems, like rubber plants. The advantages of air-layering include high success rates and the ability to produce new plants with a well-developed root system. However, this method can be more complex than leaf or stem propagation, and requires more specialized equipment.
When choosing a method, consider the specific needs and characteristics of your rubber plant. If you’re looking for a high success rate and don’t mind waiting a bit longer for the new plants to grow, leaf propagation may be the best choice. If you’re looking for faster growth rates and don’t mind a slightly lower success rate, stem propagation may be the way to go. And if you’re looking for a more complex, but highly effective method, air-layering may be the best option.

Preparing Your Plant for Propagation
Before you can start propagating your rubber plant, you need to make sure it’s healthy and ready for the process. This involves pruning, fertilizing, and ensuring the plant is free of pests and diseases. By taking the time to prepare your plant properly, you can increase the chances of successful propagation and ensure that your new plants get off to a strong start.
Pruning is an essential step in preparing your rubber plant for propagation. By removing any dead or damaged leaves, you can help prevent the spread of disease and encourage healthy growth. Use a pair of clean, sharp scissors or pruning shears to remove any affected leaves, and make sure to disinfect your tools between cuts to prevent the spread of disease.
Fertilizing is also important for preparing your rubber plant for propagation. A balanced fertilizer can help promote healthy growth and increase the chances of successful propagation. Look for a fertilizer that’s specifically formulated for indoor plants, and follow the instructions on the label for application rates and timing.
In addition to pruning and fertilizing, you should also make sure your rubber plant is free of pests and diseases. Check the plant carefully for any signs of infestation or infection, and take action promptly if you notice any problems. Common pests that can affect rubber plants include spider mites, mealybugs, and scale, while common diseases include root rot and leaf spot.
Once you’ve pruned, fertilized, and ensured your rubber plant is healthy, you can start thinking about propagation. Make sure you have a clean and well-lit workspace, and gather all the necessary materials, including a sharp knife or pruning shears, a pot or propagation tray, and a rooting medium such as water or soil.
By taking the time to prepare your rubber plant properly, you can increase the chances of successful propagation and ensure that your new plants get off to a strong start. Whether you’re a seasoned gardener or a beginner, following these steps can help you achieve success with your rubber plant propagation.

How to Take Leaf Cuttings from Your Rubber Plant
Taking leaf cuttings from your rubber plant is a simple and effective way to propagate new plants. Here’s a step-by-step guide on how to take leaf cuttings from your rubber plant:
Step 1: Select the Right Leaves
Choose healthy, mature leaves with no signs of damage or disease. Avoid taking leaves that are too young or too old, as they may not root well. Look for leaves with a thick, fleshy texture and a vibrant green color.
Step 2: Remove Lower Leaves
Remove any lower leaves from the cutting, leaving only the top two or three sets of leaves. This will help prevent the cutting from drying out and reduce the risk of root rot.
Step 3: Prepare the Cutting
Use a sharp, sterile knife or pruning shears to cut the leaf from the plant, just above a node (where the leaf meets the stem). Make a clean cut, and avoid crushing or tearing the leaf.
Step 4: Prepare the Rooting Medium
Prepare a rooting medium, such as water or a well-draining potting mix, to receive the cutting. If using water, make sure it’s room temperature and free of any contaminants.
Step 5: Plant the Cutting
Plant the cutting in the rooting medium, making sure the node is fully submerged. If using soil, firm the soil gently around the cutting to secure it in place.
Step 6: Provide the Right Conditions
Provide the cutting with the right conditions to root, including bright, indirect light and temperatures between 65-75°F (18-24°C). Keep the soil consistently moist but not waterlogged.
By following these steps, you can successfully take leaf cuttings from your rubber plant and propagate new plants. Remember to be patient, as rooting can take several weeks to several months.

Rooting Your Rubber Plant Cuttings
Once you have taken your leaf cuttings, it’s time to root them. There are several methods you can use to root your rubber plant cuttings, including water, soil, and a propagation tray. Each method has its own advantages and disadvantages, and the best method for you will depend on your personal preferences and the specific needs of your plants.
Water Rooting
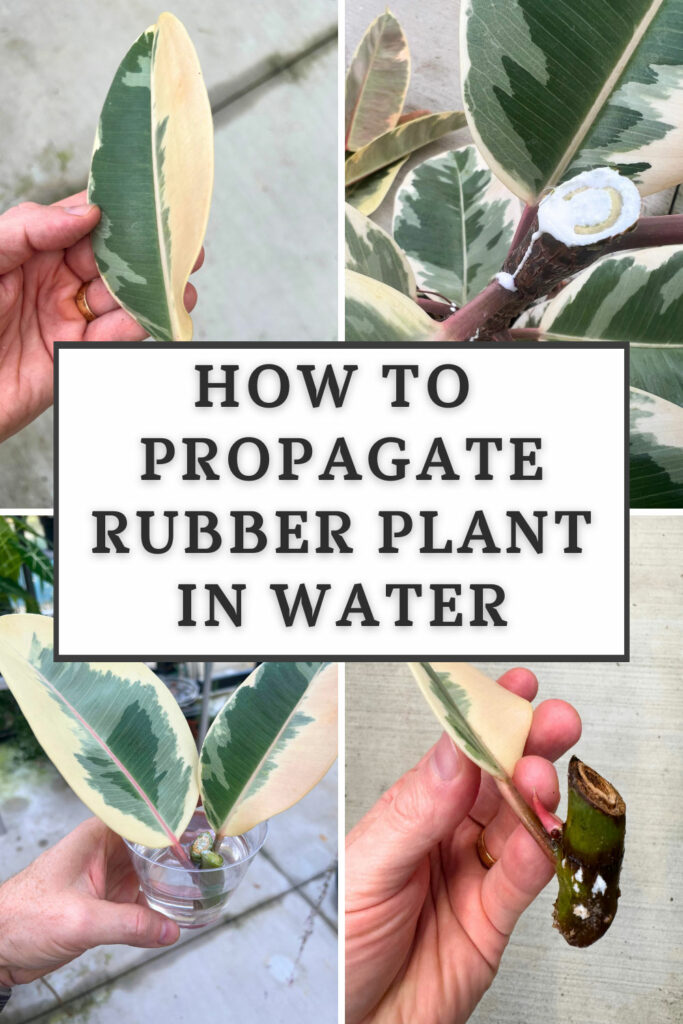
Water rooting is a popular method for rooting rubber plant cuttings. To use this method, simply place the cut end of the leaf in a glass of water, making sure that the node (where the leaf meets the stem) is fully submerged. Place the glass in a bright, indirectly lit area, and change the water every few days to prevent bacterial growth.
Soil Rooting
Soil rooting is another common method for rooting rubber plant cuttings. To use this method, fill a small pot or propagation tray with a well-draining potting mix, and plant the cutting in the soil. Water the soil gently but thoroughly, and place the pot in a bright, indirectly lit area.
Propagation Tray Rooting
A propagation tray is a specialized container designed specifically for rooting cuttings. To use a propagation tray, simply place the cut end of the leaf in the tray, making sure that the node is fully submerged in the rooting medium. Place the tray in a bright, indirectly lit area, and water the medium gently but thoroughly.
Caring for Your Cuttings
Regardless of the method you choose, it’s essential to provide your cuttings with the right conditions to root. This includes bright, indirect light, temperatures between 65-75°F (18-24°C), and consistent moisture. Avoid overwatering, as this can lead to root rot and other problems.
By following these steps and providing your cuttings with the right conditions, you should be able to successfully root your rubber plant cuttings and grow new plants.

Common Challenges and Solutions in Rubber Plant Propagation
While propagating a rubber plant can be a rewarding experience, it’s not without its challenges. Here are some common problems that may arise during the propagation process, along with some solutions and troubleshooting tips to help you overcome them.
Root Rot
Root rot is a common problem that can occur when the rooting medium is too wet or when the cutting is not receiving enough oxygen. To prevent root rot, make sure to use a well-draining rooting medium and avoid overwatering. If you notice any signs of root rot, such as soft or mushy roots, remove the affected roots and treat the cutting with a fungicide.
Leaf Drop
Leaf drop is another common problem that can occur during the propagation process. This can be caused by a variety of factors, including overwatering, underwatering, or exposure to extreme temperatures. To prevent leaf drop, make sure to provide your cutting with consistent moisture and temperatures between 65-75°F (18-24°C).
Slow Growth
Slow growth is a common problem that can occur when the cutting is not receiving enough light or nutrients. To promote healthy growth, make sure to provide your cutting with bright, indirect light and a balanced fertilizer. You can also try pruning the cutting to encourage new growth.
Pests and Diseases
Pests and diseases can also be a problem during the propagation process. To prevent infestations, make sure to inspect your cutting regularly and treat any affected areas with insecticidal soap or neem oil. You can also try using a propagation tray with a built-in pest control system.
By being aware of these common challenges and taking steps to prevent them, you can increase your chances of success when propagating a rubber plant. Remember to stay patient and persistent, and don’t be afraid to try again if you encounter any problems.
Caring for Your Newly Propagated Rubber Plant
Congratulations You have successfully propagated a new rubber plant. Now, it’s time to provide the right care to ensure it grows and thrives. Here are some tips on how to care for your newly propagated rubber plant:
Lighting
Rubber plants prefer bright, indirect light. Direct sunlight can cause the leaves to become scorched, so it’s best to provide filtered or dappled light. East- or west-facing windows are ideal for rubber plants.
Watering
Rubber plants prefer well-draining soil and should be watered carefully. Water your plant when the top inch of soil feels dry to the touch. Avoid overwatering, as this can lead to root rot and other problems.
Nutrients
Rubber plants are heavy feeders and require regular fertilization. Use a balanced fertilizer (20-20-20) and follow the instructions on the label for application rates and timing.
Pruning and Training
Pruning and training are essential for maintaining the shape and promoting healthy growth of your rubber plant. Remove any dead or damaged leaves, and prune the plant to maintain its desired shape. You can also train the plant to grow up a trellis or other support.
Pest Control
Check your plant regularly for pests, such as spider mites, mealybugs, and scale. If you notice any infestations, treat the plant with insecticidal soap or neem oil.
By following these care tips, you can help your