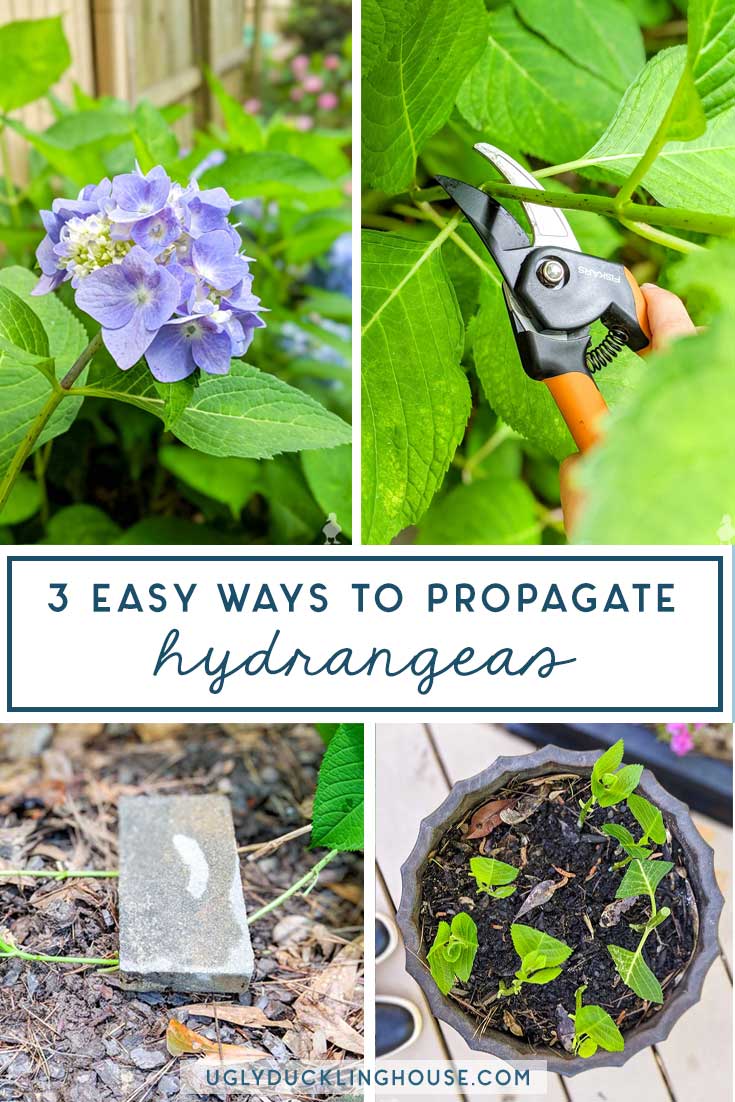
Unlocking the Secrets of Hydrangea Cuttings
Hydrangea propagation using cuttings is a cost-effective and efficient method for increasing plant yield and sharing these beautiful flowers with friends and family. By understanding the basics of hydrangea cutting propagation, gardeners can enjoy an abundance of blooms in their garden without breaking the bank. To get started, it’s essential to choose healthy parent plants with desirable traits, such as vibrant flower color or robust growth habits. When selecting cutting material, look for stems with at least two nodes, as these will have a higher chance of successful rooting.

Click Image to Find Garden Products
Before taking cuttings, make sure to inspect the parent plant for any signs of disease or pests. This will help prevent the spread of any potential issues to the new cuttings. It’s also crucial to choose the right time for taking cuttings, as this can affect the success rate of rooting. For hydrangeas, the best time to take cuttings is during the spring or summer months when the plant is actively growing.
By following these simple guidelines, gardeners can increase their chances of successful hydrangea propagation using cuttings. With a little patience and practice, anyone can master the art of rooting hydrangea cuttings and enjoy the many benefits of these stunning flowers. Whether you’re a seasoned gardener or just starting out, learning how to root a hydrangea cutting can be a rewarding and enjoyable experience.
One of the main advantages of propagating hydrangeas using cuttings is the ability to reproduce exact replicas of the parent plant. This means that gardeners can share their favorite hydrangea varieties with friends and family, or use them to create a uniform look in their garden. Additionally, propagating hydrangeas using cuttings can be a cost-effective way to increase plant yield, as it eliminates the need to purchase new plants.
By understanding the basics of hydrangea cutting propagation, gardeners can unlock the secrets of these beautiful flowers and enjoy an abundance of blooms in their garden. With a little practice and patience, anyone can master the art of rooting hydrangea cuttings and reap the many rewards of these stunning flowers.
Preparing the Perfect Cutting: Tips and Tricks
When it comes to preparing hydrangea cuttings, timing is everything. The best time to take cuttings is during the spring or summer months when the plant is actively growing. This allows the cutting to take root quickly and reduces the risk of rooting failure. It’s also essential to choose the right cutting material, as this can affect the success rate of rooting.
For hydrangea cuttings, it’s best to use stems with at least two nodes, as these will have a higher chance of successful rooting. The ideal length of the cutting is around 3-4 inches, and the thickness should be around 1/4 inch. This will provide enough stem material for rooting while minimizing the risk of the cutting drying out.
When preparing the cutting, it’s crucial to remove lower leaves to prevent rooting issues. This is because the lower leaves can rot and cause the cutting to become waterlogged, reducing the chances of successful rooting. To remove the lower leaves, simply cut them off with a pair of clean scissors or pruning shears, leaving only two or three sets of leaves at the top of the cutting.
Another important step in preparing hydrangea cuttings is to make a clean cut just above a node. This will help the cutting to take root more quickly and reduce the risk of rooting failure. To make a clean cut, use a sharp pair of scissors or pruning shears and cut the stem at a 45-degree angle. This will help the cutting to absorb water and nutrients more efficiently.
By following these simple tips and tricks, gardeners can prepare the perfect hydrangea cutting for rooting. With a little practice and patience, anyone can master the art of how to root a hydrangea cutting and enjoy the many benefits of these beautiful flowers.
In addition to preparing the cutting, it’s also essential to have the right rooting medium and equipment. This can include a rooting hormone powder or liquid, a pot or container with drainage holes, and a clear plastic bag or cloche to create a mini-greenhouse effect. By having the right materials and equipment, gardeners can increase their chances of successful rooting and enjoy a thriving hydrangea plant.
Rooting Hydrangea Cuttings: A Comprehensive Guide
Once you have prepared your hydrangea cutting, it’s time to root it. There are several methods for rooting hydrangea cuttings, each with its own pros and cons. In this section, we will explore the different methods for rooting hydrangea cuttings, including water rooting, soil rooting, and using rooting hormones.
Water rooting is a popular method for rooting hydrangea cuttings. This method involves placing the cutting in a glass of water, making sure that the node (where the leaf meets the stem) is fully submerged. The cutting will start to develop roots within 1-2 weeks, and can be transplanted into soil once the roots are visible. One of the advantages of water rooting is that it allows you to see the roots develop, making it easier to monitor the progress of the cutting.
Soil rooting is another common method for rooting hydrangea cuttings. This method involves planting the cutting in a pot or container filled with a well-draining soil mix. The cutting should be planted at the same depth as it was on the parent plant, and watered thoroughly. Soil rooting can take longer than water rooting, typically 2-4 weeks, but it allows the cutting to develop a stronger root system.
Using rooting hormones is a third method for rooting hydrangea cuttings. This method involves applying a rooting hormone powder or liquid to the cut end of the stem, and then planting the cutting in soil. Rooting hormones can increase the chances of successful rooting, but they can also be expensive and may not be necessary for all cuttings.
Regardless of the method you choose, it’s essential to provide the right conditions for rooting. This includes maintaining a consistent temperature, humidity, and light level. A temperature of around 70-80°F (21-27°C) and humidity level of 50-60% is ideal for rooting hydrangea cuttings.
By following these tips and choosing the right method for your hydrangea cutting, you can increase your chances of successful rooting. Remember to be patient, as rooting can take time, and don’t be discouraged if not all of your cuttings root successfully. With a little practice and patience, you can master the art of how to root a hydrangea cutting and enjoy the many benefits of these beautiful plants.
In addition to the methods mentioned above, there are also some innovative and creative ways to root hydrangea cuttings. For example, you can use a propagation tray with a clear plastic lid to create a mini-greenhouse effect, or use a rooting medium specifically designed for hydrangeas. By experimenting with different methods and techniques, you can find what works best for you and your hydrangea cuttings.
Creating the Ideal Environment for Rooting
Once you have prepared your hydrangea cutting and chosen a rooting method, it’s essential to create an ideal environment for rooting. This includes providing the right temperature, humidity, and light conditions. By creating a mini-greenhouse effect, you can increase the chances of successful rooting and promote healthy root growth.
Temperature is a critical factor in rooting hydrangea cuttings. The ideal temperature for rooting is between 65-75°F (18-24°C). Avoid placing the cutting in direct sunlight or near heating vents, as this can cause the temperature to fluctuate. Instead, place the cutting in a bright, indirectly lit area, such as a north-facing window or under grow lights.
Humidity is also essential for rooting hydrangea cuttings. A humid environment helps to prevent the cutting from drying out and promotes root growth. You can create a humid microclimate by covering the cutting with a clear plastic bag or cloche. This will help to maintain a consistent humidity level and promote healthy root growth.
Light is also an important factor in rooting hydrangea cuttings. While hydrangeas prefer bright, indirect light, too much light can cause the cutting to become scorched. Avoid placing the cutting in direct sunlight, especially during the hottest part of the day. Instead, provide bright, indirect light, such as east- or west-facing windows or under grow lights.
To create a mini-greenhouse effect, you can use a clear plastic bag or cloche to cover the cutting. This will help to maintain a consistent humidity level and promote healthy root growth. Simply place the cutting in a pot or container, and cover it with a clear plastic bag or cloche. Make sure to leave some space between the bag and the cutting to allow for air circulation.
By creating an ideal environment for rooting, you can increase the chances of successful rooting and promote healthy root growth. Remember to monitor the temperature, humidity, and light conditions, and adjust as necessary to ensure optimal rooting conditions. With a little patience and care, you can successfully root your hydrangea cutting and enjoy the many benefits of these beautiful plants.
In addition to creating a mini-greenhouse effect, you can also use other techniques to promote healthy root growth. For example, you can use a rooting medium specifically designed for hydrangeas, or add a small amount of fertilizer to the soil to promote root growth. By experimenting with different techniques and methods, you can find what works best for you and your hydrangea cuttings.
Common Mistakes to Avoid When Rooting Hydrangea Cuttings
While rooting hydrangea cuttings can be a rewarding experience, there are several common mistakes that can lead to rooting failure. By understanding these mistakes and taking steps to avoid them, you can increase your chances of successfully rooting your hydrangea cuttings.
One of the most common mistakes is over-watering. Hydrangea cuttings are prone to root rot if the soil is too wet, so it’s essential to ensure that the soil is moist but not waterlogged. Check the soil daily, and only water when the top inch of soil feels dry to the touch.
Under-watering is another common mistake. Hydrangea cuttings need consistent moisture to develop roots, so make sure to water them regularly. However, avoid getting water on the leaves or crown of the plant, as this can cause rot and other problems.
Inadequate light is also a common mistake. Hydrangea cuttings need bright, indirect light to develop roots, so make sure to place them in a spot that receives plenty of light. However, avoid direct sunlight, as this can cause the cutting to become scorched.
Another mistake is not providing enough humidity. Hydrangea cuttings thrive in humid environments, so make sure to cover the pot or container with a clear plastic bag or cloche. This will help to maintain a consistent humidity level and promote healthy root growth.
If you notice that your hydrangea cutting is struggling, there are several troubleshooting steps you can take. Check the soil moisture and adjust your watering schedule as needed. Make sure the cutting is receiving enough light, and consider moving it to a brighter location. If the cutting is showing signs of root rot, remove it from the soil and treat it with a fungicide.
By avoiding these common mistakes and taking steps to troubleshoot any issues that arise, you can increase your chances of successfully rooting your hydrangea cuttings. Remember to be patient, as rooting can take time, and don’t be discouraged if not all of your cuttings root successfully. With a little practice and patience, you can master the art of how to root a hydrangea cutting and enjoy the many benefits of these beautiful plants.
In addition to avoiding common mistakes, there are also several tips and tricks you can use to promote healthy root growth. For example, you can use a rooting hormone powder or liquid to stimulate root growth, or add a small amount of fertilizer to the soil to promote healthy growth. By experimenting with different techniques and methods, you can find what works best for you and your hydrangea cuttings.
Post-Rooting Care: Nurturing Your New Hydrangea Plants
Once your hydrangea cuttings have developed roots, it’s essential to provide them with proper care to ensure they continue to thrive. This includes watering, fertilizing, and pruning, as well as hardening off the plants to prepare them for outdoor conditions.
Watering is crucial for newly rooted hydrangea plants. Make sure to water them regularly, but avoid over-watering, which can lead to root rot. Check the soil daily, and only water when the top inch of soil feels dry to the touch.
Fertilizing is also important for newly rooted hydrangea plants. Use a balanced fertilizer that is high in phosphorus, which will promote healthy root growth and development. Apply the fertilizer according to the manufacturer’s instructions, and avoid over-fertilizing, which can damage the plant.
Pruning is another essential step in caring for newly rooted hydrangea plants. Prune the plant to maintain its shape and promote healthy growth. Remove any dead or damaged leaves or stems, and cut back the plant to encourage new growth.
Hardening off is the process of gradually acclimating the plant to outdoor conditions. This is essential for newly rooted hydrangea plants, as they may be sensitive to wind, sun, and temperature fluctuations. Start by moving the plant to a shaded area outdoors, and gradually increase the amount of time it spends outside over the course of 7-10 days.
Once the plant has been hardened off, it’s ready to be transplanted into a larger pot or directly into the garden. Make sure to choose a location with well-draining soil and full sun to partial shade. Water the plant regularly, and fertilize it according to the manufacturer’s instructions.
By following these steps, you can ensure that your newly rooted hydrangea plants continue to thrive and grow. Remember to be patient, as it may take some time for the plant to adjust to its new environment. With proper care and attention, your hydrangea plants will flourish and provide you with beautiful blooms for years to come.
In addition to these care tips, there are also several other factors to consider when nurturing your newly rooted hydrangea plants. For example, make sure to monitor the plant’s temperature, humidity, and light levels, and adjust its care accordingly. By providing your hydrangea plants with the right conditions and care, you can help them thrive and enjoy the many benefits of these beautiful plants.

Timing is Everything: When to Expect Roots to Develop
When it comes to rooting hydrangea cuttings, timing is everything. The length of time it takes for roots to develop can vary depending on several factors, including the method of rooting, the temperature, humidity, and light levels, and the quality of the cutting material.
On average, it can take anywhere from 2-6 weeks for roots to develop on a hydrangea cutting. However, this timeframe can be influenced by several factors, including the method of rooting and the environmental conditions. For example, water rooting tends to be faster than soil rooting, with roots developing in as little as 1-2 weeks. On the other hand, soil rooting can take longer, typically 3-6 weeks.
Temperature is also an important factor in root development. Most hydrangea cuttings root best in temperatures between 65-75°F (18-24°C). Avoid placing the cutting in areas with extreme temperatures, such as near heating vents or drafty windows.
Humidity is also crucial for root development. Hydrangea cuttings prefer a humid environment, typically above 50%. You can increase the humidity around the cutting by covering it with a clear plastic bag or cloche.
Light levels can also impact root development. Hydrangea cuttings prefer bright, indirect light. Avoid placing the cutting in direct sunlight, as this can cause the leaves to become scorched.
To monitor for root growth, gently remove the cutting from the rooting medium and inspect the base of the stem. If you see white roots developing, it’s a good sign that the cutting is rooting successfully. If not, you may need to adjust the environmental conditions or try a different rooting method.
Once roots have developed, it’s time to transplant the cutting into a larger pot or directly into the garden. Make sure to choose a location with well-draining soil and full sun to partial shade. Water the plant regularly, and fertilize it according to the manufacturer’s instructions.
By understanding the timing of root development and the factors that influence it, you can increase your chances of successfully rooting hydrangea cuttings. Remember to be patient, as rooting can take time, and don’t be discouraged if not all of your cuttings root successfully. With a little practice and patience, you can master the art of how to root a hydrangea cutting and enjoy the many benefits of these beautiful plants.

Conclusion: Successfully Rooting Hydrangea Cuttings for a Thriving Garden
Propagating hydrangeas using cuttings is a simple and effective way to increase your plant yield and reduce costs. By following the steps outlined in this article, you can successfully root hydrangea cuttings and enjoy the many benefits of these beautiful plants.
Remember to choose healthy parent plants and select the right cutting material, prepare the perfect cutting, and provide the ideal environment for rooting. Avoid common mistakes, such as over-watering and under-watering, and monitor for root growth to ensure successful rooting.
With a little practice and patience, you can master the art of how to root a hydrangea cutting and enjoy the many rewards of propagating these beautiful plants. Whether you’re a seasoned gardener or just starting out, rooting hydrangea cuttings is a great way to add some beauty and elegance to your garden.
So why not give it a try? With the right techniques and a little bit of care, you can successfully root hydrangea cuttings and enjoy the many benefits of these beautiful plants. Happy gardening!
In conclusion, rooting hydrangea cuttings is a simple and effective way to propagate these beautiful plants. By following the steps outlined in this article, you can successfully root hydrangea cuttings and enjoy the many rewards of propagating these plants. Remember to choose healthy parent plants, prepare the perfect cutting, and provide the ideal environment for rooting. With a little practice and patience, you can master the art of how to root a hydrangea cutting and enjoy the many benefits of these beautiful plants.
