Why Start with Seeds: The Benefits of Planting Butternut Squash from Seed
Planting butternut squash from seed offers numerous benefits for gardeners. By starting from seed, gardeners have complete control over the growing process, allowing them to tailor the conditions to their specific needs. This level of control is particularly important for butternut squash, which can be sensitive to environmental factors. Additionally, planting from seed can be a cost-effective option, as seeds are often less expensive than purchasing established seedlings.

Click Image to Find Garden Products
Another significant advantage of planting butternut squash from seed is the wide variety of cultivars available. Seed catalogs and online retailers offer a vast selection of butternut squash varieties, each with its unique characteristics, such as flavor, texture, and color. By planting from seed, gardeners can experiment with different varieties to find the one that best suits their taste preferences and growing conditions.
Furthermore, planting butternut squash from seed allows gardeners to avoid the potential risks associated with purchasing seedlings from nurseries or garden centers. Seedlings can be vulnerable to pests and diseases, which can be transmitted to other plants in the garden. By starting from seed, gardeners can minimize the risk of introducing these problems into their garden.
Lastly, planting butternut squash from seed can be a rewarding and educational experience. Gardeners can observe the entire growth process, from germination to maturity, and gain a deeper understanding of the plant’s needs and requirements. This knowledge can be applied to future gardening endeavors, making gardeners more confident and self-sufficient.
Overall, planting butternut squash from seed offers numerous benefits, including control over the growing process, cost-effectiveness, access to a wide variety of cultivars, reduced risk of pests and diseases, and a rewarding educational experience. By starting from seed, gardeners can set themselves up for success and enjoy a bountiful harvest of delicious butternut squash.
Preparing the Perfect Soil: Tips for a Successful Seed Starting
When it comes to planting butternut squash from seed, soil quality is crucial for successful germination and growth. A well-prepared soil mix can make all the difference in the health and productivity of your butternut squash plants. In this section, we will discuss the importance of soil quality and provide tips on how to prepare the ideal soil mix for planting butternut squash seeds.
The ideal soil mix for planting butternut squash seeds should have a pH level between 6.0 and 6.8. Butternut squash prefers a slightly acidic to neutral soil pH, which allows for optimal nutrient uptake. To achieve this pH range, you can mix in elemental sulfur or peat moss to lower the pH, or lime to raise it.
In addition to pH, the soil mix should also have a balanced nutrient profile. Butternut squash is a heavy feeder and requires a mix rich in organic matter, such as compost or well-rotted manure. A general-purpose fertilizer can also be added to the mix, but be careful not to over-fertilize, as this can lead to weak and leggy growth.
Moisture content is also critical when preparing the soil mix. Butternut squash seeds require consistent moisture to germinate, so the soil mix should be kept moist but not waterlogged. A mix with good drainage and aeration will help prevent waterlogged soil and reduce the risk of root rot.
To prepare the ideal soil mix, start by combining the following ingredients:
- 2 parts compost or well-rotted manure
- 1 part peat moss or coconut coir
- 1 part perlite or vermiculite
- 1 part general-purpose fertilizer
Mix these ingredients together until well combined, and then adjust the pH and moisture content as needed. Once the soil mix is prepared, it’s ready to use for planting butternut squash seeds.
By following these tips and preparing the perfect soil mix, you’ll be well on your way to successful seed starting and a bountiful harvest of delicious butternut squash.
How to Sow Butternut Squash Seeds: A Step-by-Step Guide
Now that you have prepared the perfect soil mix, it’s time to sow your butternut squash seeds. Sowing seeds at the right depth, spacing, and timing is crucial for successful germination and growth. In this section, we will provide a detailed, step-by-step guide on how to sow butternut squash seeds.
Step 1: Prepare the Sowing Area
Before sowing, make sure the sowing area is clear of any debris and weeds. If you are sowing directly in the garden, loosen the soil to a depth of about 12 inches. If you are sowing in containers, fill the containers with the prepared soil mix.
Step 2: Sow the Seeds
Sow the butternut squash seeds about 1 inch deep and 4-6 inches apart. You can sow multiple seeds in the same hole, but make sure to thin them out later to prevent overcrowding. Cover the seeds with a thin layer of soil and gently firm the soil down.
Step 3: Water the Seeds
Water the seeds gently but thoroughly. Make sure the soil is consistently moist during the germination period, which is usually around 7-10 days.
Step 4: Provide Warmth and Light
Butternut squash seeds require warmth and light to germinate. Provide a temperature of around 70-80°F (21-27°C) and indirect light. You can use grow lights or place the containers in a sunny windowsill.
Step 5: Thin the Seedlings
Once the seedlings emerge, thin them out to about 12-18 inches apart. This will give the remaining seedlings enough space to grow and receive adequate air circulation.
Timing is Everything
The ideal time to sow butternut squash seeds depends on your location and climate. In general, it’s best to sow seeds in late spring to early summer, when the soil has warmed up and the risk of frost has passed. In areas with a long growing season, you can also sow seeds in late summer for a fall harvest.
By following these steps and sowing your butternut squash seeds at the right time, you’ll be on your way to growing delicious and nutritious butternut squash from seed.

Providing the Right Conditions: Temperature, Light, and Water Requirements
Butternut squash plants require specific temperature, light, and water conditions to germinate and grow successfully. In this section, we will discuss the ideal conditions for planting butternut squash from seed and provide tips on how to provide the right environment for your plants.
Temperature Requirements
Butternut squash seeds germinate best in warm temperatures between 70°F (21°C) and 85°F (29°C). Once the seeds have germinated, the ideal temperature for growth is between 65°F (18°C) and 75°F (24°C). Avoid exposing the plants to extreme temperatures, as this can lead to poor growth or even plant death.
Light Requirements
Butternut squash plants require full sun to partial shade. Direct sunlight for at least 6 hours a day is ideal, but the plants can tolerate some shade, especially in warmer climates. If you are growing butternut squash in containers, make sure to provide sufficient light by placing the containers in a sunny location or using grow lights.
Water Requirements
Butternut squash plants require consistent moisture, especially during the germination and seedling stages. Water the soil gently but thoroughly, making sure not to overwater or underwater the plants. A general rule of thumb is to provide about 1 inch of water per week, either through rainfall or irrigation.
Watering Schedule
Here is a general watering schedule for butternut squash plants:
- Germination stage (7-10 days): Water every 2-3 days
- Seedling stage (1-2 weeks): Water every 3-4 days
- Maturation stage (3-4 weeks): Water every 4-5 days
Keep in mind that this is just a general guideline, and the specific watering needs of your butternut squash plants may vary depending on the climate, soil type, and weather conditions.
By providing the right temperature, light, and water conditions, you can help your butternut squash plants grow and thrive, leading to a bountiful harvest of delicious and nutritious fruit.
Common Challenges and Solutions: Troubleshooting Seed Starting Issues
When planting butternut squash from seed, several challenges may arise that can impact the success of your crop. In this section, we will identify common challenges and provide solutions and troubleshooting tips to help you overcome them.
Poor Germination
Poor germination is a common challenge when planting butternut squash from seed. This can be caused by a variety of factors, including old or low-quality seeds, inadequate moisture, and incorrect temperature. To overcome poor germination, make sure to use fresh and high-quality seeds, provide consistent moisture, and maintain optimal temperatures.
Pests and Diseases
Pests and diseases can also impact the success of your butternut squash crop. Common pests include aphids, whiteflies, and squash bugs, while diseases such as powdery mildew and fusarium wilt can also occur. To prevent pests and diseases, use organic or integrated pest management (IPM) methods, such as introducing beneficial insects, practicing good sanitation, and using crop rotation.
Seedling Damping Off
Seedling damping off is a common problem when planting butternut squash from seed. This occurs when the seedlings become waterlogged and develop a fungal infection, causing them to collapse and die. To prevent seedling damping off, make sure to provide good air circulation, avoid overwatering, and use a well-draining potting mix.
Slow Growth
Slow growth is another common challenge when planting butternut squash from seed. This can be caused by a variety of factors, including inadequate light, poor soil quality, and insufficient nutrients. To promote healthy growth, make sure to provide sufficient light, use a high-quality potting mix, and fertilize regularly.
Troubleshooting Tips
Here are some additional troubleshooting tips to help you overcome common challenges when planting butternut squash from seed:
- Monitor your plants regularly for signs of pests, diseases, and nutrient deficiencies.
- Keep a gardening journal to track your progress and identify potential issues.
- Seek advice from experienced gardeners or online resources if you’re unsure about how to address a specific challenge.
By being aware of common challenges and taking steps to prevent them, you can increase your chances of success when planting butternut squash from seed.
:max_bytes(150000):strip_icc()/butternut-squash-plant-5070478-13-294d07a3835e4b05bcfd121281cefd66.jpg)
Thinning and Transplanting: Giving Your Seedlings the Best Start
Once your butternut squash seedlings have germinated and grown to about 2-3 inches tall, it’s time to thin and transplant them. Thinning and transplanting are crucial steps in the process of planting butternut squash from seed, as they help to promote healthy growth, prevent overcrowding, and increase yields.
Why Thin Seedlings?
Thinning seedlings is necessary to prevent overcrowding, which can lead to reduced growth rates, increased disease susceptibility, and lower yields. By thinning seedlings, you can provide each plant with enough space to grow and receive adequate air circulation, light, and nutrients.
How to Thin Seedlings
To thin seedlings, carefully remove the weakest or smallest seedlings from the soil, leaving about 6-8 inches of space between each remaining seedling. Use a pair of scissors or a small tool to gently cut the seedlings at soil level, taking care not to damage the roots of the remaining seedlings.
Why Transplant Seedlings?
Transplanting seedlings is necessary to provide them with more space to grow and to improve soil quality. By transplanting seedlings into larger containers or directly into the garden, you can provide them with more room to spread out and receive adequate nutrients.
How to Transplant Seedlings
To transplant seedlings, carefully dig up the seedlings, taking care not to damage the roots. Gently place the seedlings into their new containers or into the garden, making sure to provide enough space between each plant. Water the seedlings thoroughly after transplanting and provide them with adequate nutrients and care.
Tips for Successful Thinning and Transplanting
Here are some additional tips for successful thinning and transplanting:
- Wait until the seedlings have at least 2-3 sets of leaves before thinning and transplanting.
- Use a well-draining potting mix and containers with good air circulation to prevent waterlogged soil and root rot.
- Transplant seedlings in the early morning or late afternoon to avoid exposing them to intense sunlight.
- Water the seedlings thoroughly after transplanting and provide them with adequate nutrients and care.
By following these tips and thinning and transplanting your butternut squash seedlings successfully, you can give them the best start in life and set them up for a healthy and productive growth cycle.
:max_bytes(150000):strip_icc()/seed-starts-183641288-5b1aeb0031283400361aa344.jpg)
Supporting Your Plants: The Importance of Pruning and Training
Once your butternut squash plants have been transplanted and are growing well, it’s essential to provide them with the right support to promote healthy growth, prevent disease, and increase yields. Pruning and training are two critical techniques that can help you achieve these goals.
Why Prune Butternut Squash Plants?
Pruning butternut squash plants helps to promote healthy growth by removing weak or damaged vines, encouraging bushy growth, and increasing air circulation. This can also help to prevent disease by removing infected or damaged tissue.
How to Prune Butternut Squash Plants
To prune butternut squash plants, start by removing any weak or damaged vines. Cut back the tips of the vines to encourage bushy growth and promote fruiting. Remove any infected or damaged tissue to prevent the spread of disease.
Why Train Butternut Squash Plants?
Training butternut squash plants helps to promote healthy growth by providing support for the vines and keeping them off the ground. This can also help to increase yields by allowing the plants to produce more fruit.
How to Train Butternut Squash Plants
To train butternut squash plants, start by providing a trellis or other support for the vines to climb on. You can also use a technique called “hilling” to create a mound of soil around the base of the plants, which helps to support the vines and keep them off the ground.
Tips for Successful Pruning and Training
Here are some additional tips for successful pruning and training:
- Prune butternut squash plants regularly to promote healthy growth and prevent disease.
- Train butternut squash plants to climb up a trellis or other support to increase yields and promote healthy growth.
- Use a technique called “hilling” to create a mound of soil around the base of the plants, which helps to support the vines and keep them off the ground.
- Monitor your plants regularly for signs of disease or pests, and take action promptly to prevent the spread of disease.
By following these tips and providing your butternut squash plants with the right support, you can promote healthy growth, prevent disease, and increase yields.
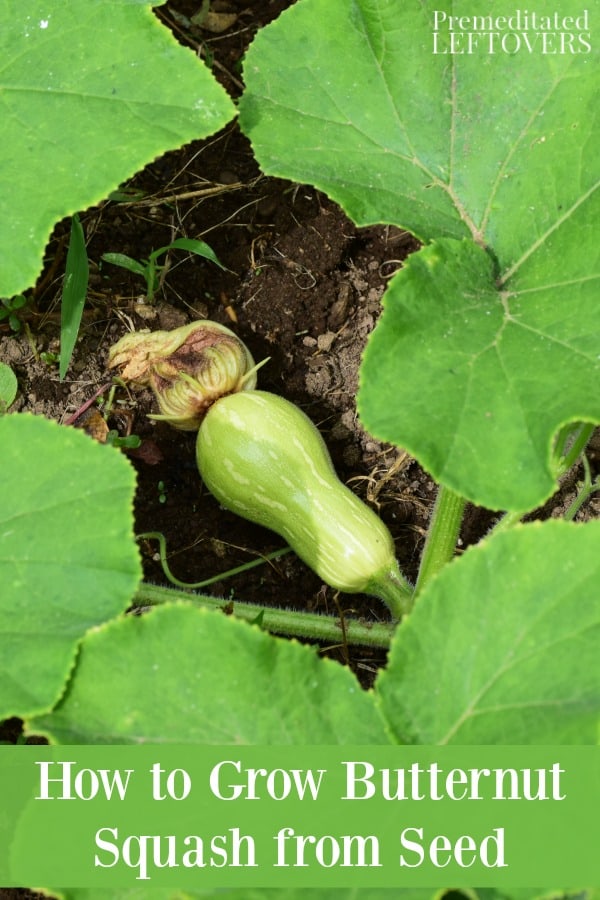
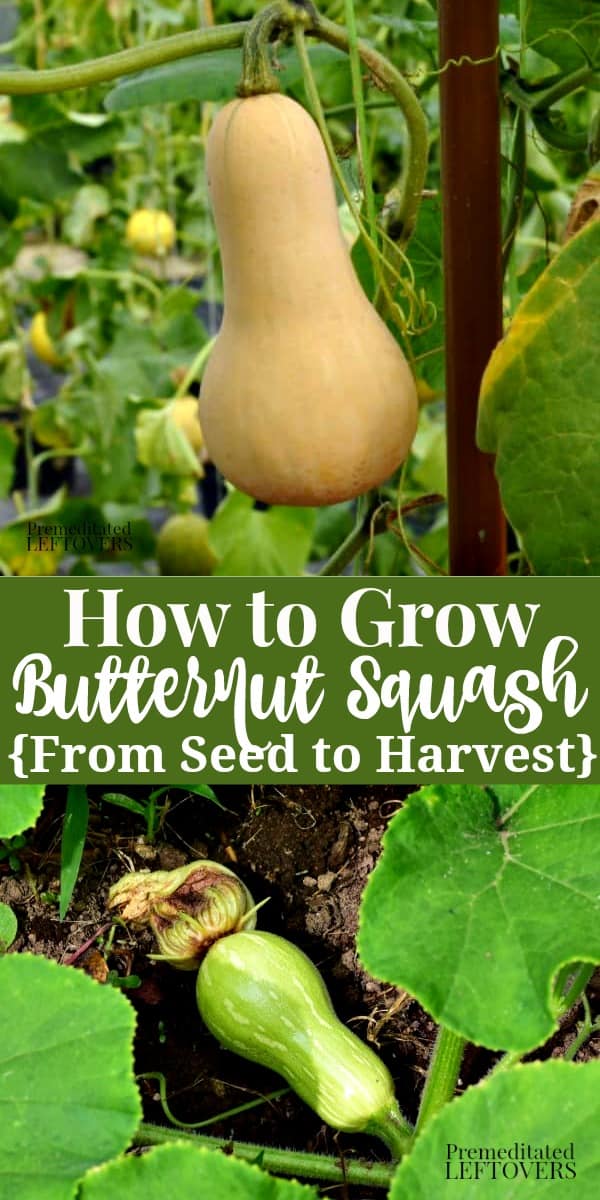
Harvesting Your Reward: Tips for Picking the Perfect Butternut Squash
After months of careful planning, planting, and tending, your butternut squash is finally ready to harvest. But how do you know when it’s ready? And how do you properly harvest and store the fruit to ensure it stays fresh and delicious? In this section, we’ll provide tips on how to determine when butternut squash is ready to harvest, including the optimal size, color, and texture, and explain how to properly harvest and store the fruit.
When to Harvest Butternut Squash
Butternut squash is typically ready to harvest about 100 to 120 days after sowing the seeds. The fruit should be fully mature, with a hard, smooth rind and a sweet, nutty flavor. To check for maturity, gently press the skin of the squash. If it’s hard and doesn’t yield to pressure, it’s ready to harvest.
How to Harvest Butternut Squash
To harvest butternut squash, use a sharp knife or pruning shears to cut the stem from the vine. Leave about 1 inch of stem attached to the fruit to prevent moisture from entering the squash and causing it to rot.
How to Store Butternut Squash
Butternut squash can be stored for several months in a cool, dry place. To store, place the squash in a single layer on a tray or basket, making sure they don’t touch each other. Cover the squash with a breathable cloth or paper bag to maintain humidity and keep them fresh.
Tips for Harvesting and Storing Butternut Squash
Here are some additional tips for harvesting and storing butternut squash:
- Harvest butternut squash in the morning, when the fruit is at its sweetest and most flavorful.
- Use a sharp knife or pruning shears to cut the stem from the vine, leaving about 1 inch of stem attached to the fruit.
- Store butternut squash in a cool, dry place, away from direct sunlight and heat sources.
- Check on the squash regularly to ensure they’re not developing any mold or rot.
By following these tips, you can enjoy your homegrown butternut squash for months to come. Happy harvesting!