When is the Best Time to Transplant Bulbs?
Timing is crucial when it comes to transplanting bulbs. While many gardeners opt to transplant bulbs in the fall, spring transplanting can be a viable option for certain types of bulbs. In fact, can I transplant bulbs in the spring? The answer is yes, but it’s essential to understand the pros and cons of spring transplanting versus fall transplanting.

Click Image to Find Garden Products
In the fall, the bulbs are dormant, making it an ideal time for transplanting. The cooler temperatures and increased moisture help the bulbs establish themselves in their new location. However, spring transplanting can be beneficial for bulbs that are sensitive to winter temperatures or need a head start on the growing season. For example, tulips and daffodils can be transplanted in the spring, as they tend to bloom earlier than other bulbs.
When deciding whether to transplant bulbs in the spring or fall, consider the specific needs of the bulbs and the climate in your region. If you live in an area with mild winters, spring transplanting might be a good option. On the other hand, if you experience harsh winters, fall transplanting might be a better choice. Ultimately, understanding the best time to transplant bulbs will help ensure a successful and thriving garden.
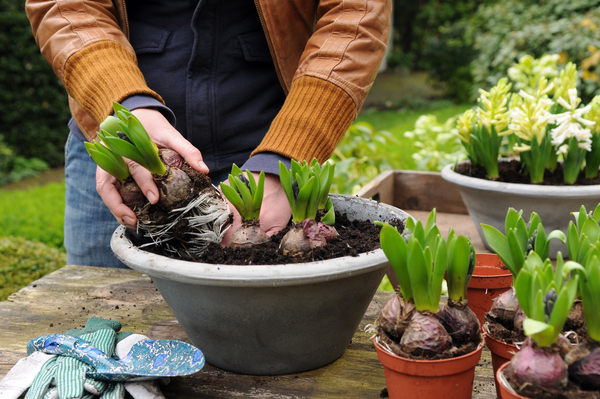
How to Prepare Your Bulbs for Spring Transplanting
Before transplanting bulbs in the spring, it’s essential to prepare them properly to ensure a successful transition. This step-by-step guide will walk you through the process of storing, cleaning, and dividing bulbs to get them ready for their new home.
Storing Bulbs: After the blooming season, allow the foliage to die back naturally, which can take several weeks to a few months. Once the foliage has died back, carefully dig up the bulbs, making sure not to damage them. Gently brush off any dirt or debris and store the bulbs in a cool, dry place with good air circulation. You can store them in paper bags, cardboard boxes, or even breathable cloth bags.
Cleaning Bulbs: Before transplanting, inspect the bulbs for any signs of disease or damage. Remove any dead or damaged tissue, and gently clean the bulbs with a soft-bristled brush to remove any dirt or debris. This will help prevent the spread of disease and encourage healthy growth.
Dividing Bulbs: If you have bulbs that have outgrown their containers or need to be divided, spring is an excellent time to do so. Carefully separate the bulbs, making sure each division has at least one “eye” or growing point. Replant the divided bulbs immediately, or store them as described above.
By following these simple steps, you’ll be able to prepare your bulbs for a successful spring transplant. Remember to handle the bulbs gently and with care, as they are delicate and require attention to thrive.

Choosing the Right Bulbs for Spring Transplanting
When it comes to spring bulb transplanting, not all bulbs are created equal. Some bulbs thrive in the spring, while others prefer the fall. In this section, we’ll explore the types of bulbs that are suitable for spring transplanting, including tulips, daffodils, and hyacinths.
Tulips are one of the most popular spring-blooming bulbs and can be transplanted in the spring. They require well-draining soil and full sun to partial shade. When transplanting tulips, make sure to plant them at a depth of 8-10 inches, and space them 3-6 inches apart.
Daffodils are another type of bulb that can be transplanted in the spring. They prefer well-draining soil and full sun to partial shade. When transplanting daffodils, plant them at a depth of 6-8 inches, and space them 3-6 inches apart. Daffodils are also deer-resistant, making them a great choice for gardens with wildlife.
Hyacinths are a popular choice for spring gardens and can be transplanted in the spring. They require well-draining soil and full sun to partial shade. When transplanting hyacinths, plant them at a depth of 6-8 inches, and space them 3-6 inches apart. Hyacinths are also known for their sweet fragrance, making them a great choice for gardens with seating areas.
When choosing bulbs for spring transplanting, make sure to select varieties that are specifically bred for spring blooming. These bulbs will have been stored in a cool, dry place over the winter and will be ready to bloom in the spring. Remember to handle the bulbs gently and with care, as they are delicate and require attention to thrive.
By choosing the right bulbs for spring transplanting, you’ll be able to enjoy a beautiful and vibrant garden in no time. And, by following the tips and guidelines outlined in this article, you’ll be able to ensure a successful transplant and enjoy your bulbs for years to come. Can I transplant bulbs in the spring? Absolutely, and with the right bulbs and care, you’ll be able to enjoy a stunning spring garden.
![]()
Transplanting Bulbs in the Spring: A Step-by-Step Guide
Once you’ve prepared your bulbs for spring transplanting, it’s time to get them in the ground. In this section, we’ll walk you through a step-by-step guide on how to transplant bulbs in the spring, including tips on soil preparation, planting depth, and spacing.
Step 1: Prepare the Soil – Before transplanting your bulbs, make sure the soil is ready. Choose a location with well-draining soil and full sun to partial shade, depending on the type of bulb. If your soil is heavy clay or sandy, mix in some organic matter like compost or peat moss to improve drainage and structure.
Step 2: Plant at the Right Depth – The planting depth will vary depending on the type of bulb. As a general rule, plant bulbs at a depth of 2-3 times their height. For example, if the bulb is 2 inches tall, plant it 4-6 inches deep. Make sure to plant the bulb at the correct orientation, with the pointed end facing upwards.
Step 3: Space Correctly – The spacing between bulbs will also vary depending on the type. As a general rule, plant bulbs 3-6 inches apart. This will give them enough room to grow and bloom without overcrowding.
Step 4: Water and Mulch – After transplanting your bulbs, water them well to settle the soil. Apply a layer of mulch to retain moisture and suppress weeds. Keep the soil consistently moist during the first growing season, but avoid overwatering.
By following these steps, you’ll be able to successfully transplant your bulbs in the spring. Remember to handle the bulbs gently and with care, as they are delicate and require attention to thrive. Can I transplant bulbs in the spring? Yes, and with these steps, you’ll be able to enjoy a beautiful and vibrant garden in no time.

Post-Transplant Care: Ensuring Success
After transplanting your bulbs in the spring, it’s essential to provide proper post-transplant care to ensure their success. This includes watering, fertilizing, and mulching. By following these tips, you’ll be able to give your bulbs the best chance to thrive and bloom beautifully.
Watering – Water your transplanted bulbs regularly, but avoid overwatering. Bulbs need consistent moisture, especially during the first growing season. Check the soil daily, and water only when the top inch of soil feels dry to the touch. Can I transplant bulbs in the spring? Yes, and with proper watering, you’ll be able to enjoy a stunning display of blooms.
Fertilizing – Feed your transplanted bulbs with a balanced fertilizer in the spring when the foliage emerges. This will provide them with the necessary nutrients to grow and bloom. Avoid overfertilizing, as this can damage the bulbs. A general-purpose fertilizer with a ratio of 10-10-10 (nitrogen-phosphorus-potassium) is suitable for most bulbs.
Mulching – Apply a layer of mulch around the base of your transplanted bulbs to retain moisture, suppress weeds, and regulate soil temperature. Organic mulches like straw, bark chips, or grass clippings work well. Keep the mulch layer thin, about 2-3 inches, to avoid rotting the bulbs.
Monitoring Bulb Health – Keep an eye on your transplanted bulbs’ health, and address any issues promptly. Check for signs of disease, pests, or nutrient deficiencies. Remove any dead or dying foliage to prevent the spread of disease and encourage healthy growth.
By following these post-transplant care tips, you’ll be able to ensure the success of your spring bulb transplanting. Remember, proper care and attention are crucial for bulbs to thrive and bloom beautifully. Can I transplant bulbs in the spring? Yes, and with these tips, you’ll be able to enjoy a vibrant and healthy garden.

Common Mistakes to Avoid When Transplanting Bulbs in the Spring
When transplanting bulbs in the spring, it’s essential to avoid common mistakes that can hinder their growth and blooming. By being aware of these mistakes, you can take steps to prevent them and ensure the success of your spring bulb transplanting.
Over-Watering – One of the most common mistakes when transplanting bulbs in the spring is over-watering. Bulbs need consistent moisture, but excessive water can cause them to rot. Check the soil daily, and water only when the top inch of soil feels dry to the touch. Can I transplant bulbs in the spring? Yes, but make sure to avoid over-watering.
Under-Watering – On the other hand, under-watering can also be detrimental to transplanted bulbs. Make sure to provide them with consistent moisture, especially during the first growing season. A general rule of thumb is to provide about 1 inch of water per week, either through rainfall or irrigation.
Planting at the Wrong Depth – Planting bulbs at the wrong depth can prevent them from growing and blooming properly. Make sure to plant bulbs at a depth of 2-3 times their height, and at the correct orientation, with the pointed end facing upwards.
Not Providing Enough Space – Bulbs need adequate space to grow and bloom. Make sure to plant them at a spacing of 3-6 inches apart, depending on the type of bulb. This will give them enough room to grow and receive adequate sunlight and air circulation.
Not Monitoring Bulb Health – Failing to monitor bulb health can lead to disease and pest issues. Keep an eye on your transplanted bulbs, and address any issues promptly. Remove any dead or dying foliage to prevent the spread of disease and encourage healthy growth.
By avoiding these common mistakes, you can ensure the success of your spring bulb transplanting. Remember, proper care and attention are crucial for bulbs to thrive and bloom beautifully. Can I transplant bulbs in the spring? Yes, and with these tips, you’ll be able to enjoy a vibrant and healthy garden.

Spring Bulb Transplanting FAQs
Frequently asked questions about spring bulb transplanting can help clarify any doubts or concerns you may have. Here are some answers to common questions about transplanting bulbs in the spring.
Can I Transplant Bulbs in the Spring? – Yes, you can transplant bulbs in the spring. In fact, spring is a great time to transplant bulbs, especially for types like tulips, daffodils, and hyacinths. Just make sure to wait until the threat of frost has passed and the soil has warmed up.
How Long Does it Take for Transplanted Bulbs to Bloom? – The time it takes for transplanted bulbs to bloom depends on the type of bulb and weather conditions. Generally, it can take anywhere from 3-6 months for bulbs to bloom after transplanting. Make sure to provide proper care, including watering, fertilizing, and mulching, to encourage healthy growth and blooming.
What are the Benefits of Transplanting Bulbs in the Spring? – Transplanting bulbs in the spring offers several benefits, including improved growth, increased blooming, and better pest and disease resistance. Spring transplanting also allows you to divide and replant bulbs that have become congested, promoting healthy growth and blooming.
How Deep Should I Plant Bulbs in the Spring? – The planting depth for bulbs in the spring depends on the type of bulb. Generally, plant bulbs at a depth of 2-3 times their height, and at the correct orientation, with the pointed end facing upwards.
Can I Transplant Bulbs in the Spring if They’re Already Blooming? – It’s not recommended to transplant bulbs in the spring if they’re already blooming. This can cause stress to the bulb and reduce blooming. Instead, wait until the blooming period has ended, and then transplant the bulbs.
By understanding the answers to these frequently asked questions, you’ll be better equipped to successfully transplant bulbs in the spring and enjoy a vibrant and healthy garden.

Conclusion: Successful Spring Bulb Transplanting
In conclusion, transplanting bulbs in the spring can be a rewarding experience, especially when done correctly. By understanding the importance of timing, preparing bulbs properly, choosing the right types, and providing proper care, you can ensure a successful transplant. Remember, can I transplant bulbs in the spring? Yes, and with the right techniques, you can enjoy a vibrant and healthy garden.
Spring bulb transplanting offers numerous benefits, including improved growth, increased blooming, and better pest and disease resistance. By following the step-by-step guide and avoiding common mistakes, you can give your bulbs the best chance to thrive. Don’t forget to monitor bulb health and address any issues promptly to ensure a successful transplant.
Whether you’re a seasoned gardener or a beginner, spring bulb transplanting can be a fun and rewarding experience. With the right knowledge and techniques, you can enjoy a beautiful and thriving garden. So, can I transplant bulbs in the spring? Yes, and with these tips, you’ll be well on your way to a successful transplant.