Why Choose Sugar Snap Peas for Container Gardening?
When it comes to growing sugar snap peas in pots, there are several advantages that make them an ideal choice for container gardening. One of the primary benefits is their compact growth habit, which allows them to thrive in small spaces. This makes them perfect for balconies, patios, or even indoor gardens. Additionally, sugar snap peas are high-yielding, producing a bountiful harvest of crunchy, sweet pods. They are also relatively low maintenance, requiring minimal care and attention once established. This ease of care makes them an excellent option for busy gardeners or those new to growing sugar snap peas in pots. With proper care and attention, sugar snap peas can produce a continuous harvest, providing a fresh supply of delicious pods throughout the growing season.

Click Image to Find Garden Products

Selecting the Right Container and Soil for Sugar Snap Peas
When it comes to growing sugar snap peas in pots, selecting the right container and soil is crucial for optimal growth and development. The ideal container for sugar snap peas should be at least 6-8 inches deep and have a diameter of 8-12 inches. This will provide enough room for the peas to grow and spread out. In terms of material, plastic or clay pots are good options, as they retain moisture and warmth well. However, make sure the container has good drainage holes to prevent waterlogged soil. A well-draining potting mix specifically designed for peas is also essential. Look for a mix that contains a blend of peat moss, vermiculite, and perlite, which will help retain moisture and provide good aeration for the roots. Avoid using regular garden soil, as it can compact and prevent proper drainage. By choosing the right container and soil, you’ll be well on your way to successfully growing sugar snap peas in pots.

How to Sow Sugar Snap Peas in Pots for Optimal Germination
When it comes to sowing sugar snap pea seeds in pots, proper technique is essential for successful germination. Start by filling your container with a well-draining potting mix, leaving about an inch at the top for watering. Sow the seeds about 1-2 inches deep and 2-3 inches apart. You can also sow in rows, with the seeds spaced about 2-3 inches apart. Water the soil gently but thoroughly after sowing. Make sure the soil is consistently moist during the germination period, which typically takes 7-10 days. To promote healthy growth, ensure the container receives adequate sunlight, ideally 6-8 hours of direct sunlight per day. By following these steps, you’ll be well on your way to successfully growing sugar snap peas in pots. Remember to keep the soil consistently moist during the germination period, as this will help to promote healthy growth and development.

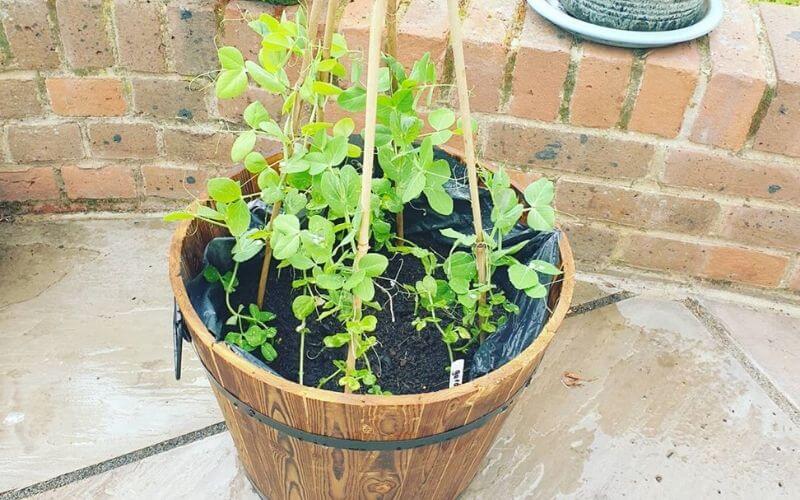
Supporting Sugar Snap Peas in Containers: Tips and Tricks
As sugar snap peas in pots begin to grow, they’ll need support to promote healthy development and maximize yields. Providing support will also help to keep the peas upright and encourage them to climb, making it easier to harvest. There are several options for supporting sugar snap peas in containers, including trellises, stakes, and cages. Trellises are a great option, as they provide a sturdy structure for the peas to climb. Simply place the trellis in the container and train the peas to climb up it. Stakes are another option, and can be placed around the perimeter of the container to provide support. Cages are also effective, and can be placed around the entire container to create a supportive structure. When growing sugar snap peas in pots, it’s essential to provide support early on, as the peas will begin to climb quickly. By providing support, you’ll be able to enjoy a bountiful harvest of crunchy, delicious sugar snap peas.
Watering and Fertilizing Sugar Snap Peas in Pots: A Balanced Approach
When it comes to growing sugar snap peas in pots, consistent moisture levels and balanced fertilization are crucial for optimal growth and development. Sugar snap peas in pots require about 1-2 inches of water per week, either from rainfall or irrigation. It’s essential to avoid overwatering, which can lead to root rot and other problems. Check the soil daily, and water only when the top inch of soil feels dry to the touch. In terms of fertilization, a balanced fertilizer with a ratio of 10-10-10 (nitrogen-phosphorus-potassium) is ideal. Apply the fertilizer according to the manufacturer’s instructions, and avoid overfertilizing, which can damage the plants. Additionally, consider using compost or well-rotted manure to provide additional nutrients and improve soil structure. By maintaining a balanced approach to watering and fertilizing, you’ll be able to enjoy a healthy and productive crop of sugar snap peas in pots.

Pest and Disease Management for Sugar Snap Peas in Containers
When growing sugar snap peas in pots, it’s essential to be aware of common pests and diseases that can affect the crop. Aphids, slugs, and powdery mildew are some of the most common issues that can arise. To manage these problems, it’s crucial to adopt an integrated pest management approach. Start by maintaining good garden hygiene, removing any debris or weeds that can harbor pests. Inspect the plants regularly, and remove any infested or infected plants to prevent the spread of disease. For aphids, use neem oil or insecticidal soap to control infestations. Slugs can be deterred by placing copper tape around the container or using crushed eggshells to create a barrier. Powdery mildew can be treated with fungicides or removed by pruning infected areas. Additionally, consider using companion planting to deter pests, such as planting marigolds to repel nematodes. By being proactive and adopting these strategies, you can minimize the risk of pest and disease issues when growing sugar snap peas in pots.

Harvesting Sugar Snap Peas at the Right Time for Maximum Flavor
When growing sugar snap peas in pots, timely harvesting is crucial to enjoy the maximum flavor and texture of the pods. Sugar snap peas are ready to harvest when the pods are plump, bright green, and about 3-4 inches long. Check the plants daily, as the peas can quickly go from perfect to overripe. To harvest, gently grasp the pod and twist it counterclockwise to avoid damaging the plant. For a longer harvest season, consider planting a succession of sugar snap peas every 2-3 weeks. This will ensure a continuous supply of fresh peas throughout the growing season. Additionally, consider freezing or canning excess peas to enjoy them year-round. By harvesting sugar snap peas at the right time, you’ll be able to enjoy the sweet, crunchy flavor of homegrown peas in a variety of dishes.
Troubleshooting Common Issues When Growing Sugar Snap Peas in Pots
When growing sugar snap peas in pots, several issues can arise that can impact the health and productivity of the plants. Poor germination, weak growth, and pest infestations are common problems that can be addressed with the right solutions and preventative measures. To overcome poor germination, ensure the soil is moist but not waterlogged, and the seeds are sown at the correct depth. Weak growth can be attributed to inadequate light, water, or nutrients. Check the soil pH and adjust it if necessary, and consider providing supplemental lighting or fertilization. Pest infestations can be managed by introducing natural predators, such as ladybugs or lacewings, or using organic pest control methods like neem oil or insecticidal soap. Regularly inspect the plants for signs of pests or diseases, and take action promptly to prevent the problem from spreading. By being proactive and addressing these common issues, you can ensure a successful harvest of delicious and crunchy sugar snap peas when growing sugar snap peas in pots.
