Understanding the Importance of Fall Pruning for Hydrangeas
As the fall season approaches, many gardeners wonder how far to cut back hydrangeas to ensure a healthy bloom in the spring. Pruning hydrangeas in the fall is a crucial step in maintaining the plant’s overall health and promoting vibrant blooms. By pruning hydrangeas in the fall, gardeners can encourage healthy growth, promote blooming, and prepare the plant for the harsh winter months.

Click Image to Find Garden Products
Proper pruning can lead to a more robust and vibrant bloom in the spring, as it allows the plant to conserve energy and resources during the winter. When hydrangeas are not pruned regularly, they can become leggy and weak, leading to a decrease in blooming and an increase in disease susceptibility. By pruning hydrangeas in the fall, gardeners can help maintain the plant’s shape, promote healthy growth, and encourage blooming.
In addition to promoting healthy growth and blooming, fall pruning also helps prepare the plant for winter. By cutting back the stems and removing any dead or damaged leaves, gardeners can help protect the plant from extreme weather conditions and reduce the risk of disease and pests. This is especially important for hydrangeas, as they can be sensitive to frost damage and other winter-related stressors.
When it comes to pruning hydrangeas in the fall, it’s essential to understand the importance of timing. Pruning too early or too late can have negative consequences for the plant, including reduced blooming and increased disease susceptibility. By pruning hydrangeas at the right time, gardeners can help ensure a healthy and vibrant bloom in the spring.
In the next section, we’ll explore how to determine the right time to prune your hydrangeas, taking into account factors such as the plant’s growth cycle, weather conditions, and the risk of frost damage.
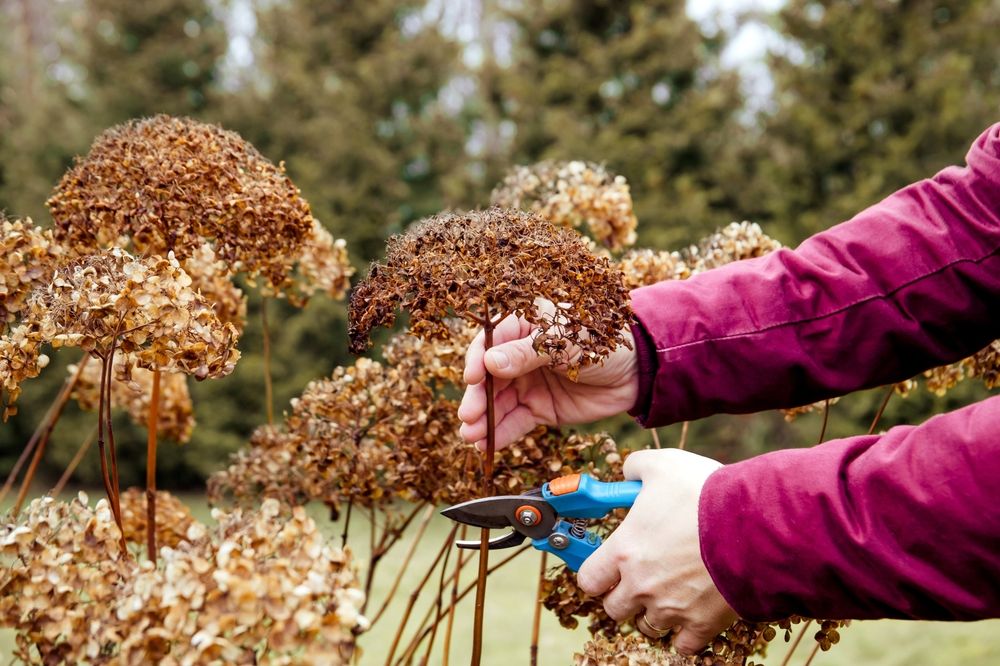
How to Determine the Right Time to Prune Your Hydrangeas
Determining the right time to prune your hydrangeas is crucial to ensure a healthy bloom in the spring. The ideal time to prune hydrangeas in the fall depends on various factors, including the plant’s growth cycle, weather conditions, and the risk of frost damage.
Hydrangeas typically stop producing new growth in the fall, and the leaves begin to change color and drop. This is a sign that the plant is preparing for dormancy, and it’s the perfect time to prune. Pruning too early, before the plant has finished growing, can reduce the number of blooms in the spring. On the other hand, pruning too late, after the first frost, can cause damage to the plant and reduce its chances of survival.
Weather conditions also play a significant role in determining the right time to prune hydrangeas. Pruning during periods of extreme weather, such as heavy rain or intense heat, can cause stress to the plant and lead to disease or pest issues. It’s essential to prune hydrangeas during a period of mild weather, when the plant is less stressed.
The risk of frost damage is another critical factor to consider when determining the right time to prune hydrangeas. Pruning too late in the fall can leave the plant vulnerable to frost damage, which can cause significant damage to the stems and leaves. It’s essential to prune hydrangeas at least 4-6 weeks before the first frost to allow the plant to heal and prepare for winter.
In general, the best time to prune hydrangeas in the fall is in late September or early October, depending on your location and climate. This allows the plant to heal and prepare for winter, while also promoting healthy growth and blooming in the spring.
By considering these factors and pruning your hydrangeas at the right time, you can help ensure a healthy and vibrant bloom in the spring. In the next section, we’ll explore the steps to prepare your hydrangeas for pruning, including cleaning and disinfecting your pruning tools, removing any dead or damaged leaves or stems, and inspecting the plant for any signs of disease or pests.
Preparing Your Hydrangeas for Pruning: What to Expect
Before you start pruning your hydrangeas, it’s essential to prepare the plant and your tools to ensure a safe and effective pruning process. This step is crucial to prevent the spread of disease and pests, and to ensure that your hydrangeas receive the best care possible.
The first step in preparing your hydrangeas for pruning is to clean and disinfect your pruning tools. This can be done by soaking the tools in a solution of 1 part bleach to 9 parts water for 10-15 minutes. This will help to kill any bacteria or fungi that may be present on the tools, and prevent the spread of disease to your hydrangeas.
Next, remove any dead or damaged leaves or stems from the plant. This will help to prevent the spread of disease and pests, and will also make it easier to see the shape of the plant and identify any areas that need pruning. Use your pruning tools to carefully cut away any dead or damaged growth, making sure to disinfect the tools between cuts.
Once you have removed any dead or damaged growth, inspect the plant for any signs of disease or pests. Check for any unusual growth patterns, discoloration, or damage to the leaves or stems. If you notice any signs of disease or pests, treat the plant accordingly before proceeding with pruning.
Finally, take a step back and evaluate the overall shape of the plant. Consider the desired shape and size of the plant, and identify any areas that need pruning to achieve this shape. Make a mental note of any areas that need attention, and proceed with pruning.
By taking the time to prepare your hydrangeas for pruning, you can ensure a safe and effective pruning process that will promote healthy growth and blooming. In the next section, we’ll explore the art of pruning hydrangeas, including how to identify and remove dead or damaged stems, how to cut back healthy stems to the right height, and how to shape the plant to maintain its desired form.

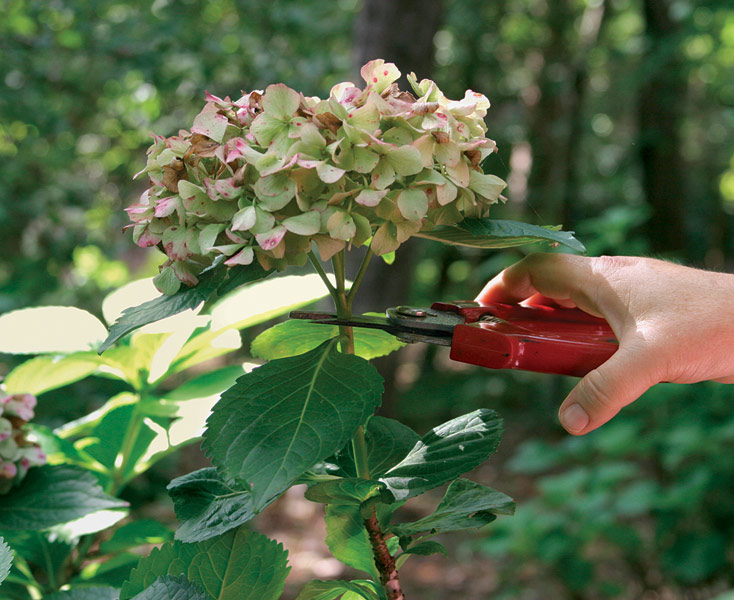
The Art of Pruning Hydrangeas: A Step-by-Step Process
Pruning hydrangeas is an art that requires patience, attention to detail, and a understanding of the plant’s growth habits. By following these steps, you can prune your hydrangeas with confidence and achieve a beautiful, healthy bloom in the spring.
Step 1: Identify Dead or Damaged Stems
Begin by inspecting the plant for any dead or damaged stems. Look for stems that are dry, brittle, or broken, and remove them at the base. This will help to prevent the spread of disease and encourage healthy growth.
Step 2: Cut Back Healthy Stems
Next, cut back healthy stems to the right height. The recommended height will depend on the type of hydrangea you are growing, but a general rule of thumb is to cut back stems to about 12-18 inches from the ground. This will help to promote new growth and encourage blooming.
Step 3: Shape the Plant
Once you have cut back the stems, use your pruning tools to shape the plant to its desired form. Remove any stems that are growing outside of the plant’s natural shape, and trim back any stems that are too long or leggy.
Step 4: Check for Crossing Stems
Finally, check the plant for any crossing stems. Crossing stems can rub against each other and cause damage to the plant, so it’s essential to remove them. Cut back any stems that are crossing or rubbing against each other, and shape the plant to its desired form.
By following these steps, you can prune your hydrangeas with confidence and achieve a beautiful, healthy bloom in the spring. Remember to always disinfect your pruning tools between cuts, and to make clean cuts just above a growth node. This will help to promote healthy growth and prevent the spread of disease.
In the next section, we’ll explore how far to cut back hydrangeas in the fall, including the recommended height and the importance of leaving enough stem and leaf growth to sustain the plant through the winter.
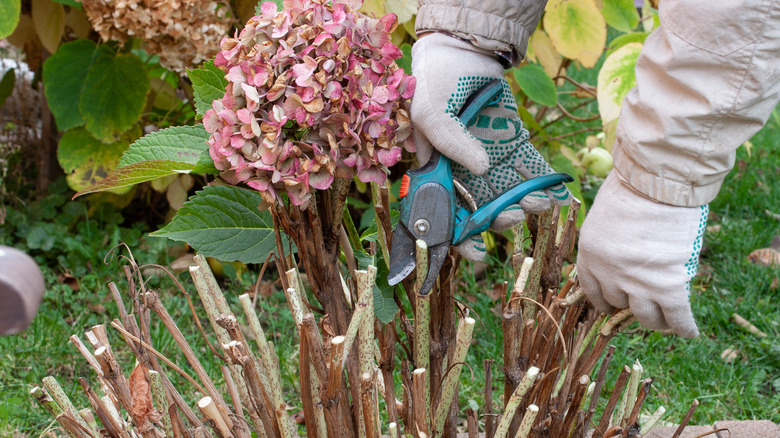
How Far to Cut Back Hydrangeas: A General Rule of Thumb
When it comes to pruning hydrangeas in the fall, one of the most common questions is how far to cut back the stems. The answer to this question depends on the type of hydrangea you are growing, as well as the climate and weather conditions in your area.
As a general rule of thumb, it’s recommended to cut back hydrangea stems to about 12-18 inches from the ground. This will help to promote new growth and encourage blooming in the spring. However, if you live in an area with harsh winters, you may want to cut back the stems a bit shorter to protect the plant from damage.
It’s also important to leave enough stem and leaf growth to sustain the plant through the winter. This will help to ensure that the plant has enough energy to produce new growth and blooms in the spring. A good rule of thumb is to leave at least 2-3 inches of stem and leaf growth on the plant.
When cutting back hydrangea stems, make sure to cut just above a growth node. This will help to promote new growth and prevent the plant from becoming leggy. Also, be sure to disinfect your pruning tools between cuts to prevent the spread of disease.
By following these guidelines, you can ensure that your hydrangeas are properly pruned and will produce beautiful blooms in the spring. In the next section, we’ll discuss the specific pruning needs of different types of hydrangeas, including bigleaf, panicle, and smooth hydrangeas.
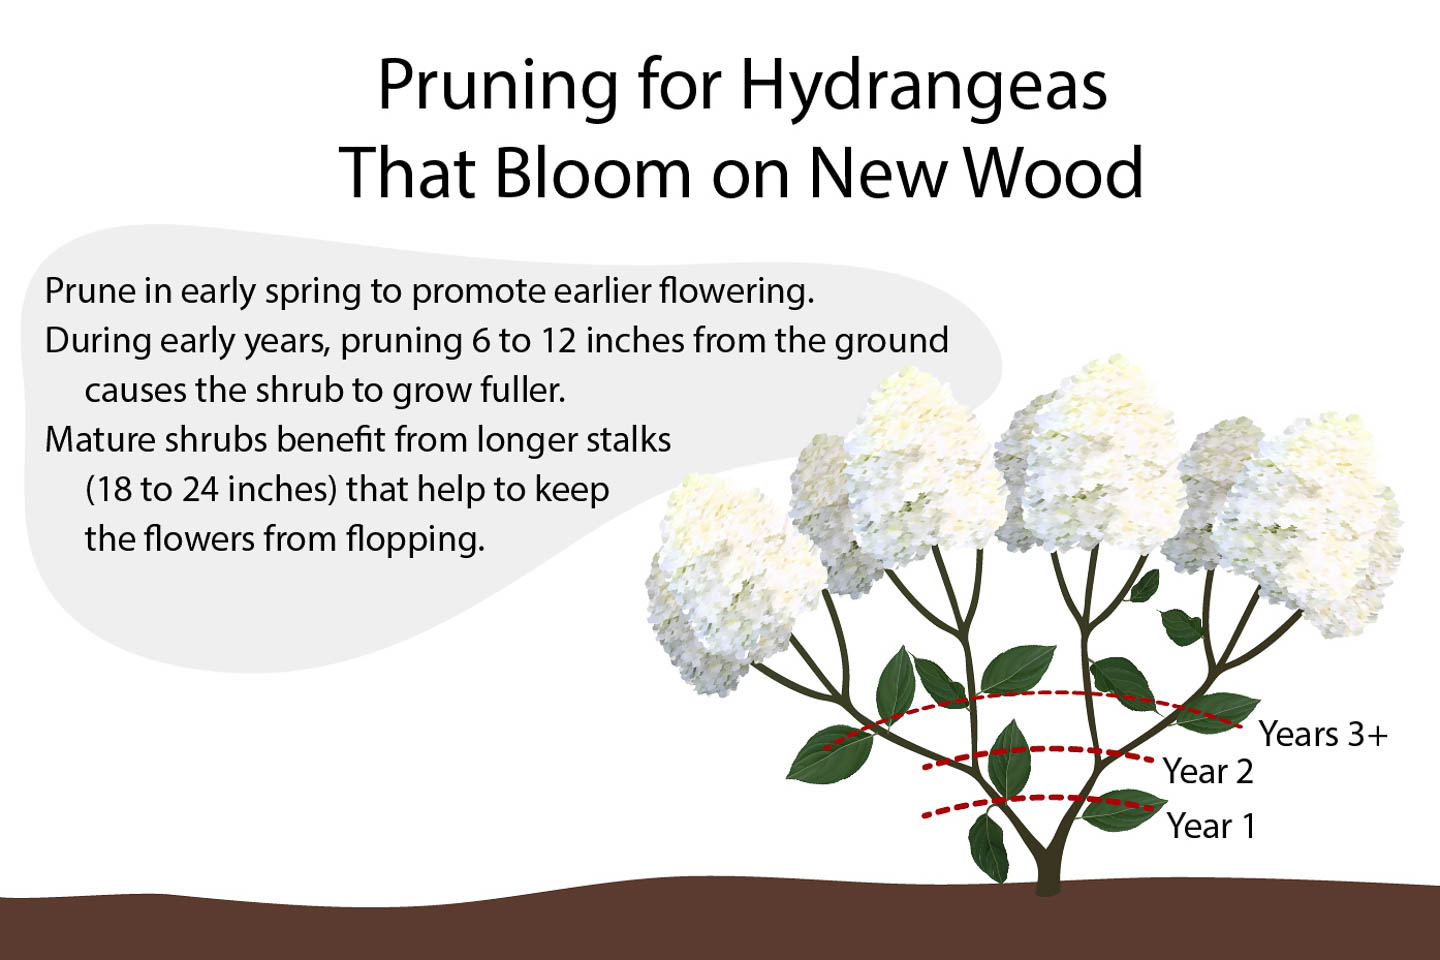
Pruning Different Types of Hydrangeas: Special Considerations
While the general pruning guidelines for hydrangeas apply to most varieties, there are some special considerations to keep in mind when pruning different types of hydrangeas. In this section, we’ll discuss the specific pruning needs of bigleaf, panicle, and smooth hydrangeas.
Bigleaf Hydrangeas (Hydrangea macrophylla)
Bigleaf hydrangeas are one of the most common types of hydrangeas and require regular pruning to maintain their shape and promote blooming. When pruning bigleaf hydrangeas, it’s essential to remove any dead or damaged stems and cut back the plant to about 12-18 inches from the ground. This will help to promote new growth and encourage blooming in the spring.
Panicle Hydrangeas (Hydrangea paniculata)
Panicle hydrangeas are known for their long, cone-shaped flowers and require less pruning than bigleaf hydrangeas. When pruning panicle hydrangeas, it’s essential to remove any dead or damaged stems and cut back the plant to about 24-36 inches from the ground. This will help to promote new growth and encourage blooming in the spring.
Smooth Hydrangeas (Hydrangea arborescens)
Smooth hydrangeas are known for their round, ball-shaped flowers and require regular pruning to maintain their shape and promote blooming. When pruning smooth hydrangeas, it’s essential to remove any dead or damaged stems and cut back the plant to about 12-18 inches from the ground. This will help to promote new growth and encourage blooming in the spring.
By understanding the specific pruning needs of different types of hydrangeas, you can ensure that your plants receive the best care possible and produce beautiful blooms in the spring. In the next section, we’ll discuss common mistakes to avoid when pruning hydrangeas.
Common Mistakes to Avoid When Pruning Hydrangeas
Pruning hydrangeas can be a delicate process, and making mistakes can lead to reduced blooming, damaged plants, and even plant death. In this section, we’ll highlight common mistakes to avoid when pruning hydrangeas, including pruning too much or too little, pruning at the wrong time, and failing to disinfect pruning tools.
Pruning Too Much or Too Little
One of the most common mistakes when pruning hydrangeas is pruning too much or too little. Pruning too much can cause stress to the plant, leading to reduced blooming and potentially even plant death. On the other hand, pruning too little can result in a leggy, unkempt plant that fails to produce blooms. To avoid this mistake, make sure to prune your hydrangeas according to the recommended guidelines for your specific variety.
Pruning at the Wrong Time
Pruning hydrangeas at the wrong time can also be detrimental to the plant. Pruning in the spring or summer can cause the plant to produce new growth, which can be damaged by frost or other extreme weather conditions. Pruning in the fall, on the other hand, allows the plant to prepare for winter and promotes healthy growth and blooming in the spring.
Failing to Disinfect Pruning Tools
Failing to disinfect pruning tools is another common mistake when pruning hydrangeas. This can lead to the spread of disease and pests, which can damage the plant and reduce blooming. To avoid this mistake, make sure to disinfect your pruning tools with a solution of 1 part bleach to 9 parts water between cuts.
By avoiding these common mistakes, you can ensure that your hydrangeas receive the best care possible and produce beautiful blooms in the spring. In the next section, we’ll discuss how to care for your hydrangeas after pruning, including how to protect the plant from extreme weather conditions, how to maintain soil moisture, and how to fertilize the plant in the spring to promote healthy growth and blooming.

After Pruning: How to Care for Your Hydrangeas Through the Winter
After pruning your hydrangeas, it’s essential to provide them with the right care to ensure they survive the winter and produce healthy growth and blooms in the spring. In this section, we’ll discuss how to protect your hydrangeas from extreme weather conditions, how to maintain soil moisture, and how to fertilize the plant in the spring to promote healthy growth and blooming.
Protecting Your Hydrangeas from Extreme Weather Conditions
Hydrangeas are sensitive to extreme weather conditions, such as frost, wind, and drought. To protect your hydrangeas from these conditions, make sure to provide them with a layer of mulch or straw to insulate the soil and protect the roots from freezing temperatures. You can also use a frost blanket or a cold frame to protect the plant from frost damage.
Maintaining Soil Moisture
Hydrangeas prefer well-draining soil that is consistently moist but not waterlogged. To maintain soil moisture, make sure to water your hydrangeas regularly during the winter months, but avoid overwatering, which can lead to root rot and other problems.
Fertilizing Your Hydrangeas in the Spring
In the spring, fertilize your hydrangeas with a balanced fertilizer that is high in phosphorus to promote healthy growth and blooming. You can also add a layer of compost or well-rotted manure to the soil to provide nutrients and improve soil structure.
By following these tips, you can ensure that your hydrangeas receive the right care after pruning and produce healthy growth and blooms in the spring. Remember to prune your hydrangeas regularly to maintain their shape and promote blooming, and to provide them with the right care to ensure they thrive throughout the year.