Choosing the Right Fern Species for Your Outdoor Space
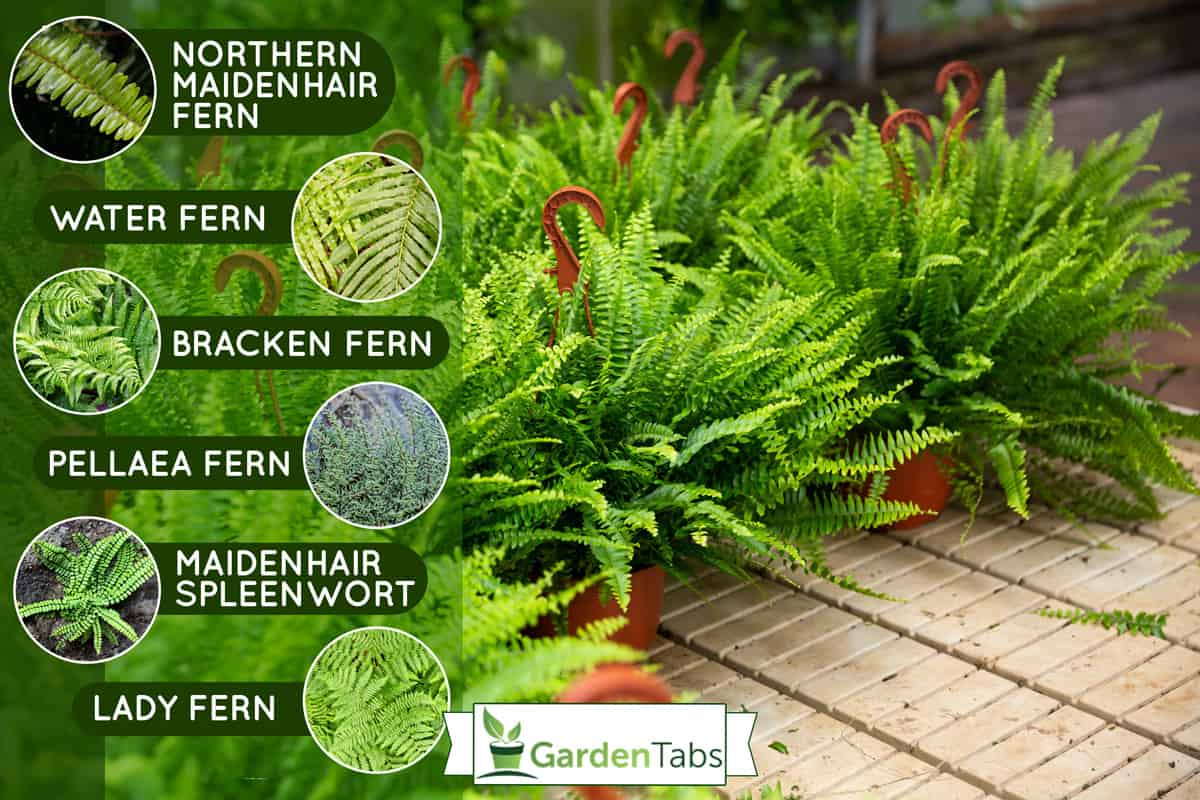
When it comes to growing ferns outside, selecting the right species is crucial for their survival and success. With over 10,000 known species of ferns, choosing the right one can be overwhelming. However, by understanding the characteristics of different fern species, you can make an informed decision and create a thriving outdoor fern garden. Autumn ferns, maidenhair ferns, and ostrich ferns are popular species that can be grown outdoors, each with its unique features and requirements.

Click Image to Find Garden Products
Autumn ferns (Dryopteris erythrosora) are a popular choice for outdoor gardens due to their vibrant fall colors and ability to thrive in shaded areas. They prefer well-drained soil and consistent moisture, making them ideal for woodland gardens or shaded borders. Maidenhair ferns (Adiantum spp.), on the other hand, are known for their delicate, lacy fronds and require more precise growing conditions. They prefer bright, indirect light and high humidity, making them a great choice for shaded areas with consistent moisture.
Ostrich ferns (Matteuccia struthiopteris) are another popular species that can be grown outdoors. They are known for their tall, feathery fronds and can grow up to 6 feet tall. They prefer shaded areas with rich, moist soil and can tolerate a range of light conditions. When choosing a fern species, consider the specific climate and outdoor conditions of your garden. By selecting a species that is well-suited to your environment, you can ensure the success and longevity of your outdoor fern garden.
For example, if you live in a hot and dry climate, you may want to consider a species like the autumn fern, which is more drought-tolerant. On the other hand, if you live in a cool and humid climate, a species like the maidenhair fern may thrive. By understanding the specific needs and requirements of different fern species, you can create a thriving outdoor fern garden that brings beauty and elegance to your outdoor space.
By following these tips and choosing the right fern species for your outdoor space, you can learn how to grow ferns outside and create a stunning and thriving fern garden. With the right combination of light, water, and nutrients, your ferns will flourish and provide a beautiful display of foliage and color.
:max_bytes(150000):strip_icc()/how-to-grow-organic-fiddlehead-ferns-2539638-04-adec75242d1749ccbe378429d25b717c.jpg)
Preparing the Perfect Environment for Outdoor Ferns
Creating the right environment is crucial for ferns to thrive outdoors. Ferns typically prefer shaded areas with consistent moisture and high humidity. To determine the ideal location for your ferns, consider the amount of sunlight your outdoor space receives. If your area receives direct sunlight, consider creating a shaded area using trees, shrubs, or a gazebo.
The ideal temperature for ferns varies depending on the species, but most prefer daytime temperatures between 65-75°F (18-24°C) and nighttime temperatures around 55-65°F (13-18°C). Avoid placing ferns in areas with extreme temperature fluctuations, such as near heating vents or drafty windows.
Humidity is also essential for ferns, as they thrive in environments with high moisture levels. To maintain the right humidity, you can place the ferns on a tray filled with water and pebbles or use a humidifier nearby. This will help maintain a humid microclimate around the ferns.
When it comes to light conditions, ferns generally prefer bright, indirect light. Placing ferns near a north- or east-facing wall can provide the right amount of light. Avoid placing ferns in areas with direct sunlight, as this can cause the leaves to become scorched.
By providing the right environment, you can learn how to grow ferns outside and create a thriving fern garden. Remember to consider the specific needs of your fern species and adjust the environment accordingly. With the right combination of light, temperature, and humidity, your ferns will flourish and provide a beautiful display of foliage and color.
In addition to creating the right environment, it’s essential to choose a location with good air circulation. This will help prevent fungal diseases and promote healthy growth. By following these tips, you can create a perfect environment for your outdoor ferns and enjoy their beauty for years to come.
How to Plant Ferns Outdoors for Optimal Growth
Planting ferns outdoors requires careful attention to detail to ensure optimal growth. Before planting, prepare the soil by loosening it to a depth of 12-18 inches. Remove any debris, rocks, or weeds that may compete with the ferns for water and nutrients.
Next, dig a hole that is twice as wide and just as deep as the fern’s root ball. Gently remove the fern from its container and place it in the hole, making sure the crown (where the leaves meet the roots) is level with the soil surface. Fill the hole with soil, gently firming it around the roots to prevent air pockets.
Planting at the right depth is crucial for ferns. If the fern is planted too deeply, the crown may rot, while planting too shallowly can cause the roots to dry out. Make sure to plant the fern at the same depth it was in the container, and water thoroughly after planting.
Spacing ferns correctly is also important for optimal growth. Plant ferns 12-18 inches apart, depending on the species and growth habits. Overcrowding can lead to reduced growth and increased susceptibility to disease.
When handling ferns, it’s essential to be gentle to avoid damaging their delicate roots. Avoid touching the roots or crown, and handle the ferns by the leaves or fronds instead. This will help prevent damage and ensure the ferns establish themselves quickly in their new environment.
By following these steps, you can learn how to grow ferns outside and create a thriving fern garden. Remember to choose a location with the right environment and provide the necessary care, including watering, fertilizing, and pruning. With proper care, your ferns will flourish and provide a beautiful display of foliage and color.
After planting, water the ferns thoroughly and keep the soil consistently moist during the first few weeks. This will help the ferns establish themselves and promote healthy growth. As the ferns grow, you can reduce watering to once or twice a week, depending on weather conditions.

Watering and Mulching Ferns for Healthy Growth
Proper watering and mulching techniques are essential for healthy growth and development of outdoor ferns. Ferns prefer consistently moist soil, but overwatering can lead to root rot and other problems. To avoid overwatering, check the soil moisture by inserting your finger into the soil up to the first knuckle. If the soil feels dry, it’s time to water.
Water ferns thoroughly, making sure the soil is moist but not waterlogged. Avoid getting water on the leaves or crown of the fern, as this can cause fungal diseases. Instead, water at the base of the plant, allowing the soil to absorb the moisture.
Mulching is also important for ferns, as it helps retain moisture, suppress weeds, and regulate soil temperature. Use a 2-3 inch layer of organic mulch, such as wood chips or bark, around the base of the ferns. Keep the mulch a few inches away from the crown of the fern to prevent rot and other problems.
When selecting a mulch, choose one that is acidic and has a low pH, as ferns prefer slightly acidic soil. Avoid using mulches that contain weed seeds or other contaminants that can harm the ferns.
By following these watering and mulching tips, you can learn how to grow ferns outside and create a thriving fern garden. Remember to monitor the soil moisture and adjust your watering schedule accordingly. With proper care, your ferns will flourish and provide a beautiful display of foliage and color.
In addition to watering and mulching, consider using a drip irrigation system or soaker hose to deliver water directly to the roots of the ferns. This can help reduce evaporation and runoff, making it easier to maintain consistent soil moisture.
Fertilizing Ferns for Maximum Foliage and Color
Fertilizing ferns is an essential step in promoting healthy growth and maximizing foliage and color. Ferns require a balanced diet of nutrients to thrive, and fertilizing provides them with the necessary nutrients to grow and flourish.
When selecting a fertilizer for your ferns, choose a balanced, water-soluble fertilizer that contains equal amounts of nitrogen, phosphorus, and potassium (NPK). A 20-20-20 NPK fertilizer is a good option for ferns. Avoid using high-nitrogen fertilizers, as they can cause the ferns to produce too much foliage and not enough roots.
Apply the fertilizer at the right time, typically during the growing season (spring and summer). Dilute the fertilizer to half the recommended strength to avoid burning the ferns’ roots. Water the ferns thoroughly before fertilizing, and then apply the fertilizer according to the manufacturer’s instructions.
It’s also important to note that overfertilizing can be detrimental to ferns. Avoid fertilizing too frequently, as this can cause the ferns to become dependent on the fertilizer and lead to weak and spindly growth. Instead, fertilize your ferns once a month during the growing season, and skip fertilizing during the dormant season (fall and winter).
By fertilizing your ferns correctly, you can promote healthy growth and maximize foliage and color. Remember to choose the right type of fertilizer, apply it at the right time, and avoid overfertilizing. With proper care, your ferns will thrive and provide a beautiful display of foliage and color.
In addition to fertilizing, consider adding a layer of compost or well-rotted manure to the soil around your ferns. This will provide them with a slow release of nutrients and help to improve the soil’s structure and fertility.
Pest and Disease Control for Healthy Outdoor Ferns
Outdoor ferns can be susceptible to pests and diseases, which can damage their leaves and roots. To prevent infestations and infections, it’s essential to monitor your ferns regularly and take action at the first sign of trouble.
Common pests that can affect outdoor ferns include slugs, snails, and caterpillars. These pests can chew holes in the leaves and cause damage to the plant. To prevent infestations, use physical barriers such as copper tape or crushed eggshells around the base of the ferns. You can also use organic pesticides such as neem oil or insecticidal soap to control infestations.
Fungal infections are another common problem that can affect outdoor ferns. These infections can cause yellowing or browning of the leaves and can be spread by water or insects. To prevent fungal infections, make sure to water your ferns carefully and avoid getting water on the leaves. You can also use fungicides to control infections.
Other diseases that can affect outdoor ferns include root rot and leaf spot. These diseases can be caused by overwatering or poor air circulation. To prevent these diseases, make sure to water your ferns carefully and provide good air circulation around the plants.
By monitoring your ferns regularly and taking action at the first sign of trouble, you can prevent pests and diseases from damaging your plants. Remember to use organic methods of control whenever possible and to take action quickly to prevent the spread of disease.
In addition to monitoring your ferns regularly, it’s also essential to maintain good garden hygiene. Remove any dead or dying leaves or stems from the plants, and dispose of them carefully. This will help prevent the spread of disease and keep your ferns healthy.

Pruning and Dividing Ferns for Continued Growth
Pruning and dividing ferns are essential maintenance tasks that help maintain their health and promote new growth. Pruning involves removing dead or damaged fronds, while dividing involves separating the fern into smaller sections to create new plants.
To prune ferns, use a pair of clean, sharp scissors or pruning shears to remove any dead or damaged fronds. Cut the fronds at the base of the plant, making sure not to damage the crown or roots. This will help prevent the spread of disease and encourage new growth.
Dividing ferns is a bit more involved, but it’s a great way to create new plants and maintain the health of your existing ferns. To divide ferns, carefully dig up the entire plant, making sure to get as much of the root system as possible. Gently separate the roots, taking care not to damage them, and replant the sections in well-draining soil.
When dividing ferns, make sure to provide enough space for the new plants to grow. A general rule of thumb is to plant the sections 12-18 inches apart, depending on the species and growth habits of the fern.
By pruning and dividing ferns regularly, you can help maintain their health and promote new growth. This will keep your ferns looking their best and ensure they continue to thrive in their outdoor environment.
In addition to pruning and dividing, it’s also important to monitor your ferns for signs of disease or pests. Regularly inspect your ferns for any signs of trouble, and take action quickly to prevent the spread of disease or infestation.
Tips for Winterizing and Protecting Outdoor Ferns
As the winter months approach, it’s essential to take steps to protect your outdoor ferns from harsh weather conditions. Frost and freezing temperatures can damage or kill ferns, so it’s crucial to provide them with adequate protection.
One way to protect your ferns is to mulch them heavily. Apply a thick layer of organic mulch, such as straw or bark chips, around the base of the ferns. This will help insulate the soil and protect the roots from freezing temperatures.
Another way to protect your ferns is to cover them with a breathable cloth or tarp. This will help shield the ferns from wind, frost, and freezing temperatures. Make sure to secure the cloth or tarp with weights or stakes to prevent it from blowing away.
If you have potted ferns, you can bring them indoors during the winter months to protect them from harsh weather conditions. Place the ferns in a bright, cool location, such as a sunroom or a north-facing window. Water the ferns sparingly, as they require less moisture during the winter months.
By taking these steps, you can help protect your outdoor ferns from harsh winter conditions and ensure they continue to thrive in the spring. Remember to monitor your ferns regularly and take action quickly if you notice any signs of damage or stress.
In addition to mulching and covering your ferns, you can also take steps to prepare the soil for the winter months. Add a layer of compost or well-rotted manure to the soil to help retain moisture and suppress weeds. This will help your ferns get a head start on the growing season when the weather warms up.