Unleashing Your Creativity: Why Make a Ladybird?
Making a ladybird can be a fun and creative activity for people of all ages. Whether you’re a parent looking for a project to do with your child, a teacher seeking a educational activity, or simply someone who enjoys crafting, creating a ladybird can be a rewarding and enjoyable experience. With a few simple materials and some basic crafting skills, you can bring a charming ladybird to life and enjoy the process of creating something with your own hands.

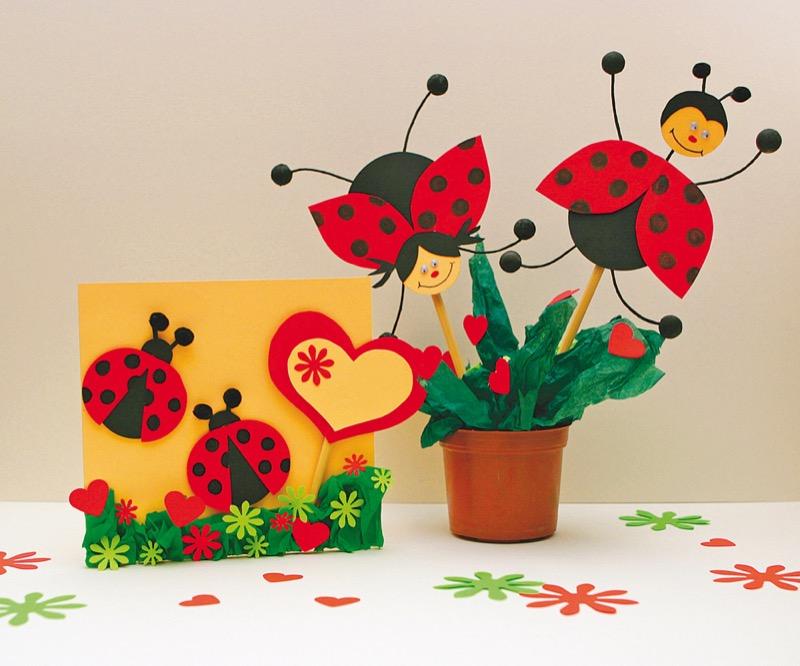
Click Image to Find Garden Products
One of the joys of making a ladybird is the opportunity to unleash your creativity and imagination. You can choose from a variety of materials and colors to create a unique and personalized ladybird that reflects your personality and style. Whether you prefer bright and bold colors or more subdued and natural tones, you can create a ladybird that is truly one-of-a-kind.
In addition to being a fun and creative activity, making a ladybird can also be a great way to learn new skills and develop your crafting abilities. By following a simple tutorial or guide, you can learn the basics of crafting and create a beautiful ladybird that you can be proud of. And, with practice and patience, you can continue to develop your skills and create even more complex and intricate crafts.
So, why make a ladybird? Whether you’re looking for a fun and creative activity, a way to learn new skills, or simply a unique and personalized decoration, making a ladybird can be a rewarding and enjoyable experience. With a few simple materials and some basic crafting skills, you can bring a charming ladybird to life and enjoy the process of creating something with your own hands. If you’re interested in learning how to make a ladybird, keep reading for a step-by-step guide and tips to get you started.
Gathering Materials: What You’ll Need to Get Started
To make a ladybird, you’ll need a few basic craft supplies. The materials you choose will depend on the design and complexity of your ladybird, but here are some essentials to get you started:
Paper or cardstock: This will be the base material for your ladybird’s body and wings. You can use colored paper or cardstock to add a pop of color to your design.
Glue: A good quality glue is essential for assembling your ladybird. You can use white glue, hot glue, or a glue stick, depending on the materials you’re working with.
Scissors: You’ll need scissors to cut out the shapes for your ladybird’s body and wings. Make sure they’re sharp and easy to handle.
Paint and paintbrushes: If you want to add some extra color and detail to your ladybird, you’ll need paint and paintbrushes. You can use acrylic paint or watercolor paint, depending on the effect you’re looking for.
Other materials: Depending on the design you choose, you may also need other materials like felt, fabric, or pipe cleaners. Don’t be afraid to get creative and experiment with different materials to add texture and interest to your ladybird.
When choosing materials, consider the age and skill level of the person making the ladybird. If you’re working with children, you may want to use simpler materials and techniques to make the project more accessible. On the other hand, if you’re looking for a more challenging project, you can use more complex materials and techniques to create a more intricate design.
Remember, the key to making a successful ladybird is to have fun and be creative. Don’t be afraid to experiment and try new things – and don’t worry if your ladybird doesn’t turn out perfectly. It’s all part of the process of learning and creating.

Designing Your Ladybird: Tips and Inspiration
When it comes to designing your ladybird, the possibilities are endless. You can choose from a variety of colors, patterns, and shapes to create a unique and personalized design. Here are a few tips and ideas to get you started:
Color Schemes: Ladybirds are typically red and black, but you can also experiment with other colors like yellow, blue, and green. Consider using a combination of bright and muted colors to create a visually appealing design.
Patterns: You can add patterns to your ladybird’s body and wings using paint, markers, or stickers. Consider using stripes, polka dots, or chevrons to add some visual interest to your design.
Shapes: Ladybirds can be made in a variety of shapes, from simple circles and ovals to more complex shapes like hearts and stars. Consider using a combination of shapes to create a unique and interesting design.
Personal Touches: One of the best things about making a ladybird is the ability to add personal touches and make it your own. Consider adding details like eyes, antennae, and spots to make your ladybird more realistic and charming.
Inspiration: If you’re stuck for ideas, consider looking at pictures of real ladybirds or other craft projects for inspiration. You can also experiment with different materials and techniques to create a unique and interesting design.
Remember, the key to designing a great ladybird is to have fun and be creative. Don’t be afraid to try new things and experiment with different materials and techniques. With a little practice and patience, you can create a beautiful and charming ladybird that you’ll be proud to display.
When designing your ladybird, keep in mind the age and skill level of the person making it. If you’re working with children, you may want to use simpler designs and materials to make the project more accessible. On the other hand, if you’re looking for a more challenging project, you can use more complex designs and materials to create a more intricate and detailed ladybird.
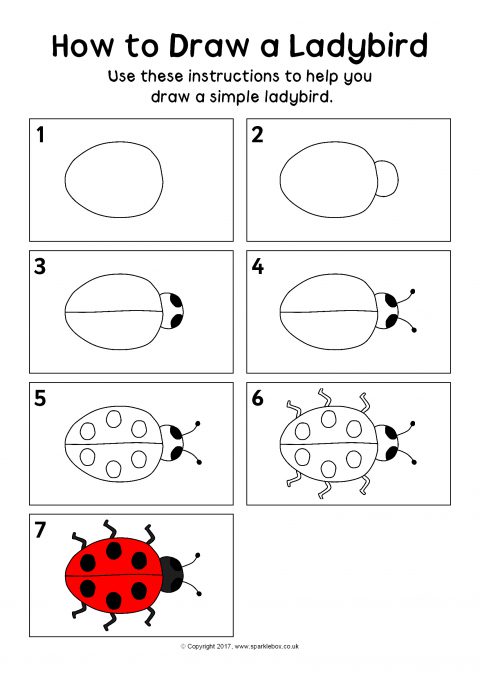
Step-by-Step Instructions: Bringing Your Ladybird to Life
Now that you have your materials and design in place, it’s time to start bringing your ladybird to life. Here’s a step-by-step guide to help you get started:
Step 1: Cut out the body and wings of your ladybird using scissors or a craft knife. Make sure to cut along the lines carefully and smoothly.
Step 2: Use glue to attach the wings to the body of the ladybird. Make sure to apply a small amount of glue to avoid any mess.
Step 3: Paint your ladybird using acrylic or watercolor paint. You can use a single color or multiple colors to create a unique design.
Step 4: Add details to your ladybird, such as eyes, antennae, and spots. You can use markers, paint, or stickers to add these details.
Step 5: Allow your ladybird to dry completely before handling it. This may take several hours or overnight, depending on the materials you used.
Step 6: Once your ladybird is dry, you can add any final details or embellishments. You can use glue, markers, or other craft supplies to add these details.
Step 7: Finally, display your ladybird proudly You can use it as a decorative piece, give it as a gift, or use it as a educational tool.
Remember to be patient and take your time when making your ladybird. It’s a fun and creative process, and the end result will be worth it. If you’re making a ladybird with children, be sure to supervise them closely and provide guidance and support as needed.
By following these steps, you can create a beautiful and charming ladybird that you’ll be proud to display. Don’t be afraid to experiment and try new things – and most importantly, have fun!
Adding Details and Embellishments: Making Your Ladybird Special
Now that you have the basic shape of your ladybird, it’s time to add some details and embellishments to make it truly special. Here are some ideas to get you started:
Eyes: You can use markers, paint, or even small beads to create the eyes of your ladybird. Consider adding some personality to your ladybird by making the eyes different shapes or sizes.
Antennae: Use pipe cleaners, wire, or even small sticks to create the antennae of your ladybird. You can bend them into different shapes or add some texture to make them more interesting.
Spots: Ladybirds are known for their distinctive spots, so consider adding some to your ladybird. You can use paint, markers, or even small stickers to create the spots.
Other details: Consider adding some other details to your ladybird, such as a mouth, nose, or even some texture to the body. You can use a variety of materials, such as markers, paint, or even fabric, to add these details.
Embellishments: If you want to add some extra flair to your ladybird, consider using some embellishments like glitter, sequins, or even small ribbons. Just be sure to use them sparingly, as too many embellishments can make your ladybird look cluttered.
Remember, the key to adding details and embellishments is to have fun and be creative. Don’t be afraid to experiment and try new things – and most importantly, enjoy the process of making your ladybird special.
When adding details and embellishments, consider the age and skill level of the person making the ladybird. If you’re working with children, you may want to use simpler materials and techniques to make the project more accessible. On the other hand, if you’re looking for a more challenging project, you can use more complex materials and techniques to create a more intricate and detailed ladybird.
Tips and Variations: Making Your Ladybird Unique
Now that you have the basic steps down, it’s time to think outside the box and make your ladybird truly unique. Here are some tips and variations to get you started:
Use different shapes: Instead of using the traditional oval shape, try using a heart-shaped or star-shaped body for your ladybird.
Experiment with materials: Try using different materials, such as felt, fabric, or even recycled materials, to create a unique and eco-friendly ladybird.
Add movable parts: Consider adding movable parts, such as wings or antennae, to make your ladybird more interactive and fun.
Try different colors: Instead of using the traditional red and black colors, try using different colors, such as pink, blue, or yellow, to create a unique and personalized ladybird.
Get creative with embellishments: Consider adding embellishments, such as glitter, sequins, or even small toys, to make your ladybird truly special.
Make it 3D: Instead of making a flat ladybird, try making a 3D version using cardboard, paper mache, or even clay.
Use natural materials: Consider using natural materials, such as leaves, twigs, or even flowers, to create a unique and earthy ladybird.
Make it glow-in-the-dark: Try adding glow-in-the-dark paint or materials to make your ladybird glow in the dark.
Remember, the key to making a unique ladybird is to think outside the box and be creative. Don’t be afraid to
Displaying Your Ladybird: Ideas for Showcasing Your Creation
Now that you’ve completed your ladybird, it’s time to show it off Here are some ideas for displaying your creation:
Create a diorama: Use a shoe box or a small container to create a diorama of your ladybird’s habitat. You can add some green paper or fabric to create a grassy background, and some small rocks or pebbles to create a path.
Make a mobile: Use some string or fishing line to hang your ladybird from a mobile base or a hanger. You can add some other decorations, such as beads or small toys, to create a colorful and eye-catching mobile.
Use it as a decorative piece: You can use your ladybird as a decorative piece on a shelf or a mantle. You can add some other decorations, such as candles or vases, to create a beautiful and unique display.
Create a garden scene: Use some cardboard or foam board to create a garden scene, complete with flowers, trees, and other garden features. You can add your ladybird to the scene, and use some glue or tape to secure it in place.
Make a collage: Use some glue or tape to create a collage of your ladybird and other craft projects. You can add some background paper or fabric, and some other decorations, such as stickers or stamps, to create a unique and colorful collage.
Remember, the most important thing is to have fun and be creative when displaying your ladybird. Don’t be afraid to try new things and experiment with different ideas and techniques.

Conclusion: The Joy of Creating a Ladybird
Crafting a charming ladybird is a fun and creative activity that can be enjoyed by people of all ages. With the right materials and a little bit of imagination, you can create a beautiful and unique ladybird that will bring joy to yourself and others.
Throughout this article, we have provided a step-by-step guide on how to make a ladybird, from gathering materials to displaying your finished creation. We have also offered tips and variations to help you make your ladybird truly special.
Remember, the most important thing is to have fun and be creative when making your ladybird. Don’t be afraid to try new things and experiment with different materials and techniques. With a little bit of practice and patience, you can create a beautiful and charming ladybird that you will be proud to display.
So why not get started today and create your own ladybird? With the help of this guide, you can make a beautiful and unique ladybird that will bring joy to yourself and others. Happy crafting!
