The Magic of Mistletoe: A Brief History and Significance
Mistletoe has been a part of Christmas traditions for centuries, with its origins dating back to ancient European folklore. The plant’s association with romance and love is rooted in Norse mythology, where it was believed to possess magical powers that could ignite passion and spark romance. In the 18th century, the tradition of hanging mistletoe in doorways and under ceilings became popular in England, where couples would steal a kiss under the mistletoe, believing it would bring them good luck and a long-lasting relationship.
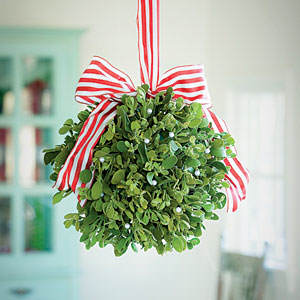
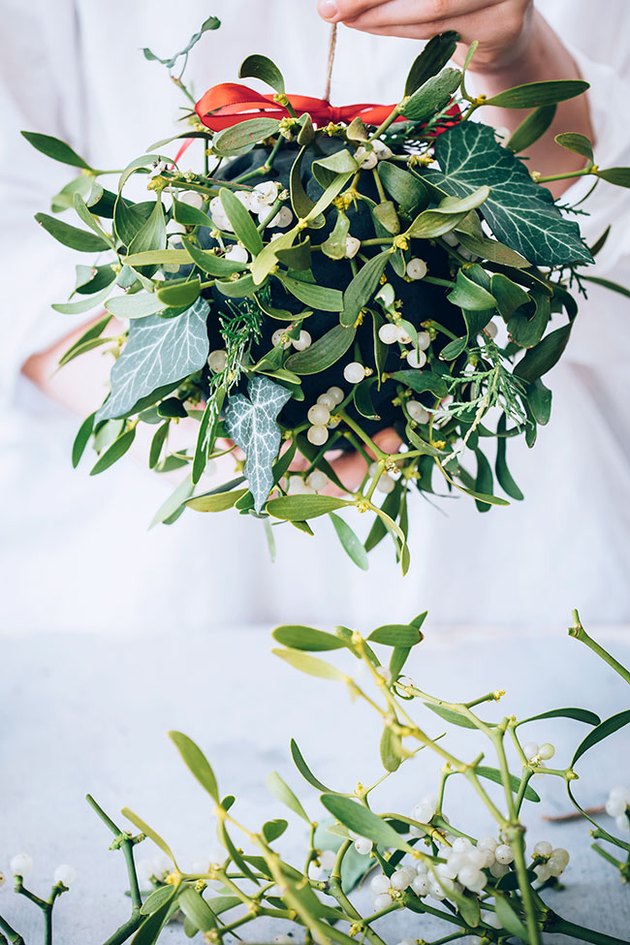
Today, mistletoe is a beloved Christmas decoration, symbolizing love, affection, and the joy of the holiday season. Creating a DIY mistletoe ball is a fun and creative way to bring this festive tradition into your home, and with a few simple materials, you can make your own mistletoe ball to hang in your doorway or give as a gift to loved ones.
When it comes to making a mistletoe ball, the key is to create a beautiful and lush arrangement that captures the magic of the mistletoe plant. By following a few simple steps and using the right materials, you can create a stunning mistletoe ball that will add a touch of romance and festive cheer to your holiday decor. Whether you’re looking for a fun DIY project or a unique gift idea, making a mistletoe ball is a great way to get into the holiday spirit and create a beautiful and meaningful decoration that will be treasured for years to come.
As you begin your DIY mistletoe ball project, keep in mind that the key to success lies in the quality of your materials and the attention to detail you bring to the project. By choosing fresh, high-quality mistletoe and taking the time to carefully shape and arrange the leaves, you can create a truly stunning mistletoe ball that will be the centerpiece of your holiday decor. With a little creativity and some basic crafting skills, you can make a mistletoe ball that will bring joy and romance to your holiday season.
Gathering Materials: What You’ll Need to Make a Mistletoe Ball
To create a beautiful and lush mistletoe ball, you’ll need a few essential materials. The most important ingredient, of course, is mistletoe itself. You can find mistletoe at most craft stores or online, or you can forage for it in the wild if you have access to a mistletoe tree. When selecting mistletoe, look for fresh, green leaves with a slightly waxy texture.
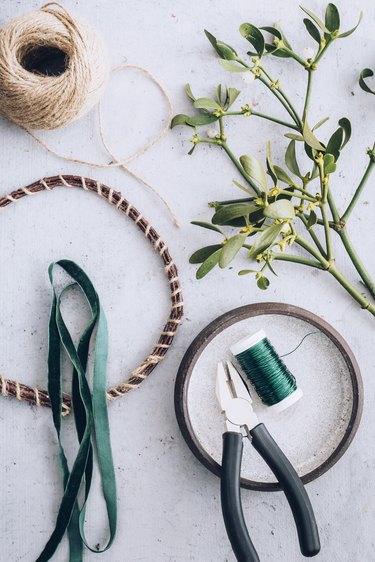
In addition to mistletoe, you’ll need a few basic crafting supplies, including wire, floral tape, and decorative items like ribbons, pinecones, and berries. The wire will serve as the base of the mistletoe ball, so choose a sturdy, flexible wire that can be shaped into a spherical frame. Floral tape will help you attach the mistletoe leaves to the wire frame, while decorative items will add a touch of festive flair to your finished mistletoe ball.
When it comes to choosing decorative items, the possibilities are endless. Consider adding some festive ribbons or garlands to your mistletoe ball, or use pinecones and berries to create a more rustic, natural look. You can also experiment with different textures and colors to create a unique and eye-catching design.
Before you begin your DIY mistletoe ball project, make sure you have all the necessary materials on hand. This will help you work efficiently and ensure that your finished mistletoe ball is beautiful and professional-looking. With the right materials and a little creativity, you can create a stunning mistletoe ball that will be the centerpiece of your holiday decor.
Here’s a list of the materials you’ll need to make a mistletoe ball:
- Mistletoe
- Wire (sturdy, flexible)
- Floral tape
- Decorative items (ribbons, pinecones, berries, etc.)
Preparing the Mistletoe: Cleaning and Trimming the Leaves
Before you can start creating your mistletoe ball, you’ll need to prepare the mistletoe leaves. This involves cleaning and trimming the leaves to remove any debris or dirt that may be present. Start by gently rinsing the mistletoe leaves with water to remove any loose dirt or debris. Then, use a soft-bristled brush or a clean cloth to gently wipe away any remaining dirt or debris from the leaves.
Next, use a pair of scissors or pruning shears to trim the mistletoe leaves to the desired length. You’ll want to leave enough stem on each leaf to attach it to the wire frame, but trim off any excess stem or leaves that may be damaged or discolored. This will help create a clean and uniform appearance for your mistletoe ball.
When trimming the mistletoe leaves, be sure to make clean cuts just above a node (where a leaf meets the stem). This will help the leaves stay fresh and prevent them from drying out. You can also use a floral preservative to help keep the mistletoe leaves fresh and extend their lifespan.
Once you’ve cleaned and trimmed the mistletoe leaves, you’re ready to start creating your mistletoe ball. This is a crucial step in the process, as it will help ensure that your finished mistletoe ball looks its best. By taking the time to properly prepare the mistletoe leaves, you’ll be able to create a beautiful and long-lasting decoration that will add a touch of festive flair to your holiday decor.
Here are some tips to keep in mind when preparing the mistletoe leaves:
- Gently rinse the mistletoe leaves with water to remove any loose dirt or debris.
- Use a soft-bristled brush or a clean cloth to gently wipe away any remaining dirt or debris from the leaves.
- Trim the mistletoe leaves to the desired length, leaving enough stem to attach to the wire frame.
- Make clean cuts just above a node (where a leaf meets the stem) to help the leaves stay fresh.
- Use a floral preservative to help keep the mistletoe leaves fresh and extend their lifespan.
Creating the Base: Shaping the Wire Frame
Now that you have your mistletoe leaves prepared, it’s time to create the base of your mistletoe ball. This involves shaping the wire into a spherical frame that will serve as the foundation for your decoration. To do this, you’ll need a sturdy, flexible wire that can be shaped into a sphere.
Start by cutting a length of wire that is approximately 12-18 inches long. This will give you enough wire to create a sphere that is about 6-8 inches in diameter. Next, use your hands or a wire shaping tool to bend the wire into a spherical shape. You can use a wire frame or a Styrofoam ball as a guide to help you achieve a symmetrical shape.
As you shape the wire, make sure to create a sturdy and even frame that will support the weight of the mistletoe leaves. You can use a wire wrapping technique to secure the ends of the wire together and create a seamless joint.
Once you have shaped the wire into a sphere, you can begin attaching the mistletoe leaves to the frame using floral tape. This will create a beautiful and lush appearance that will add a touch of festive flair to your holiday decor.
Here are some tips to keep in mind when creating the base of your mistletoe ball:
- Use a sturdy, flexible wire that can be shaped into a sphere.
- Cut a length of wire that is approximately 12-18 inches long.
- Use your hands or a wire shaping tool to bend the wire into a spherical shape.
- Use a wire frame or a Styrofoam ball as a guide to help you achieve a symmetrical shape.
- Secure the ends of the wire together using a wire wrapping technique.
Adding the Mistletoe: Attaching the Leaves to the Wire Frame
Now that you have your wire frame shaped and ready, it’s time to add the mistletoe leaves. This is the most crucial part of the process, as it will determine the overall appearance of your mistletoe ball. To attach the leaves, you’ll need to use floral tape, which is a special type of tape designed specifically for attaching flowers and greenery to wire frames.
Start by selecting a few mistletoe leaves and attaching them to the wire frame using floral tape. Make sure to space the leaves evenly and create a full, lush appearance. You can use a single type of mistletoe or mix and match different varieties to create a unique and interesting texture.
As you add the mistletoe leaves, make sure to work your way around the wire frame, covering the entire surface. This will help create a uniform and balanced appearance. You can also use a few sprigs of baby’s breath or other filler flowers to add some extra texture and interest to the arrangement.
Here are some tips to keep in mind when adding the mistletoe leaves:
- Use floral tape to attach the mistletoe leaves to the wire frame.
- Space the leaves evenly and create a full, lush appearance.
- Work your way around the wire frame, covering the entire surface.
- Use a single type of mistletoe or mix and match different varieties to create a unique and interesting texture.
- Add a few sprigs of baby’s breath or other filler flowers to add some extra texture and interest to the arrangement.
By following these tips and taking your time, you can create a beautiful and lush mistletoe ball that will add a touch of festive flair to your holiday decor. Remember to be patient and gentle when handling the mistletoe leaves, as they can be delicate and easily damaged.
Embellishing the Ball: Adding Decorative Touches
Now that you have your mistletoe ball base complete, it’s time to add some decorative touches to make it truly special. This is where you can get creative and add your own personal style to the project. Consider adding some ribbons, pinecones, and berries to give your mistletoe ball a festive and romantic look.
Start by selecting a few decorative items that complement the color and texture of your mistletoe leaves. You can use ribbons in a variety of colors and textures, such as velvet, satin, or lace. Pinecones and berries can add a natural and rustic touch to your mistletoe ball, while also providing a pop of color and texture.
When adding decorative items, make sure to balance them evenly around the mistletoe ball. You don’t want to overload one side of the ball with too many decorations, as this can make it look unbalanced and messy. Instead, space out your decorations evenly, making sure to leave some space between each item.
Here are some tips to keep in mind when embellishing your mistletoe ball:
- Choose decorative items that complement the color and texture of your mistletoe leaves.
- Balance your decorations evenly around the mistletoe ball.
- Don’t overload one side of the ball with too many decorations.
- Leave some space between each decorative item to create a visually appealing arrangement.
- Consider using a variety of textures and colors to add depth and interest to your mistletoe ball.
By adding some decorative touches to your mistletoe ball, you can create a truly unique and special holiday decoration that will add a touch of romance and festivity to your home. Remember to have fun and be creative with this step, as it’s a great opportunity to express your personal style and add some extra flair to your mistletoe ball.
Finishing Touches: Securing the Stem and Adding a Hanger
Now that your mistletoe ball is complete, it’s time to add the finishing touches. This includes securing the stem of the ball and adding a hanger or loop for easy hanging. To secure the stem, you can use a small amount of floral tape or a hot glue gun to attach it to the wire frame.
Once the stem is secure, you can add a hanger or loop to the top of the ball. This can be made from a piece of wire, a ribbon, or a small hook. Make sure the hanger is sturdy enough to support the weight of the ball, and that it is securely attached to the stem.
Here are some tips to keep in mind when adding a hanger to your mistletoe ball:
- Use a sturdy material for the hanger, such as wire or a small hook.
- Make sure the hanger is securely attached to the stem of the ball.
- Test the hanger to make sure it can support the weight of the ball.
- Consider adding a small loop or hook to the top of the ball for easy hanging.
By adding a hanger to your mistletoe ball, you can easily hang it in a doorway, from a ceiling, or on a wall. This will allow you to showcase your beautiful DIY mistletoe ball and add a touch of festive flair to your holiday decor.
Remember to be patient and take your time when adding the finishing touches to your mistletoe ball. With a little care and attention to detail, you can create a beautiful and unique holiday decoration that will be the centerpiece of your holiday decor.
Displaying Your Masterpiece: Tips for Showcasing Your DIY Mistletoe Ball
Now that your DIY mistletoe ball is complete, it’s time to showcase your masterpiece. Here are some tips for displaying your mistletoe ball in a way that will add a touch of festive flair to your holiday decor.
One of the most popular ways to display a mistletoe ball is to hang it in a doorway. This creates a beautiful and romantic entrance to your home, and is a great way to welcome guests during the holiday season. Simply attach a loop or hook to the top of the ball, and hang it from a sturdy doorframe or hook.
Another great way to display your mistletoe ball is to hang it from a ceiling or a wall. This creates a beautiful and dramatic display that will add a touch of elegance to any room. Simply attach a loop or hook to the top of the ball, and hang it from a sturdy hook or nail.
Here are some additional tips for displaying your DIY mistletoe ball:
- Hang the ball in a doorway or entranceway to create a beautiful and romantic entrance.
- Hang the ball from a ceiling or wall to create a dramatic and elegant display.
- Use a sturdy hook or nail to hang the ball, to ensure it is secure and stable.
- Consider adding some greenery or flowers around the ball to create a beautiful and festive display.
- Use some fairy lights or string lights to add a touch of magic and wonder to your display.
By following these tips, you can create a beautiful and festive display that will add a touch of romance and elegance to your holiday decor. Remember to have fun and be creative with your display, and don’t be afraid to experiment with different ideas and arrangements.


