Why pH Levels Matter for Your Plants
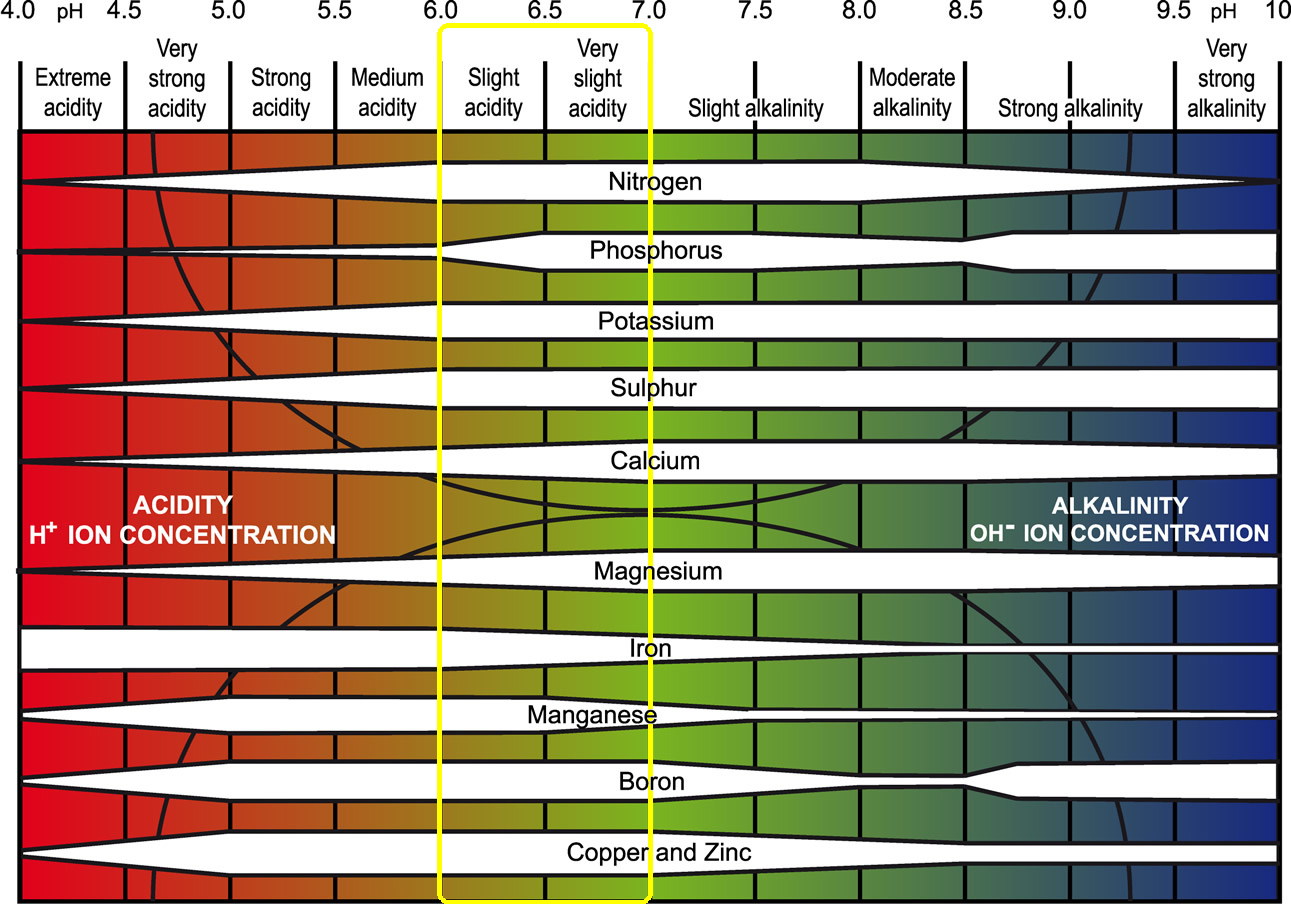
Soil pH levels play a crucial role in determining the health and productivity of plants. The pH scale, ranging from 0 to 14, measures the acidity or alkalinity of the soil. A pH level between 6.0 and 7.0 is considered optimal for most plants, as it allows for the best nutrient availability and microbial activity. When the pH level is too high or too low, it can lead to nutrient deficiencies, reduced plant growth, and increased susceptibility to diseases.

Click Image to Find Garden Products
For instance, if the soil pH is too low (acidic), it can cause a deficiency in essential nutrients like phosphorus, calcium, and magnesium. On the other hand, if the soil pH is too high (alkaline), it can lead to a buildup of toxic substances like sodium and chloride. Moreover, extreme pH levels can disrupt the balance of beneficial microorganisms in the soil, which are essential for decomposing organic matter and fighting plant diseases.
Understanding the importance of pH levels in soil is essential for gardeners and farmers who want to optimize plant growth and productivity. By learning how to pH soil test and adjust the pH levels accordingly, individuals can create a more favorable environment for their plants to thrive. This, in turn, can lead to improved crop yields, reduced soil erosion, and a more sustainable agricultural practice.
In the next section, we will delve into the pH scale and its ranges, exploring what they mean for plant growth and how to interpret the results of a pH test.

Understanding pH Scales and Ranges
The pH scale is a measure of the acidity or alkalinity of a solution, with a range of 0 to 14. A pH of 7 is considered neutral, while a pH below 7 is acidic and a pH above 7 is alkaline. The pH scale is logarithmic, meaning that each whole number increase or decrease represents a tenfold change in acidity or alkalinity.
For plant growth, the ideal pH range is between 6.0 and 7.0, which is slightly acidic to neutral. This range allows for optimal nutrient availability and microbial activity. Soils with a pH below 6.0 are considered acidic, while those with a pH above 7.0 are considered alkaline.
Acidic soils (pH 0-6.0) are often found in areas with high rainfall, as the water can leach away basic nutrients like calcium and magnesium. Plants that thrive in acidic soils include blueberries, azaleas, and rhododendrons. On the other hand, alkaline soils (pH 8-14) are often found in areas with low rainfall, as the lack of water can cause a buildup of basic nutrients. Plants that thrive in alkaline soils include succulents, cacti, and asparagus.
Neutral soils (pH 7.0) are often considered ideal for plant growth, as they provide a balanced environment for nutrient availability and microbial activity. However, it’s worth noting that most plants can adapt to a wide range of pH levels, and some may even thrive in slightly acidic or alkaline conditions.
When it comes to pH testing, it’s essential to understand the pH scale and its ranges to accurately interpret the results. By knowing the pH level of your soil, you can take steps to adjust it if necessary, ensuring optimal growing conditions for your plants. In the next section, we’ll explore the different methods for testing soil pH, including DIY kits, professional lab testing, and digital pH meters.
How to Choose the Right pH Testing Method
When it comes to pH testing, there are several methods to choose from, each with its own advantages and disadvantages. The right method for you will depend on your specific needs, budget, and level of expertise. Here are some of the most common methods for pH testing, including DIY kits, professional lab testing, and digital pH meters.
DIY pH testing kits are a popular choice for gardeners and farmers who want to test their soil pH regularly. These kits usually include a testing solution, a color chart, and a set of instructions. They are relatively inexpensive and easy to use, but may not provide the most accurate results. DIY kits are best suited for small-scale testing and may not be suitable for large-scale agricultural operations.
Professional lab testing is a more accurate and reliable method for pH testing. This involves sending a soil sample to a laboratory for analysis, where it is tested using advanced equipment and techniques. Professional lab testing provides detailed and accurate results, but can be more expensive and time-consuming than DIY kits.
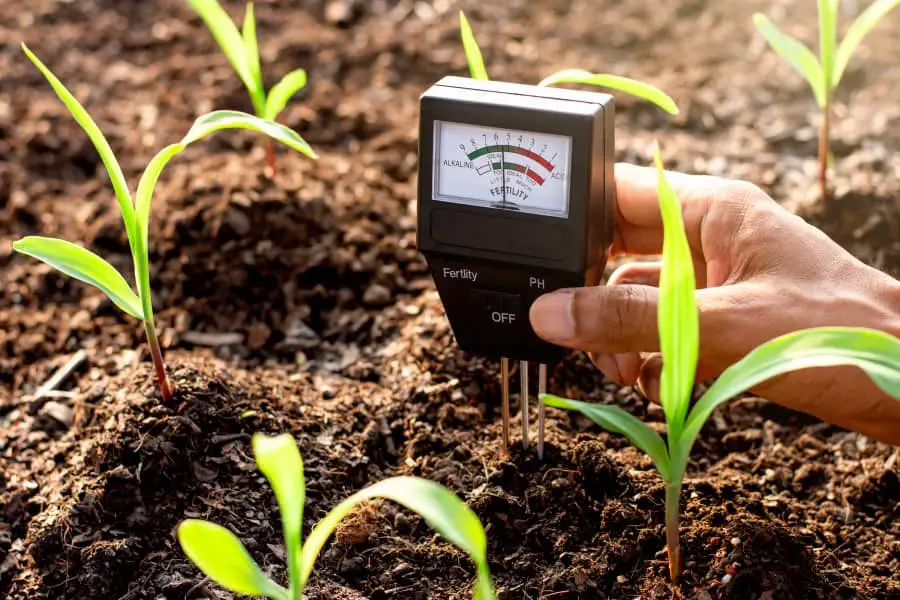
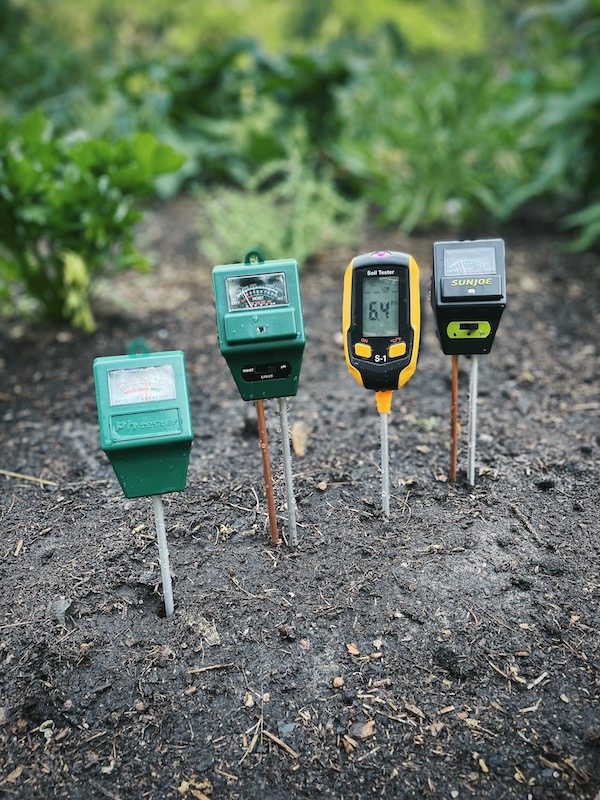
Digital pH meters are another option for pH testing. These meters use advanced technology to provide accurate and instant results. They are often more expensive than DIY kits, but provide more accurate results and are easier to use. Digital pH meters are suitable for both small-scale and large-scale testing.
When choosing a pH testing method, consider the following factors: accuracy, cost, ease of use, and speed of results. It’s also important to consider the type of soil you are testing, as some methods may be more suitable for certain types of soil. By choosing the right pH testing method, you can ensure accurate and reliable results, and make informed decisions about your soil management practices.
In the next section, we’ll provide a step-by-step guide on how to use a DIY pH testing kit, including preparing the soil sample, mixing the testing solution, and interpreting the results.
A Step-by-Step Guide to pH Testing with a DIY Kit
Using a DIY pH testing kit is a simple and cost-effective way to test your soil pH. Here’s a step-by-step guide to help you get started:
Step 1: Prepare the Soil Sample
Collect a small sample of soil from the area you want to test. Make sure to take a representative sample by mixing soil from different depths and locations. Remove any debris, rocks, or roots from the sample.
Step 2: Mix the Testing Solution
Follow the instructions provided with the DIY kit to mix the testing solution. Typically, you’ll need to add a few drops of the solution to a small container filled with distilled water.
Step 3: Add the Soil Sample to the Testing Solution
Add a small amount of the soil sample to the testing solution. Make sure to follow the instructions for the correct amount of soil to add.
Step 4: Mix the Solution and Soil
Mix the solution and soil thoroughly until the soil is fully dissolved. This may take a few minutes, depending on the type of soil and testing solution.
Step 5: Compare the Color to the Chart
Once the solution and soil are fully mixed, compare the color to the chart provided with the DIY kit. The chart will show the corresponding pH level for each color.
Step 6: Record the Results
Record the pH level of your soil sample. Take note of any potential issues or adjustments that may be needed based on the results.
By following these steps, you can easily test your soil pH using a DIY kit. Remember to always follow the instructions provided with the kit and take multiple readings to ensure accurate results.
In the next section, we’ll explain how to interpret the results of a pH test, including understanding the pH scale, identifying potential issues, and determining the necessary adjustments.

Interpreting Your pH Test Results: What Do the Numbers Mean?
Once you have completed a pH test, you will receive a numerical value that represents the pH level of your soil. But what do these numbers mean, and how can you use them to improve your soil’s health?
The pH scale ranges from 0 to 14, with 7 being neutral. A pH level below 7 is considered acidic, while a pH level above 7 is considered alkaline. Most plants prefer a slightly acidic to neutral soil pH, ranging from 6.0 to 7.0.
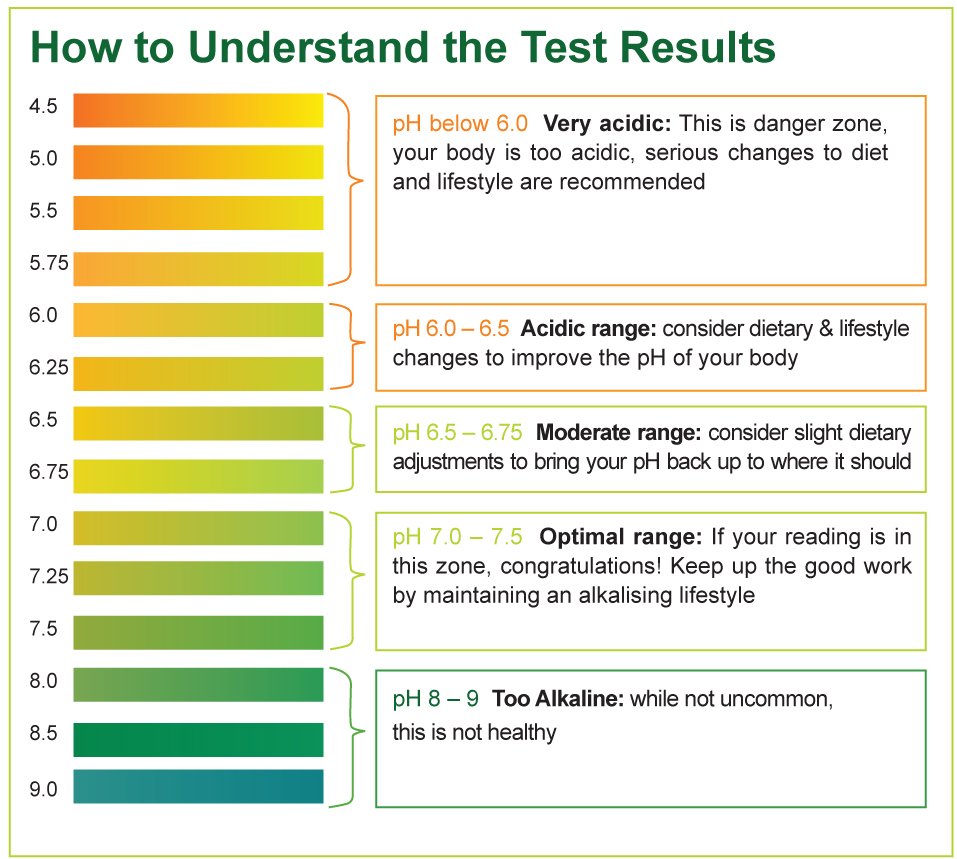
When interpreting your pH test results, consider the following:
* pH 0-5.5: Extremely acidic, potentially toxic to plants
* pH 5.6-6.0: Acidic, may require adjustments for optimal plant growth
* pH 6.1-7.0: Slightly acidic to neutral, ideal for most plants
* pH 7.1-8.0: Slightly alkaline, may require adjustments for optimal plant growth
* pH 8.1-14: Extremely alkaline, potentially toxic to plants
By understanding the pH scale and how to interpret your test results, you can make informed decisions about how to adjust your soil’s pH level to create an optimal growing environment for your plants.
In addition to pH level, you should also consider other factors that can impact soil health, such as nutrient availability, microbial activity, and soil structure.
In the next section, we’ll provide tips and tricks for adjusting your soil pH levels, including adding amendments, using natural methods, and monitoring progress over time.
Adjusting Your Soil pH: Tips and Tricks
Once you have determined that your soil pH needs to be adjusted, there are several methods you can use to make the necessary changes. Here are some tips and tricks to help you adjust your soil pH:
Adding Amendments:
One of the most common methods for adjusting soil pH is to add amendments such as lime or sulfur. Lime is used to raise the pH of acidic soils, while sulfur is used to lower the pH of alkaline soils. It’s essential to use the correct type and amount of amendment for your specific soil type and pH level.
Using Natural Methods:
There are also several natural methods you can use to adjust your soil pH. For example, adding compost or manure can help to raise the pH of acidic soils, while adding peat moss or sulfur can help to lower the pH of alkaline soils.
Monitoring Progress:
It’s crucial to monitor the progress of your soil pH adjustments over time. This can be done by regularly testing the pH of your soil and making adjustments as needed. It’s also essential to keep track of any changes you make to your soil, including the type and amount of amendments used.
Timing is Everything:
The timing of your soil pH adjustments is also critical. For example, it’s best to make adjustments during the off-season when plants are dormant, as this can help to minimize any potential disruptions to plant growth.
Seeking Professional Advice:
If you’re unsure about how to adjust your soil pH or need guidance on the best methods for your specific soil type, it’s always best to seek the advice of a professional. A soil scientist or agronomist can provide you with personalized advice and help you develop a plan for adjusting your soil pH.
In the next section, we’ll highlight common mistakes to avoid when pH testing your soil, including incorrect sampling, inadequate mixing, and misinterpreting results.

Common Mistakes to Avoid When pH Testing Your Soil
When it comes to pH testing your soil, there are several common mistakes to avoid in order to ensure accurate and reliable results. Here are some of the most common mistakes to watch out for:
Incorrect Sampling:
One of the most common mistakes when pH testing soil is incorrect sampling. This can include taking a sample from the wrong location, not mixing the sample properly, or not using a representative sample of the soil. To avoid this mistake, make sure to take multiple samples from different locations and depths, and mix the samples thoroughly before testing.
Inadequate Mixing:
Inadequate mixing of the soil sample and testing solution can also lead to inaccurate results. Make sure to mix the sample and solution thoroughly, and follow the instructions provided with the testing kit or equipment.
Misinterpreting Results:
Misinterpreting the results of a pH test is another common mistake. Make sure to understand the pH scale and how to interpret the results, and take into account any potential factors that may affect the accuracy of the results.
Not Calibrating Equipment:
If you are using a digital pH meter or other equipment to test your soil pH, make sure to calibrate the equipment properly before use. This will ensure that the results are accurate and reliable.
Not Considering Soil Type:
Soil type can also affect the accuracy of pH test results. Make sure to consider the type of soil you are testing, and adjust the testing method and interpretation of results accordingly.
By avoiding these common mistakes, you can ensure accurate and reliable results from your pH testing, and make informed decisions about how to adjust your soil pH levels for optimal plant growth.
In the next section, we’ll emphasize the importance of regular pH testing and maintenance, including scheduling regular tests, tracking changes, and making adjustments as needed.

Monitoring and Maintaining Optimal pH Levels for Healthy Plant Growth
Regular pH testing and maintenance are crucial for maintaining optimal pH levels for healthy plant growth. By scheduling regular tests, tracking changes, and making adjustments as needed, you can ensure that your soil pH levels remain within the optimal range for your plants.
Scheduling Regular Tests:
It’s essential to schedule regular pH tests to monitor the pH levels of your soil. The frequency of testing will depend on the type of plants you are growing, the soil type, and the climate. As a general rule, it’s recommended to test your soil pH at least once a year, but more frequent testing may be necessary in certain situations.
Tracking Changes:
Tracking changes in your soil pH levels over time is crucial for identifying potential issues and making adjustments as needed. By keeping a record of your pH test results, you can identify trends and patterns that may indicate a problem with your soil pH levels.
Making Adjustments:
Based on the results of your pH tests, you may need to make adjustments to your soil pH levels. This can include adding amendments, using natural methods, or making other changes to your soil management practices. By making adjustments as needed, you can ensure that your soil pH levels remain within the optimal range for your plants.
Conclusion:
By following the tips and guidelines outlined in this article, you can ensure that your soil pH levels are optimal for healthy plant growth. Remember to schedule regular pH tests, track changes, and make adjustments as needed to maintain optimal pH levels. With regular monitoring and maintenance, you can create a healthy and thriving soil environment that supports the growth of your plants.