Getting Started with Peanut Planting: Understanding the Basics
Planting peanuts can be a rewarding experience, but it requires careful planning and preparation. To ensure a successful harvest, it’s essential to understand the ideal climate, soil, and timing for planting peanuts. Peanuts are a warm-season crop that thrives in temperatures between 65°F and 95°F (18°C and 35°C). They require a long growing season, typically 120 to 150 days, and adequate moisture, especially during the germination and flowering stages.
In terms of soil, peanuts prefer well-draining, sandy loam soils with a pH between 6.0 and 7.0. The ideal soil depth for peanut planting is around 2-3 inches (5-7.5 cm), and the soil should be free of debris and rocks. If you’re new to peanut planting, it’s crucial to test your soil to determine its pH level and nutrient content. This will help you make informed decisions about fertilization and pest control.
When it comes to timing, the best time to plant peanuts depends on your location and climate. In general, peanuts are planted in late spring to early summer, when the soil has warmed up and the risk of frost has passed. In regions with a shorter growing season, peanuts can be started indoors 2-3 weeks before the last frost date and then transplanted outside.
By understanding these basic requirements, you’ll be well on your way to growing a healthy and productive peanut crop. Whether you’re a seasoned gardener or a beginner, following these guidelines will help you achieve success with your peanut planting endeavors. For those looking to learn more about the specifics of how to plant peanut plants, the following sections will provide a step-by-step guide to help you get started.
Preparing the Soil for Peanut Planting: Tips and Tricks
Before planting peanuts, it’s essential to prepare the soil to ensure optimal growth and productivity. Soil preparation is a critical step in how to plant peanut plants successfully. A well-prepared soil will provide the necessary nutrients, water, and aeration for the peanut plants to thrive.
Soil testing is the first step in preparing the soil for peanut planting. A soil test will help determine the pH level and nutrient content of the soil. Based on the test results, you can adjust the soil pH and add necessary fertilizers to create a conducive environment for peanut growth. Peanuts prefer a slightly acidic to neutral soil pH, ranging from 6.0 to 7.0.
Fertilization is another crucial aspect of soil preparation. Peanuts require a balanced fertilizer that provides nitrogen, phosphorus, and potassium. A general-purpose fertilizer with a ratio of 10-10-10 (nitrogen-phosphorus-potassium) is suitable for peanut plants. However, it’s essential to follow the recommended application rates to avoid over-fertilization, which can harm the plants.
Pest control is also an essential aspect of soil preparation. Peanuts are susceptible to pests like nematodes, white grubs, and wireworms. To control these pests, you can use crop rotation, biological control methods, or chemical pesticides. However, it’s essential to use integrated pest management (IPM) techniques to minimize the environmental impact and ensure the long-term sustainability of the soil.
In addition to soil testing, fertilization, and pest control, it’s essential to ensure the soil is well-draining and has a good structure. Peanuts prefer a sandy loam soil with a depth of at least 2-3 inches (5-7.5 cm). You can improve the soil structure by adding organic matter like compost or manure. This will help improve the soil’s water-holding capacity, aeration, and nutrient availability.
By following these tips and tricks, you can prepare the soil for peanut planting and create a conducive environment for optimal growth and productivity. Remember, proper soil preparation is a critical step in how to plant peanut plants successfully, and it will pay off in the long run with a healthy and productive peanut crop.
Choosing the Right Peanut Variety for Your Climate
When it comes to planting peanuts, choosing the right variety is crucial for optimal growth and productivity. With over 100 peanut varieties to choose from, selecting the right one can be overwhelming. However, by understanding the different types of peanut varieties and their characteristics, you can make an informed decision that suits your specific climate and region.
There are four main types of peanut varieties: Virginia, Spanish, Valencia, and Runner. Each type has its unique characteristics, growth habits, and climate requirements. Virginia peanuts are known for their large seeds and are commonly grown in the southeastern United States. Spanish peanuts are smaller in size and are often used for peanut oil production. Valencia peanuts are known for their bright red skin and are commonly grown in the southwestern United States. Runner peanuts are the most widely grown variety and are known for their high yields and disease resistance.
When selecting a peanut variety, consider factors such as climate, soil type, and desired use. If you live in a region with a short growing season, choose a variety that matures quickly, such as the Valencia or Spanish peanut. If you live in a region with a long growing season, choose a variety that is more disease-resistant, such as the Runner peanut.
In addition to considering the type of peanut variety, also consider the specific characteristics of the variety, such as its growth habit, seed size, and yield potential. Some peanut varieties are bred for their high yields, while others are bred for their disease resistance or drought tolerance.
By choosing the right peanut variety for your climate and region, you can ensure optimal growth and productivity. Remember, the key to successful peanut planting is to choose a variety that is well-suited to your specific growing conditions. By doing so, you can increase your chances of a successful harvest and enjoy the many benefits of growing peanuts.
For more information on how to plant peanut plants, including tips on soil preparation, sowing, and care, be sure to check out the rest of this article.
How to Plant Peanut Seeds: A Step-by-Step Process
Planting peanut seeds is a straightforward process that requires attention to detail and proper technique. By following these steps, you can ensure a successful peanut crop and enjoy the many benefits of growing peanuts.
Step 1: Prepare the Soil – Before planting peanut seeds, make sure the soil is well-prepared and free of debris. Till the soil to a depth of 8-10 inches to loosen and aerate it. Add organic matter like compost or manure to improve soil fertility and structure.
Step 2: Sow the Seeds – Plant peanut seeds 1-2 inches deep and 3-4 inches apart in rows that are 3 feet apart. You can plant multiple seeds in a single hole, but make sure to space them evenly. Cover the seeds with a thin layer of soil and firm it gently.
Step 3: Water the Seeds – Water the seeds gently but thoroughly after planting. Keep the soil consistently moist during the first few weeks after planting. As the plants grow, you can reduce watering to about 1 inch per week.
Step 4: Provide Support – Peanut plants need support as they grow. You can use a trellis or a stake to provide support for the plants. Make sure to tie the plants loosely to the support to avoid damaging the stems.
Step 5: Mulch the Soil – Mulching the soil helps retain moisture, suppress weeds, and regulate soil temperature. Use a thin layer of organic mulch like straw or grass clippings around the plants.
By following these steps, you can successfully plant peanut seeds and enjoy a bountiful harvest. Remember to keep the soil consistently moist, provide support for the plants, and mulch the soil to retain moisture and suppress weeds.
For more information on how to plant peanut plants, including tips on soil preparation, care, and harvesting, be sure to check out the rest of this article.
Caring for Your Peanut Plants: Watering, Fertilizing, and Pest Control
Once you’ve planted your peanut seeds, it’s essential to provide them with the right care to ensure a healthy and productive crop. Proper watering, fertilizing, and pest control are crucial for optimal growth and development.
Watering: Peanut plants require consistent moisture, especially during the first few weeks after planting. Water the plants deeply once or twice a week, depending on weather conditions. Avoid overwatering, which can lead to root rot and other problems.
Fertilizing: Peanut plants benefit from regular fertilization. Use a balanced fertilizer (10-10-10 NPK) and follow the recommended application rates. You can also add organic matter like compost or manure to improve soil fertility and structure.
Pest Control: Peanut plants are susceptible to various pests, including aphids, whiteflies, and spider mites. Use integrated pest management (IPM) techniques to minimize the use of chemical pesticides. Encourage beneficial insects, like ladybugs and lacewings, which prey on pests. Use physical barriers, like fine-mesh screens, to prevent pests from reaching the plants.
Disease Management: Peanut plants are also susceptible to diseases like powdery mildew and leaf spot. Use fungicides as a last resort, and instead, focus on preventing disease through good sanitation, pruning, and air circulation.
Pruning: Prune your peanut plants regularly to promote healthy growth and prevent disease. Remove any weak or damaged stems, and trim back the plants to encourage bushy growth.
By following these care tips, you can ensure a healthy and productive peanut crop. Remember to monitor your plants regularly and take action promptly if you notice any problems.
For more information on how to plant peanut plants, including tips on soil preparation, sowing, and harvesting, be sure to check out the rest of this article.
Common Mistakes to Avoid When Planting Peanuts
Planting peanuts can be a rewarding experience, but it requires careful planning and attention to detail. Avoiding common mistakes can help ensure a successful harvest and minimize potential problems. Here are some common mistakes to avoid when planting peanuts:
Planting Too Early or Too Late: Peanuts are a warm-season crop and thrive in temperatures between 65°F and 95°F (18°C and 35°C). Planting too early can lead to poor germination and increased susceptibility to disease, while planting too late can result in reduced yields and lower quality peanuts.
Inadequate Soil Preparation: Peanuts require well-draining soil with a pH between 6.0 and 7.0. Inadequate soil preparation can lead to poor growth, reduced yields, and increased susceptibility to disease.
Insufficient Watering: Peanuts require consistent moisture, especially during the first few weeks after planting. Insufficient watering can lead to poor germination, reduced growth, and lower yields.
Overwatering: While peanuts require consistent moisture, overwatering can lead to root rot and other problems. Avoid overwatering, especially during periods of high rainfall.
Not Providing Support: Peanut plants can grow quite tall and require support to prevent lodging and reduce disease susceptibility. Provide support using stakes, trellises, or other methods to keep the plants upright and promote healthy growth.
Not Monitoring for Pests and Diseases: Peanuts are susceptible to various pests and diseases, including aphids, whiteflies, and powdery mildew. Regularly monitor your plants for signs of pests and diseases, and take action promptly to prevent infestations and infections.
By avoiding these common mistakes, you can increase your chances of a successful peanut harvest and enjoy the many benefits of growing peanuts.
Troubleshooting Common Issues with Peanut Plants
Despite proper care and attention, peanut plants can still encounter issues that affect their growth and productivity. Here are some common problems that may arise and how to troubleshoot them:
Yellowing Leaves: Yellowing leaves can be a sign of nutrient deficiency, overwatering, or disease. Check the soil pH and nutrient levels, and adjust as necessary. Also, ensure that the plants are receiving adequate sunlight and water.
Stunted Growth: Stunted growth can be caused by inadequate soil preparation, insufficient watering, or pest infestations. Check the soil for nutrient deficiencies and adjust as necessary. Also, ensure that the plants are receiving adequate sunlight and water.
Pest Infestations: Peanut plants are susceptible to various pests, including aphids, whiteflies, and spider mites. Regularly monitor the plants for signs of pests and take action promptly to prevent infestations.
Disease: Peanut plants are susceptible to various diseases, including powdery mildew and leaf spot. Regularly monitor the plants for signs of disease and take action promptly to prevent infections.
Root Rot: Root rot can be caused by overwatering or poor soil drainage. Check the soil for moisture levels and adjust as necessary. Also, ensure that the plants are receiving adequate sunlight and water.
By troubleshooting common issues with peanut plants, you can identify and address problems early on, ensuring a healthy and productive crop.
Remember, prevention is key. Regularly monitoring your plants and taking action promptly can help prevent issues from arising in the first place.
Harvesting Your Peanut Crop: Timing and Techniques
Harvesting peanuts is a critical step in the peanut planting process. Timing is everything when it comes to harvesting peanuts, as it can affect the quality and yield of the crop.
Optimal Timing: Peanuts are typically ready to harvest 120 to 150 days after planting, depending on the variety and weather conditions. Check the plants regularly for signs of maturity, such as yellowing leaves and dry, brittle stems.
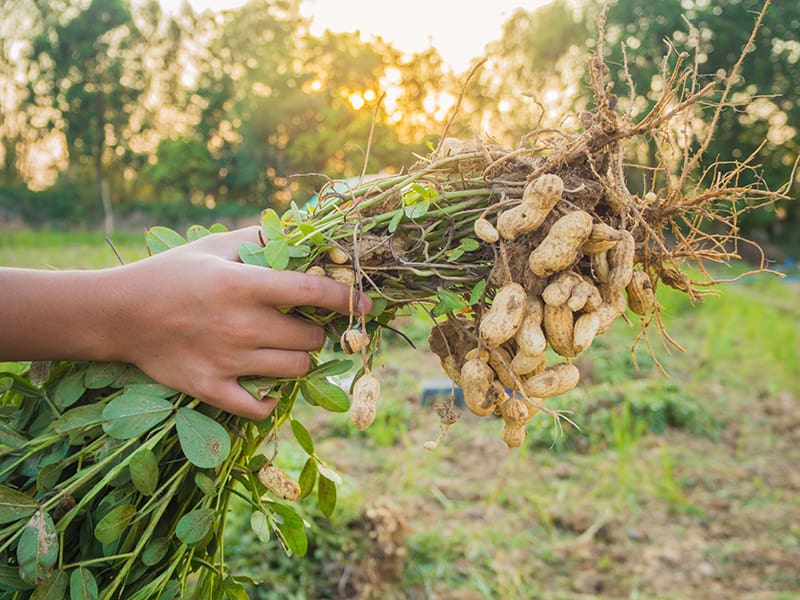
Techniques for Digging: Use a garden fork or spade to carefully dig up the peanut plants, taking care not to damage the roots or disturb the surrounding soil. Gently lift the plants out of the ground, and shake off any excess soil.
Techniques for Drying: After digging, spread the peanut plants out in a dry, well-ventilated area to dry. This will help to reduce the moisture content of the peanuts and prevent spoilage.
Tips for Storing: Store the harvested peanuts in a cool, dry place, away from direct sunlight and moisture. Use airtight containers or bags to keep the peanuts fresh and prevent pests from getting in.
By following these tips and techniques, you can successfully harvest and store your peanut crop, ensuring a bountiful and delicious yield.
Remember, harvesting peanuts is just the beginning. With proper care and attention, you can enjoy a delicious and nutritious peanut crop for months to come.


:max_bytes(150000):strip_icc()/peanut-plant-profile-4797389-hero-439ff76cc5444ca7869eacb25e683306.jpg)

