Why Water-Based Propagation is a Game-Changer
When it comes to learning how to propagate hydrangea cuttings in water, many gardeners are surprised to discover the numerous benefits of this method. By propagating hydrangea cuttings in water, you can increase your chances of success, reduce the risk of root rot, and even speed up the root development process. In fact, studies have shown that water-based propagation can result in up to 90% success rates, compared to around 50% for soil-based propagation. This is because water-based propagation provides a sterile and nutrient-rich environment, allowing the cutting to focus its energy on developing roots, rather than fighting off soil-borne diseases. As a result, you can expect to see roots developing within 1-2 weeks, compared to 2-3 weeks or more for soil-based propagation. With its higher success rates and faster root development, it’s no wonder that water-based propagation is becoming the go-to method for many hydrangea enthusiasts.

Choosing the Right Hydrangea Variety for Water Propagation
When it comes to propagating hydrangea cuttings in water, selecting the right variety is crucial for success. Not all hydrangea varieties are suitable for water propagation, and some may perform better than others. Popular varieties like Bigleaf, Panicle, and Oakleaf are known to thrive in water-based propagation systems. Bigleaf hydrangeas, for example, are ideal for water propagation due to their large, showy flowers and robust root systems. Panicle hydrangeas, on the other hand, are known for their ease of propagation and can produce roots in as little as 7-10 days. Oakleaf hydrangeas, with their distinctive oak-shaped leaves, are also well-suited for water propagation and can produce roots in 10-14 days. By choosing a hydrangea variety that is specifically bred for water propagation, you can increase your chances of success and reduce the risk of root rot and other common issues.

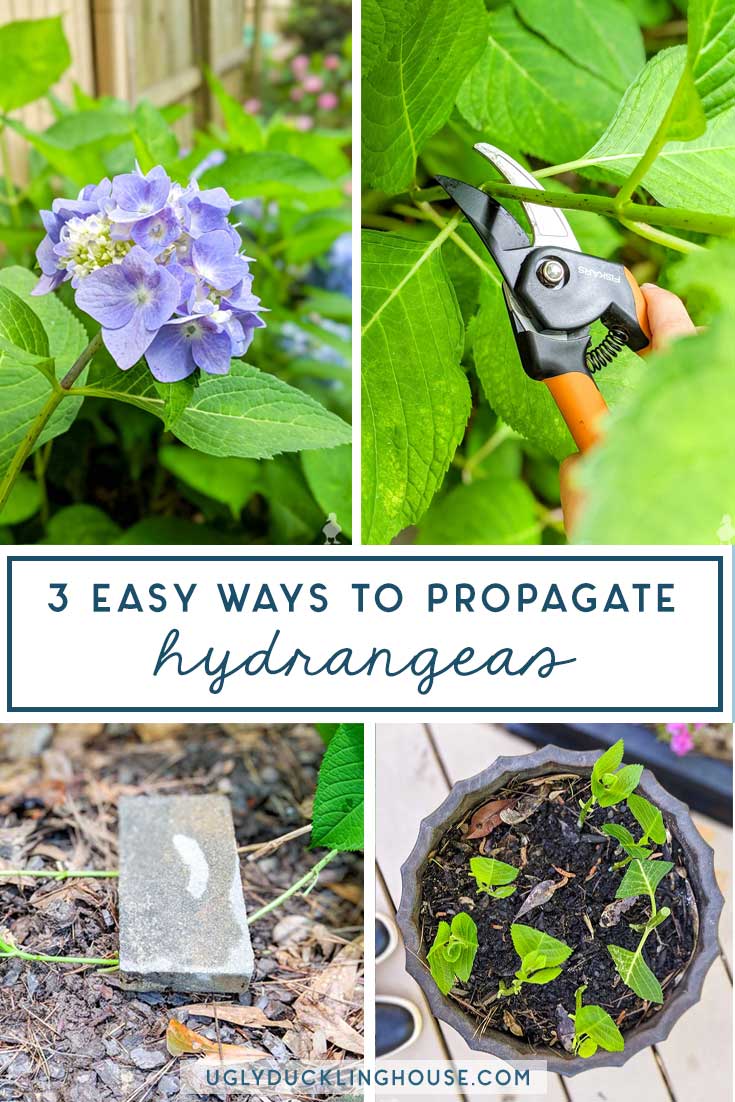
How to Take Hydrangea Cuttings for Water Propagation
When it comes to learning how to propagate hydrangea cuttings in water, taking healthy cuttings is a crucial step in the process. To increase your chances of success, it’s essential to take cuttings at the right time and prepare them properly. The best time to take hydrangea cuttings is in the early morning, when the stems are at their highest water content. Cuttings should be taken from the current season’s growth, and should be around 3-5 inches in length. Avoid taking cuttings from weak or damaged stems, as these can reduce the chances of successful propagation. To prepare the cut ends, cut just above a node (where a leaf meets the stem) using a sharp, clean knife or pruning tool. Remove any lower leaves that will be below the waterline, leaving only a few leaves at the top of the cutting. This will help prevent the cutting from rotting and reduce the risk of root rot. By following these simple steps, you can take healthy hydrangea cuttings that are ready for water propagation.

The Art of Preparing Hydrangea Cuttings for Water
Once you have taken healthy hydrangea cuttings, the next step is to prepare them for water propagation. This crucial step can make all the difference in the success of your propagation efforts. To prepare your cuttings, start by removing any lower leaves that will be below the waterline. This helps prevent the cutting from rotting and reduces the risk of root rot. Next, treat the cut ends with a rooting hormone powder or liquid to stimulate root growth. This can increase the chances of successful propagation and help roots develop faster. Finally, trim any excess foliage from the cutting, leaving only a few leaves at the top. This helps reduce transpiration and prevents the cutting from drying out. By following these simple steps, you can prepare your hydrangea cuttings for water propagation and set them up for success. Remember, when learning how to propagate hydrangea cuttings in water, proper preparation is key to achieving high success rates and healthy root development.

Setting Up Your Water Propagation Station
When it comes to learning how to propagate hydrangea cuttings in water, setting up a proper water propagation station is crucial for success. The type of container used can make a big difference in the health and development of the cuttings. A clear glass or plastic container is ideal, as it allows for easy monitoring of root growth and water quality. The container should be clean and sterile to prevent the growth of bacteria and fungi. Fill the container with distilled or dechlorinated water, as chlorine can inhibit root growth. The ideal water temperature for hydrangea propagation is between 65-75°F (18-24°C), which promotes healthy root development. To maintain water quality, change the water every 2-3 weeks or when it becomes cloudy. This will prevent the buildup of bacteria and fungi that can harm the cuttings. By setting up a proper water propagation station, you can create an optimal environment for your hydrangea cuttings to thrive and develop healthy roots.

The Waiting Game: What to Expect During Water Propagation
Once you’ve set up your water propagation station and prepared your hydrangea cuttings, it’s time to wait for roots to develop. This can be the most patience-testing part of the process, but understanding what to expect can help you stay on track. When learning how to propagate hydrangea cuttings in water, it’s essential to monitor the cuttings regularly for signs of root growth. Roots typically begin to develop within 1-2 weeks, but it can take up to 4-6 weeks for a robust root system to form. During this time, check the cuttings daily for signs of root growth, such as white roots or a slight resistance when gently tugging on the cutting. Common issues to watch out for include bacterial or fungal growth, which can be prevented by maintaining good water quality and changing the water regularly. By understanding the water propagation process and what to expect, you can increase your chances of success and enjoy the rewards of propagating hydrangea cuttings in water.
Transplanting Your Hydrangea Cuttings to Soil
Once roots have developed and the cuttings are ready, it’s time to transplant them into soil. This is a critical step in the process of how to propagate hydrangea cuttings in water, as it requires careful handling to ensure the cuttings thrive in their new environment. To harden off the cuttings, gradually introduce them to outdoor conditions over the course of 7-10 days, starting with indirect sunlight and increasing exposure to direct sunlight. Choose a well-draining potting mix specifically designed for hydrangeas, and plant the cuttings at the same depth as they were in the water. Water thoroughly after transplanting and keep the soil consistently moist during the first few weeks. After transplanting, continue to provide the right conditions for the cuttings to grow, including adequate light, water, and nutrients. With proper care, the cuttings will develop into healthy, thriving hydrangea plants. By following these steps, you can successfully transplant your hydrangea cuttings from water to soil and enjoy the fruits of your labor.

Tips and Tricks for Successful Hydrangea Propagation in Water
To increase success rates when learning how to propagate hydrangea cuttings in water, it’s essential to pay attention to detail and avoid common mistakes. One key tip is to use fresh, healthy cuttings with at least two nodes, as these will have a higher chance of developing roots. Another important consideration is water quality, as stagnant or contaminated water can lead to root rot and poor growth. Regularly changing the water and adding a few drops of hydrogen peroxide can help prevent these issues. Additionally, providing the right environment for the cuttings, including adequate light and temperature control, can significantly impact success rates. By following these tips and tricks, you can troubleshoot common issues and optimize your chances of successfully propagating hydrangea cuttings in water. For example, if you notice the cuttings are not developing roots, try adjusting the water temperature or adding more rooting hormone. With patience and practice, you can master the art of hydrangea propagation in water and enjoy the many benefits it has to offer.