Why Replanting is Crucial for Orchid Health
Replanting an orchid is a crucial step in maintaining its overall health and promoting healthy growth. Over time, the potting media can break down, causing the roots to become waterlogged and leading to root rot. Additionally, the orchid’s roots can outgrow the pot, becoming root-bound and restricting the plant’s ability to absorb essential nutrients. By replanting the orchid, you can provide fresh potting media, prune old roots, and give the plant room to grow, ultimately revitalizing its health and encouraging blooming.
Orchids are known for their exquisite beauty and delicate nature, but they can be finicky plants to care for. One of the most common mistakes orchid enthusiasts make is not replanting their orchids often enough. This can lead to a range of problems, including stunted growth, reduced blooming, and increased susceptibility to pests and diseases. By learning how to replant an orchid, you can help prevent these issues and keep your plant thriving.
When considering how to replant an orchid, it’s essential to understand the benefits of this process. Replanting provides an opportunity to inspect the roots, remove any dead or damaged tissue, and trim back overgrown roots. This helps to prevent root rot and promotes healthy growth. Additionally, replanting allows you to refresh the potting media, which can become depleted of essential nutrients over time.
By replanting your orchid, you can help to maintain its overall health, promote healthy growth, and encourage blooming. Whether you’re a seasoned orchid enthusiast or just starting out, learning how to replant an orchid is an essential skill that can help you keep your plant thriving. In the following sections, we’ll explore the best time to replant your orchid, how to prepare it for replanting, and provide a step-by-step guide on how to replant an orchid.
Choosing the Right Time to Replant Your Orchid
When it comes to replanting an orchid, timing is everything. Replanting at the right time can make all the difference in the success of the process. So, when is the best time to replant an orchid? The answer depends on several factors, including the type of orchid, its growth cycle, and the climate you live in.
In general, spring and summer are the best seasons to replant an orchid. During these seasons, the plant is actively growing, and the warmer temperatures and increased humidity provide ideal conditions for replanting. Additionally, replanting during the spring and summer allows the orchid to establish itself in its new pot before the cooler winter months.
It’s also essential to consider the orchid’s growth cycle when deciding when to replant. Orchids typically go through a period of active growth, followed by a period of dormancy. Replanting during the active growth phase can help the orchid establish itself more quickly in its new pot.
Another factor to consider is the signs that indicate the need for replanting. If the orchid’s roots have outgrown the pot, or if the potting media is breaking down, it’s likely time to replant. Additionally, if the orchid is showing signs of nutrient deficiency or is not blooming as frequently as it once did, replanting may be necessary.
By choosing the right time to replant your orchid, you can help ensure the success of the process and give your plant the best chance to thrive. In the next section, we’ll discuss how to prepare your orchid for replanting, including tips on watering, fertilizing, and pruning old flowers and stems.
Preparing Your Orchid for Replanting
Before replanting your orchid, it’s essential to prepare the plant properly to ensure a successful transition. This involves a few simple steps that will help your orchid thrive in its new pot. In this section, we’ll discuss the importance of watering, fertilizing, and pruning old flowers and stems before replanting.
Watering is a critical step in preparing your orchid for replanting. About a week before replanting, reduce watering to allow the potting media to dry out slightly. This will help prevent the roots from becoming waterlogged and make it easier to handle the roots during replanting. However, be careful not to underwater, as this can cause stress to the plant.
Fertilizing is also essential before replanting. Feed your orchid with a balanced, water-soluble fertilizer to provide it with the necessary nutrients for healthy growth. This will help your orchid recover from any stress caused by replanting and promote new growth.
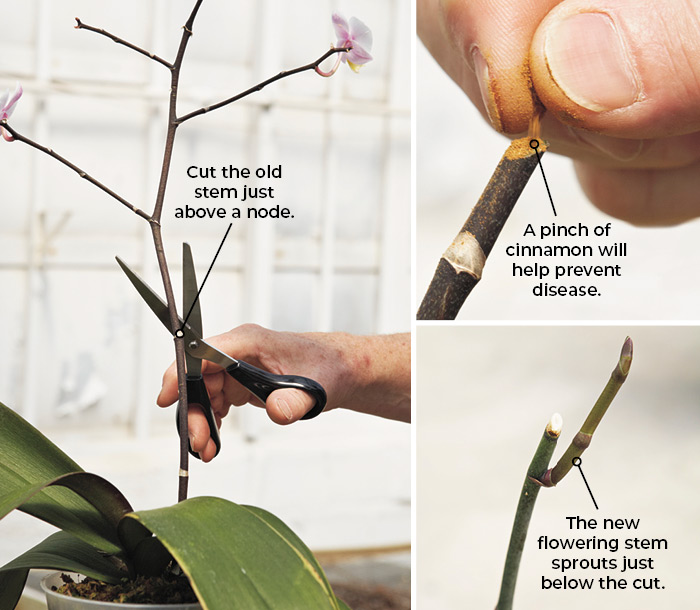
Pruning old flowers and stems is another crucial step in preparing your orchid for replanting. Remove any dead or dying flowers and stems to prevent the spread of disease and encourage new growth. Use sterile scissors or pruning shears to prevent the spread of disease, and make clean cuts just above a node to promote new growth.
By following these simple steps, you can help prepare your orchid for replanting and ensure a successful transition to its new pot. In the next section, we’ll discuss the importance of selecting the right potting mix for your orchid, including the characteristics of a good potting mix and how to choose the right one for your plant.
Selecting the Perfect Potting Mix for Your Orchid
When it comes to replanting an orchid, selecting the right potting mix is crucial for the plant’s success. A good potting mix should provide the right balance of drainage, aeration, and moisture retention to support healthy root growth and prevent root rot. In this section, we’ll discuss the characteristics of a good potting mix for orchids and provide tips on how to choose the right one for your plant.
A good potting mix for orchids should be well-draining, meaning it should allow excess water to drain quickly and prevent waterlogging. This is especially important for orchids, which are prone to root rot if the roots are too wet. Look for a potting mix that contains ingredients like perlite, vermiculite, or sand, which help to improve drainage and aeration.
In addition to good drainage, a potting mix for orchids should also provide adequate aeration. This means that the mix should contain ingredients that allow for air to reach the roots, such as charcoal or sphagnum moss. Aeration is essential for healthy root growth and helps to prevent root rot.
Moisture retention is also an important characteristic of a good potting mix for orchids. The mix should be able to retain enough moisture to support healthy root growth, but not so much that it becomes waterlogged. Look for a potting mix that contains ingredients like peat moss or coconut coir, which help to retain moisture without becoming too wet.
When selecting a potting mix for your orchid, be sure to read the ingredient list carefully and look for the characteristics mentioned above. Avoid potting mixes that contain too much fertilizer or other additives, as these can burn the roots and cause more harm than good. By choosing the right potting mix for your orchid, you can help ensure a successful replanting and support healthy growth.
A Step-by-Step Guide to Replanting Your Orchid
Now that you have prepared your orchid for replanting and selected the perfect potting mix, it’s time to replant your orchid. In this section, we’ll provide a detailed, step-by-step guide on how to replant an orchid, including removing the plant from its pot, trimming old roots, and placing the plant in its new pot.
Step 1: Remove the Plant from Its Pot
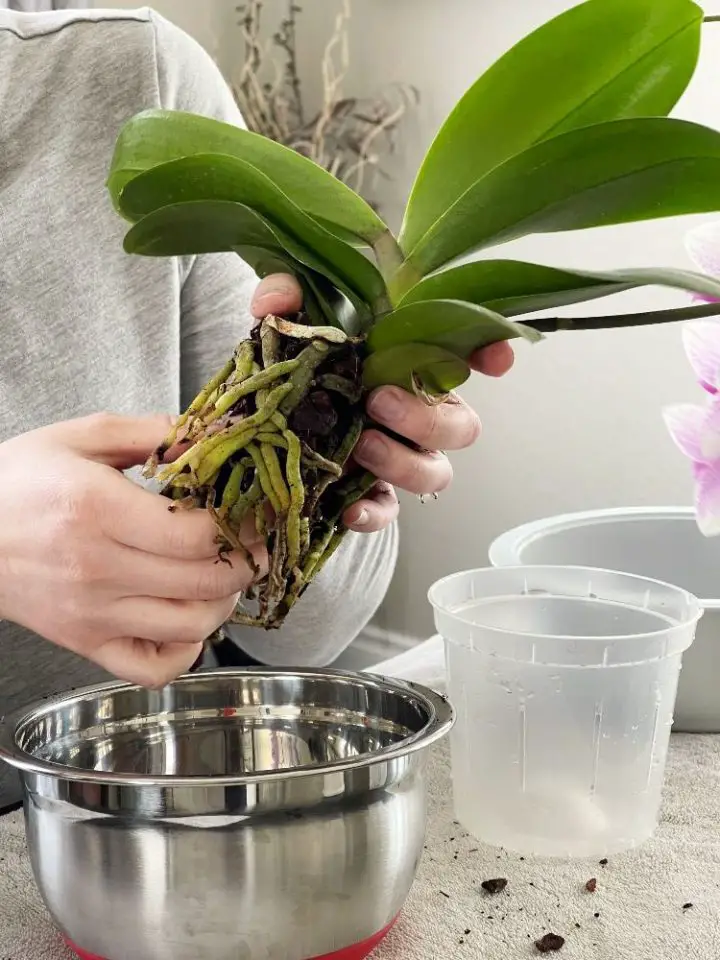
Gently remove the orchid from its pot, taking care not to damage the roots or disturb the plant. If the plant is stuck to the pot, you can run a knife or spatula around the inside of the pot to loosen it.
Step 2: Trim Old Roots
Using a pair of sterile scissors or pruning shears, trim away any dead or damaged roots. This will help prevent the spread of disease and encourage new growth.
Step 3: Inspect the Roots
Inspect the roots of the orchid, looking for any signs of damage or disease. If you notice any problems, you can treat the roots with a fungicide or bactericide before replanting.
Step 4: Place the Plant in Its New Pot
Gently place the orchid in its new pot, making sure the plant is centered and the roots are spread out evenly. Add a small amount of potting mix to the pot, just enough to cover the roots.
Step 5: Water the Plant
Water the orchid thoroughly after replanting, making sure the potting mix is moist but not waterlogged. This will help the plant settle into its new pot and reduce stress.
By following these steps, you can successfully replant your orchid and give it the best chance to thrive. Remember to provide your orchid with the right care and attention after replanting, including watering, fertilizing, and monitoring for pests and diseases.
Post-Replanting Care: Tips for Encouraging Healthy Growth
After replanting your orchid, it’s essential to provide the right care to encourage healthy growth and prevent common problems. In this section, we’ll discuss the importance of watering, fertilizing, and monitoring for pests and diseases after replanting.
Watering is crucial after replanting, as the orchid needs time to adjust to its new potting mix and pot. Water the orchid thoroughly after replanting, and then reduce watering to once a week. This will help the orchid settle into its new pot and prevent root rot.
Fertilizing is also essential after replanting, as it provides the orchid with the necessary nutrients for healthy growth. Use a balanced, water-soluble fertilizer, and follow the instructions on the label for application rates. Fertilize the orchid once a month, and avoid fertilizing during the winter months when the orchid is dormant.
Monitoring for pests and diseases is also crucial after replanting. Check the orchid regularly for signs of pests, such as mealybugs, spider mites, and scale. Also, inspect the orchid for signs of disease, such as yellowing leaves, black spots, and root rot. If you notice any problems, treat the orchid promptly with insecticidal soap or a fungicide.
In addition to watering, fertilizing, and monitoring for pests and diseases, it’s also essential to provide the orchid with the right environment. Place the orchid in a bright, sunny location, but avoid direct sunlight, which can cause the leaves to become scorched. Maintain a consistent temperature between 65-75°F (18-24°C), and provide high humidity to promote healthy growth.
By following these tips, you can encourage healthy growth and prevent common problems after replanting your orchid. Remember to be patient, as the orchid may take some time to adjust to its new pot and potting mix.
Common Mistakes to Avoid When Replanting an Orchid
Replanting an orchid can be a delicate process, and making mistakes can be costly. In this section, we’ll discuss common mistakes to avoid when replanting an orchid, including over-handling the roots, using too much potting mix, and not providing sufficient humidity.
Over-handling the roots is a common mistake that can cause damage to the orchid’s roots. When replanting, it’s essential to handle the roots gently and avoid touching them excessively. This can cause the roots to become bruised or damaged, leading to root rot and other problems.
Using too much potting mix is another mistake to avoid. While it’s essential to provide enough potting mix to support the orchid’s roots, using too much can cause the roots to become waterlogged. This can lead to root rot and other problems, so it’s essential to use the right amount of potting mix.
Not providing sufficient humidity is also a common mistake. Orchids thrive in humid environments, and not providing enough humidity can cause the leaves to become dry and brittle. To avoid this, make sure to provide a humid environment for your orchid, either by placing the pot on a tray filled with water and pebbles or by using a humidifier.
Other common mistakes to avoid when replanting an orchid include not pruning old roots, not providing enough light, and not fertilizing the orchid after replanting. By avoiding these mistakes, you can help ensure a successful replanting and promote healthy growth.
By being aware of these common mistakes, you can take steps to avoid them and ensure a successful replanting. In the next section, we’ll discuss troubleshooting common issues that may arise after replanting an orchid.
Troubleshooting Common Issues After Replanting
After replanting an orchid, it’s not uncommon to encounter some common issues. In this section, we’ll discuss some of the most common problems that may arise after replanting an orchid, including root rot, leaf drop, and slow growth.
Root rot is a common problem that can occur after replanting an orchid. This is usually caused by overwatering, which can cause the roots to become waterlogged and rot. To prevent root rot, make sure to water your orchid carefully and avoid getting water on the roots. If you notice any signs of root rot, such as soft, mushy roots or a foul odor, treat the orchid with a fungicide and repot it in fresh potting mix.
Leaf drop is another common issue that can occur after replanting an orchid. This is usually caused by stress, which can be triggered by changes in temperature, humidity, or light. To prevent leaf drop, make sure to provide your orchid with a stable environment and avoid making any sudden changes. If you notice any leaves dropping, remove them immediately to prevent the spread of disease.
Slow growth is a common problem that can occur after replanting an orchid. This is usually caused by a lack of nutrients, which can be triggered by inadequate fertilization. To prevent slow growth, make sure to fertilize your orchid regularly and provide it with a balanced diet of nutrients. If you notice any signs of slow growth, such as yellowing leaves or stunted growth, treat the orchid with a fertilizer and provide it with more light.
By troubleshooting common issues after replanting an orchid, you can help ensure a successful replanting and promote healthy growth. Remember to be patient and monitor your orchid closely after replanting, as it may take some time for it to adjust to its new environment.


