Selecting the Ideal Space: Factors to Consider for Your Vegetable Garden
When learning how to start a vegetable garden from seeds, one of the crucial initial steps is choosing the perfect location for your garden. This decision significantly impacts the growth and development of your plants, as several factors contribute to creating an optimal environment. By understanding these factors and implementing appropriate measures, you can ensure your vegetable garden thrives and yields a bountiful harvest.

Click Image to Find Garden Products
First and foremost, consider the amount of sunlight your garden space receives. Most vegetables require at least six to eight hours of direct sunlight daily for healthy growth. Assess your potential garden sites throughout the day to determine which areas receive the most consistent and intense sunlight exposure. Keep in mind that some vegetables, such as lettuce and spinach, can tolerate partial shade, making them suitable options for areas with limited sunlight.
Another essential factor when learning how to start a vegetable garden from seeds is soil quality. Ideally, your garden soil should be well-draining, loose, and rich in organic matter. To evaluate your soil’s drainage capabilities, dig a small hole approximately six inches deep and fill it with water. If the water drains within an hour, your soil has adequate drainage. If it takes longer, consider amending your soil with organic matter, such as compost or well-rotted manure, to improve its structure and drainage.
Soil pH is another critical aspect of soil quality. Most vegetables prefer slightly acidic to neutral soil, with a pH between 6.0 and 7.0. Test your soil’s pH using a home testing kit or sending a sample to a local extension service. If your soil’s pH is outside this range, consider amending it with lime to raise the pH or sulfur to lower it. Regularly monitoring and adjusting your soil’s pH ensures your vegetables have access to the necessary nutrients for optimal growth.
Lastly, when learning how to start a vegetable garden from seeds, ensure your garden site is easily accessible to water sources. Consistent watering is crucial for seed germination and plant growth, especially during the establishment phase. If your garden site is not close to a water source, consider installing a drip irrigation system or using soaker hoses to conserve water and ensure your plants receive the necessary moisture.

Procuring Seeds: A Primer on Selecting the Best Varieties for Your Garden
An essential step in learning how to start a vegetable garden from seeds is acquiring the right seeds for your garden space. Selecting the perfect varieties for your climate, garden size, and personal preferences can significantly impact your gardening experience and the overall success of your vegetable garden. By understanding the process of purchasing and acquiring vegetable seeds, as well as employing seed-saving techniques for long-term sustainability, you can create a thriving and diverse garden tailored to your unique needs and preferences.
When procuring vegetable seeds, consider purchasing from reputable seed suppliers. These companies often offer a wide variety of seed types, ensuring you have access to the best options for your region and gardening goals. Some well-known seed suppliers include Baker Creek Heirloom Seeds, Botanical Interests, and High Mowing Organic Seeds. These companies prioritize seed quality, variety, and regional adaptability, making them excellent resources for home gardeners.
In addition to purchasing seeds from seed suppliers, consider acquiring seeds from local sources, such as gardening clubs, seed exchanges, or fellow gardeners. These seeds often have a proven track record of success in your specific region, increasing the likelihood of a successful harvest. Furthermore, exchanging seeds with other gardeners fosters a sense of community and collaboration, enhancing your overall gardening experience.
When selecting vegetable seeds, consider factors such as your climate, garden space, and personal preferences. For example, if you live in a region with a short growing season, focus on selecting vegetables that mature quickly, such as radishes, arugula, or bush beans. Conversely, if you have ample garden space, consider growing larger vegetables, like tomatoes, peppers, or squash, which require more room to grow and produce higher yields.
Personal preferences also play a significant role in seed selection. If you enjoy cooking with specific herbs or vegetables, prioritize seeds for those plants in your garden. Additionally, consider selecting seeds for unique or heirloom varieties to add visual interest and diversity to your garden. Heirloom vegetables often have distinct flavors, textures, and histories, making them exciting and rewarding choices for home gardeners.
Lastly, to foster long-term sustainability in your vegetable garden, consider implementing seed-saving techniques. Seed saving involves preserving seeds from your current harvest for use in future plantings. This practice not only reduces the cost of purchasing new seeds each year but also promotes genetic diversity and resilience in your garden. To successfully save seeds, ensure you are harvesting from open-pollinated or heirloom varieties, as hybrid seeds may not produce true to their parent plants.

Preparing the Soil: Essential Steps for a Nutrient-Rich Growing Medium
Properly preparing the soil is a crucial step in learning how to start a vegetable garden from seeds, as it directly impacts seed germination, plant growth, and overall yield. By following a series of essential steps, including soil testing, amending, and tilling, you can create an ideal growing medium that supports healthy plant development and ensures a successful gardening experience.
Begin by testing your soil to determine its pH level, nutrient content, and drainage capabilities. Soil testing kits, available at most garden centers or online, provide a simple and accurate method for evaluating these factors. Once you have obtained your soil test results, you can then amend your soil as needed to create the optimal growing conditions for your vegetable garden.
For most vegetable gardens, maintaining a slightly acidic to neutral soil pH, between 6.0 and 7.0, is ideal. If your soil test indicates that your pH is outside this range, consider amending your soil with lime to raise the pH or sulfur to lower it. Additionally, ensure your soil contains adequate levels of essential nutrients, such as nitrogen, phosphorus, and potassium, by incorporating organic matter, such as compost, well-rotted manure, or aged leaf litter, into your soil.
Tilling, or turning over, your soil is another essential step in preparing your garden for seed planting. Tilling helps to break up compacted soil, improve drainage, and incorporate amendments, ensuring a consistent and well-aerated growing medium. For small to medium-sized gardens, a manual garden tiller or broadfork is often sufficient. For larger gardens, consider using a motorized rototiller to make the process more efficient.
When tilling your soil, aim for a depth of six to eight inches, which allows for adequate root penetration and nutrient access. Be mindful of existing weed populations, as tilling can inadvertently spread weed seeds throughout your garden. To minimize this risk, consider solarizing your soil by covering it with a clear plastic tarp for several weeks during the hottest months of the year. This process kills existing weed seeds and reduces the overall weed pressure in your garden.
Lastly, ensure your garden has proper drainage to prevent waterlogging, which can lead to root rot and other detrimental issues. If your soil test indicates poor drainage, consider incorporating organic matter, such as peat moss or perlite, to improve its structure and promote better water flow. Additionally, consider creating raised garden beds, which provide improved drainage and increased control over soil composition.

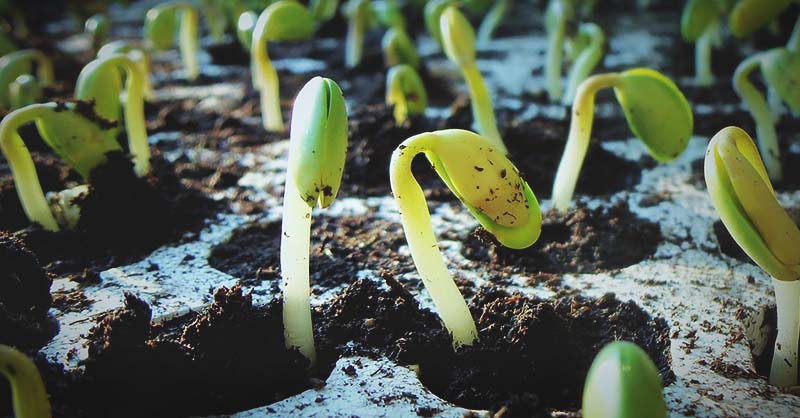
Sowing Seeds: Techniques and Best Practices for Successful Germination
Once you have prepared the soil for your vegetable garden, it’s time to focus on sowing the seeds and promoting successful germination. By understanding the proper techniques for seed depth, spacing, and watering requirements, you can maximize your chances of a thriving garden and enjoy the rewards of homegrown produce. Additionally, creating a suitable planting schedule based on regional climate conditions and average frost dates ensures a productive and efficient gardening experience.
Begin by carefully reading the seed packets for specific planting instructions, as different vegetable varieties have unique requirements. In general, sow seeds at a depth of two to three times their width, which typically ranges from one-quarter to one-half inch deep. Planting seeds too deeply can hinder germination, while planting them too shallowly may expose them to excessive moisture loss or predation from birds and insects.
Proper seed spacing is also crucial for successful germination and plant growth. Planting seeds too closely together can lead to overcrowding, which may result in reduced yields, poor air circulation, and increased susceptibility to diseases. To ensure adequate spacing, follow the guidelines provided on the seed packets or consult a reliable gardening resource. For smaller seeds, consider using a seedling grid or planting guide to maintain consistent spacing.
Watering is another critical factor in promoting successful seed germination. Maintaining consistent soil moisture is essential, as seeds and emerging seedlings are particularly vulnerable to drying out. However, avoid overwatering, as excess moisture can lead to fungal issues and other problems. To strike the right balance, water your garden consistently, aiming for a consistently moist—but not waterlogged—soil environment.
Creating a suitable planting schedule is also vital for a successful vegetable garden. By considering regional climate conditions and average frost dates, you can optimize your planting schedule to maximize yields and minimize the risk of frost damage. In colder climates, consider starting seeds indoors or in a greenhouse several weeks before the last expected frost date, allowing seedlings to establish themselves before being transplanted outdoors. In warmer climates, direct seeding may be a more viable option, with planting times adjusted to avoid excessive heat and drought conditions.
Lastly, be prepared to adapt your planting schedule as needed based on local weather patterns and conditions. Monitor weather forecasts and adjust your planting schedule accordingly, taking advantage of milder temperatures and avoiding periods of extreme heat, cold, or drought. By remaining flexible and responsive to your local climate, you can create an optimal environment for your vegetable garden and enjoy a bountiful harvest.
Nurturing Seedlings: Essential Care and Maintenance Tips
As your vegetable seedlings emerge and grow, it’s essential to provide them with proper care and maintenance to ensure their health and vigor. By addressing topics such as watering, fertilizing, and hardening off, you can create an optimal environment for your seedlings and set the stage for a thriving vegetable garden. Additionally, understanding common seedling issues and implementing preventative measures can help you avoid potential problems and maximize your gardening success.
Watering is a critical aspect of seedling care, as young plants require consistent moisture to establish strong root systems and promote healthy growth. However, overwatering can lead to fungal issues and other problems. To strike the right balance, water your seedlings consistently, aiming for a consistently moist—but not waterlogged—soil environment. Consider using a watering can with a narrow spout or a mister to gently apply water directly to the soil, minimizing the risk of damaging delicate seedlings.
Fertilizing seedlings is another essential consideration for a successful vegetable garden. As young plants require a consistent supply of nutrients to fuel their growth, consider using a balanced, water-soluble fertilizer to provide essential nutrients. Dilute the fertilizer to half the recommended strength and apply it every two to four weeks, following the manufacturer’s instructions. Be cautious not to over-fertilize, as excessive nutrient levels can lead to weak, leggy growth and other issues.
Hardening off is a crucial process for preparing seedlings grown indoors or in a greenhouse for outdoor transplanting. By gradually exposing your seedlings to outdoor conditions, you can help them acclimate to temperature fluctuations, wind, and direct sunlight, reducing the risk of transplant shock and promoting healthy growth. Begin by placing your seedlings in a sheltered, shady location for a few hours each day, gradually increasing their exposure to sunlight and wind over the course of one to two weeks. Once your seedlings have adjusted to outdoor conditions, they will be ready for transplanting into their final garden positions.
Common seedling issues include leggy growth, damping off, and pest infestations. Leggy growth, characterized by tall, spindly stems and small leaves, can be addressed by providing adequate light and maintaining proper spacing between seedlings. Damping off, a fungal disease that causes seedlings to collapse and die, can be prevented by ensuring good air circulation, practicing proper watering techniques, and using sterile seed-starting mix. Pest infestations, such as aphids, whiteflies, and spider mites, can be managed through the use of insecticidal soap, beneficial insects, or sticky traps.
By following these essential care and maintenance tips, you can nurture your seedlings into strong, healthy plants, setting the stage for a productive and rewarding vegetable garden. With patience, dedication, and a proactive approach to garden maintenance, you’ll soon be enjoying the fruits of your labor and celebrating the satisfaction of growing your own fresh produce from seeds.
https://www.youtube.com/watch?v=WygacroTB8g
Transplanting Seedlings: Techniques for a Smooth Transition to the Garden
Once your vegetable seedlings have grown strong and healthy, it’s time to transplant them from their indoor germination trays or outdoor seed beds to their final garden positions. By employing proper transplanting techniques and taking steps to minimize transplant shock, you can ensure a smooth transition for your seedlings and promote continued growth and development. In this section, we will discuss the process of transplanting seedlings and offer advice on how to ensure a successful transition to outdoor growing conditions.
Begin by preparing your garden beds for transplanting. Ensure that the soil is well-tilled, amended, and free of weeds or debris. Create a well-draining, loose soil structure that will provide adequate space for root growth and development. If necessary, adjust the soil pH levels and organic matter content to maintain optimal growing conditions for your vegetable varieties.
Next, carefully remove your seedlings from their germination trays or seed beds, being mindful not to damage the roots or stems. For seedlings grown in trays, gently tap the container to loosen the soil and encourage the seedlings to slide out. For seedlings grown in seed beds, use a small trowel or hand fork to carefully lift the seedlings from the soil, taking care to preserve as much of the root system as possible.
Once you have removed your seedlings from their containers or seed beds, gently shake off any excess soil and inspect the roots for signs of damage or entanglement. If necessary, gently tease apart any matted or tangled roots, using your fingers or a small tool, to promote healthy root growth and prevent root-bound plants. This step is crucial for ensuring that your seedlings can establish strong, healthy root systems in their new garden positions.
To minimize transplant shock, it’s essential to transplant your seedlings on a cool, cloudy day or in the early evening, when temperatures are lower and sunlight intensity is reduced. This will help to prevent excessive moisture loss and reduce the stress on your seedlings during the transplanting process. Additionally, consider watering your seedlings thoroughly before transplanting, ensuring that the soil is evenly moist and that the roots are well-hydrated.
When transplanting your seedlings, dig a hole in the garden bed that is large enough to accommodate the entire root system. Gently place the seedling in the hole, ensuring that the soil level is consistent with the original seed bed or germination tray. Backfill the hole with soil, pressing down gently around the roots to remove any air pockets and promote good soil contact. Finally, water the seedlings thoroughly, providing enough moisture to settle the soil around the roots and establish firm contact between the soil and the seedling.
To further minimize transplant shock and promote healthy growth, consider using a transplanting solution or root stimulator, which can help to encourage root development and reduce stress on your seedlings. Additionally, provide shade cloth or other protection from direct sunlight for the first few days after transplanting, allowing your seedlings to gradually acclimate to their new environment and reducing the risk of sunburn or heat stress.
By following these essential transplanting techniques and taking steps to minimize transplant shock, you can ensure a smooth transition for your seedlings and promote continued growth and development in their final garden positions. With patience, dedication, and a proactive approach to garden maintenance, you’ll soon be enjoying the fruits of your labor and celebrating the satisfaction of nurturing your vegetable garden from seed to table.
![]()
Monitoring and Troubleshooting: Addressing Common Vegetable Garden Challenges
As your vegetable garden grows and thrives, it’s essential to remain vigilant and proactive in addressing common challenges that may arise. By understanding the potential issues that can impact your garden, such as pests, diseases, and weather-related concerns, you can implement effective solutions and prevention strategies to maintain optimal growth conditions and protect your plants from harm. In this section, we will discuss common challenges faced in vegetable gardens and offer guidance on how to monitor, troubleshoot, and maintain a thriving garden environment.
Pests
Pests are a common challenge in vegetable gardens, with a variety of insects and animals capable of causing damage to plants. To monitor for pests, regularly inspect your garden for signs of damage, such as chewed leaves, tunneling in stems, or discolored foliage. Common vegetable garden pests include aphids, cutworms, flea beetles, slugs, and whiteflies. If you identify an infestation, consider using insecticidal soap, beneficial insects, or other organic pest control methods to manage the problem without resorting to harsh chemical pesticides.
Diseases
Diseases can also pose a significant challenge in vegetable gardens, with fungal, bacterial, and viral infections capable of impacting plant health. To monitor for diseases, look for signs such as discolored or wilted leaves, spots or lesions on foliage, and stunted growth. Common vegetable garden diseases include blight, powdery mildew, and root rot. To prevent diseases, practice crop rotation, maintain good air circulation, and ensure proper watering techniques. If a disease is identified, remove and destroy affected plants to prevent the spread of infection.
Weather-Related Issues
Weather-related issues, such as extreme temperatures, drought, or heavy rainfall, can significantly impact vegetable garden performance. To monitor for weather-related concerns, stay informed about local weather forecasts and adjust your gardening practices accordingly. For example, during periods of extreme heat, provide shade and additional water to protect your plants from sunburn and dehydration. In the event of heavy rainfall, ensure proper drainage to prevent waterlogging and root rot. By remaining proactive and adaptable in the face of weather-related challenges, you can maintain a thriving vegetable garden and protect your plants from potential harm.
By understanding and addressing common challenges faced in vegetable gardens, you can promote healthy growth, prevent issues before they arise, and maintain a thriving garden environment. With regular monitoring, diligent care, and a proactive approach to troubleshooting, you’ll be well on your way to enjoying the satisfaction of nurturing your garden from seed to table. Remember, the key to a successful vegetable garden is staying informed, engaged, and committed to providing the best possible care for your plants.

Harvesting and Storing Your Bounty: Enjoying the Fruits of Your Labor
As your vegetable garden reaches maturity and begins to yield a bountiful harvest, it’s essential to understand the proper techniques for harvesting and storing your homegrown produce. By following best practices for harvesting and storage, you can ensure maximum freshness, longevity, and flavor for your vegetables, allowing you to enjoy the fruits of your labor well beyond the growing season. In this section, we will offer advice on how to harvest and store your homegrown vegetables, celebrating the satisfaction of nurturing your garden from seed to table and considering the potential for expanding your gardening skills in the future.
Harvesting Techniques
Harvesting vegetables at the proper stage of maturity is crucial for ensuring optimal flavor, texture, and nutritional value. To determine the ideal harvesting time for your vegetables, consult the seed packet or plant tag for specific guidelines, as well as general recommendations for your specific vegetable varieties. In general, harvest vegetables when they have reached their full size but before they become overripe or fibrous. For root vegetables, such as carrots and beets, harvest when the roots have reached the desired size but before the quality begins to decline. For leafy greens, such as lettuce and spinach, harvest the outer leaves as needed, allowing the inner leaves to continue growing.
Storage Techniques
Proper storage is essential for maintaining the freshness and longevity of your homegrown vegetables. To store your vegetables effectively, consider the following techniques:
- Refrigeration: Store temperature-sensitive vegetables, such as leafy greens, herbs, and root vegetables, in the crisper drawer of your refrigerator, where they will benefit from higher humidity levels and cooler temperatures. Be sure to wrap leafy greens in damp paper towels to maintain moisture and prevent wilting.
- Counter Storage: Store vegetables that are sensitive to cold, such as tomatoes, peppers, and cucumbers, on the counter at room temperature. These vegetables will continue to ripen and develop flavor when stored properly.
- Cellaring: For long-term storage of root vegetables, such as carrots, beets, and potatoes, consider storing them in a cool, dark, well-ventilated space, such as a root cellar or basement. Be sure to store these vegetables in breathable containers, such as burlap bags or wooden crates, to prevent moisture buildup and spoilage.
Preserving Techniques
In addition to fresh consumption, consider preserving your homegrown vegetables to enjoy them throughout the year. Preservation techniques, such as canning, freezing, and dehydrating, can help extend the shelf life of your produce while maintaining flavor, texture, and nutritional value. By incorporating these preservation methods into your gardening routine, you can celebrate the satisfaction of nurturing your garden from seed to table and enjoy the fruits of your labor long after the growing season has ended.
By understanding the proper techniques for harvesting, storing, and preserving your homegrown vegetables, you can maximize the benefits of your vegetable garden and enjoy the satisfaction of nurturing your plants from seed to table. As you savor the fresh, flavorful produce from your garden, consider the potential for expanding your gardening skills in the future, experimenting with new vegetable varieties, and sharing your knowledge and experience with others. With dedication, curiosity, and a commitment to best practices, you can cultivate a thriving vegetable garden and enjoy the many rewards that come with it.