The Benefits of Taking Lavender Cuttings
Taking cuttings from lavender plants is a simple and effective way to propagate new plants, allowing gardeners to reproduce their favorite varieties, share plants with friends, and create new plants for garden expansion. This method of propagation is particularly useful for lavender, as it can be a slow process to grow from seed. By taking cuttings, gardeners can ensure that the new plants will have the same desirable traits as the parent plant, such as fragrance, color, and growth habit.

Click Image to Find Garden Products
One of the main advantages of taking lavender cuttings is that it allows gardeners to reproduce plants that are already thriving in their garden. This is especially useful for gardeners who have a favorite lavender variety that they want to replicate. By taking cuttings, they can create new plants that will have the same characteristics as the parent plant, ensuring that they will perform well in the same growing conditions.
In addition to reproducing favorite varieties, taking lavender cuttings is also a great way to share plants with friends and family. Lavender is a popular plant among gardeners, and being able to share cuttings with others can be a thoughtful and generous gesture. It’s also a great way to introduce others to the joys of growing lavender, and to help them get started with their own lavender garden.
Furthermore, taking lavender cuttings can be a cost-effective way to expand a garden. Instead of purchasing new plants, gardeners can take cuttings from their existing lavender plants and use them to create new plants. This can be especially useful for gardeners who are on a budget, or who want to create a large number of new plants.
Overall, taking lavender cuttings is a simple and effective way to propagate new plants, and it offers a number of benefits for gardeners. By reproducing favorite varieties, sharing plants with others, and expanding their garden, gardeners can enjoy the many rewards of growing lavender.
Choosing the Right Lavender Variety for Cuttings
When it comes to taking cuttings from lavender plants, selecting the right variety is crucial for success. Not all lavender varieties are created equal, and some are better suited for cuttings than others. To increase the chances of successful propagation, it’s essential to choose a healthy, disease-free lavender plant with desirable traits such as fragrance, color, and growth habit.
Some popular lavender varieties that are well-suited for cuttings include ‘Hidcote’ and ‘Munstead’. These varieties are known for their compact growth habit, vibrant purple flowers, and sweet fragrance. They are also relatively easy to propagate and can thrive in a variety of conditions.
When selecting a lavender plant for cuttings, look for one that is vigorous and healthy, with no signs of disease or pests. Avoid plants that are stressed or weakened, as they may not produce healthy cuttings. Also, consider the time of year and the plant’s growth cycle when taking cuttings. The best time to take cuttings from lavender is in the spring or summer, when the plant is actively growing.
In addition to choosing the right variety, it’s also important to consider the specific characteristics you want to propagate. For example, if you’re looking for a lavender with a strong fragrance, choose a variety that is known for its potent scent. If you’re looking for a compact growth habit, choose a variety that is naturally compact or dwarf.
By selecting the right lavender variety for cuttings, you can increase the chances of successful propagation and create new plants that will thrive in your garden. Remember to always choose healthy, disease-free plants and consider the specific characteristics you want to propagate.

Preparing the Tools and Materials
To take cuttings from lavender plants, you will need a few essential tools and materials. Having the right equipment will help ensure that your cuttings are successful and that you can provide the best possible care for your new plants.
First, you will need a sharp, clean knife or pruning tool. This will be used to cut the stem sections from the lavender plant. It’s essential to use a clean and sharp tool to prevent spreading diseases and to make a clean cut.
Next, you will need a pot or tray filled with a well-draining rooting medium. This can be a mix of peat moss, perlite, and vermiculite, or a commercial rooting medium. The rooting medium should be moist but not waterlogged, as this can cause the cuttings to rot.
A clear plastic bag or cloche will also be necessary to cover the pot or tray. This will help to maintain high humidity and provide a warm, stable environment for the cuttings to root.
Other materials you may need include a watering can or spray bottle, a pair of gloves, and a label or marker to identify the cuttings.
When preparing the tools and materials, make sure to sterilize the knife or pruning tool with a solution of one part bleach to nine parts water. This will help to prevent the spread of diseases and ensure that the cuttings are healthy.
By having the right tools and materials, you will be able to take healthy cuttings from your lavender plant and provide the best possible care for your new plants. Remember to always use clean and sharp tools, and to provide a well-draining rooting medium to help your cuttings succeed.
How to Take Cuttings from Lavender Plants
Taking cuttings from lavender plants is a straightforward process that requires some basic knowledge and attention to detail. To increase the chances of successful propagation, it’s essential to follow a step-by-step guide on how to take cuttings from lavender plants.
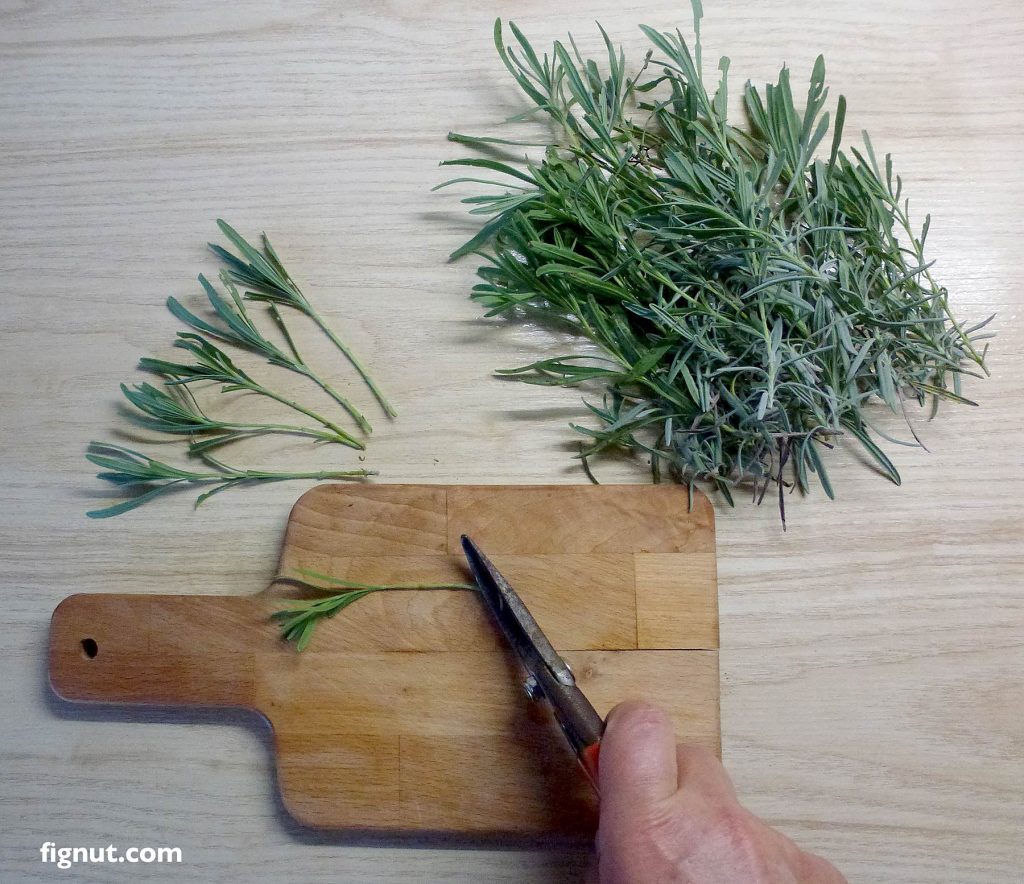
Step 1: Choose Healthy Stem Sections
Select healthy stem sections from the lavender plant, ideally with at least two nodes (the joint where a leaf meets the stem). Avoid taking cuttings from weak or damaged stems, as they may not root well.
Step 2: Cut the Stem Sections
Using a sharp, clean knife or pruning tool, cut the stem sections from the lavender plant. Make the cut just above a node, at a 45-degree angle, and about 1-2 inches from the tip of the stem.
Step 3: Remove Lower Leaves
Remove the lower leaves from the cut stem section, leaving only two or three sets of leaves at the top. This will help prevent the cutting from drying out and reduce the risk of fungal diseases.
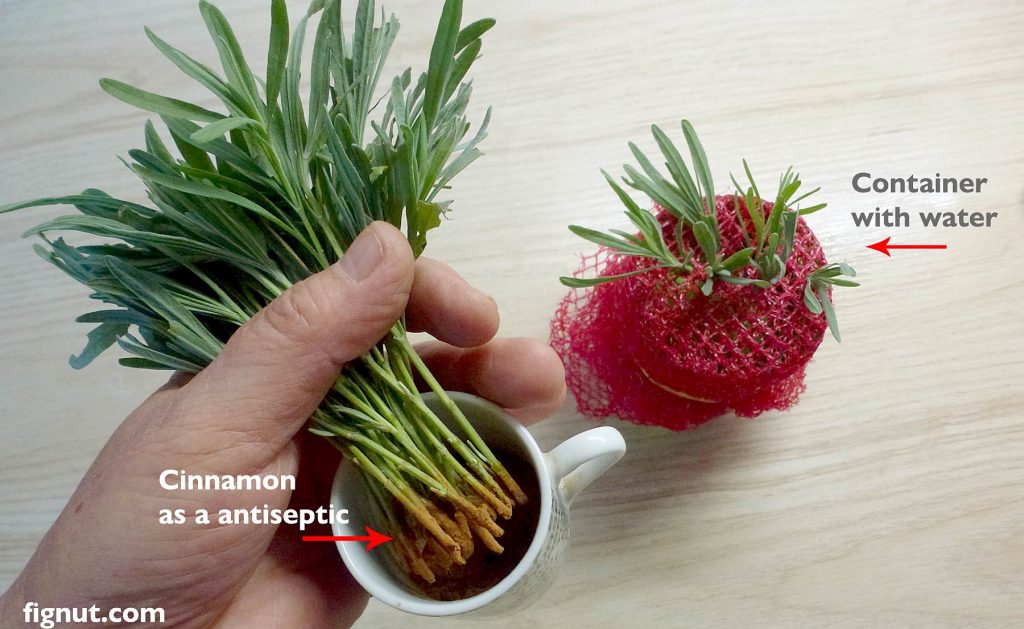
Step 4: Prepare the Cut Ends for Rooting
Dip the cut ends of the stem section into a rooting hormone powder or liquid, if desired. This will help stimulate root growth and increase the chances of successful propagation.
Step 5: Plant the Cuttings
Plant the cuttings in a pot or tray filled with a well-draining rooting medium. Firm the medium gently around the cutting to secure it in place. Water the cuttings thoroughly, and then cover the pot or tray with a clear plastic bag or cloche to maintain high humidity.
By following these steps, you can take healthy cuttings from your lavender plant and increase the chances of successful propagation. Remember to provide the right conditions for rooting, including high humidity, adequate light, and consistent moisture.
Rooting Lavender Cuttings: Tips and Techniques
Once you have taken the cuttings from your lavender plant, it’s essential to provide the right conditions for rooting. This will increase the chances of successful propagation and help your new plants thrive.
Maintaining High Humidity
High humidity is crucial for rooting lavender cuttings. You can achieve this by covering the pot or tray with a clear plastic bag or cloche. This will create a mini-greenhouse effect, maintaining high humidity and promoting root growth.
Providing Adequate Light
Lavender cuttings require adequate light to root successfully. Place the pot or tray in a bright, sunny location, but avoid direct sunlight, which can cause the cuttings to dry out.
Keeping the Rooting Medium Consistently Moist
It’s essential to keep the rooting medium consistently moist but not waterlogged. Check the medium daily, and water only when necessary. Overwatering can lead to root rot and poor rooting.
Using Rooting Hormones
Rooting hormones can be used to stimulate root growth and increase the chances of successful propagation. These hormones can be applied to the cut ends of the stem sections before planting. However, it’s essential to follow the manufacturer’s instructions and use the hormones sparingly, as excessive use can harm the cuttings.
Monitoring Temperature
The ideal temperature for rooting lavender cuttings is between 65°F to 75°F (18°C to 24°C). Avoid placing the pot or tray near heating or cooling vents, fireplaces, or drafty windows, as this can cause temperature fluctuations.
By following these tips and techniques, you can create an optimal environment for your lavender cuttings to root successfully. Remember to monitor the cuttings regularly and adjust the conditions as necessary to ensure the best possible results.

Caring for Lavender Cuttings During the Rooting Process
Caring for lavender cuttings during the rooting process is crucial for successful propagation. By monitoring and maintaining optimal conditions, you can help your cuttings develop strong roots and thrive.
Temperature
The ideal temperature for rooting lavender cuttings is between 65°F to 75°F (18°C to 24°C). Avoid placing the pot or tray near heating or cooling vents, fireplaces, or drafty windows, as this can cause temperature fluctuations.
Light
Lavender cuttings require adequate light to root successfully. Place the pot or tray in a bright, sunny location, but avoid direct sunlight, which can cause the cuttings to dry out.
Watering
Watering is critical during the rooting process. Check the rooting medium daily, and water only when necessary. Overwatering can lead to root rot and poor rooting.
Humidity
High humidity is essential for rooting lavender cuttings. You can maintain high humidity by covering the pot or tray with a clear plastic bag or cloche.
Pest and Disease Control
Regularly inspect your lavender cuttings for signs of pests or diseases. If you notice any issues, treat the cuttings promptly with insecticidal soap or fungicides.
Common Problems and Solutions
Some common problems that may arise during the rooting process include fungal diseases, pests, and poor rooting. To prevent fungal diseases, ensure good air circulation and avoid overwatering. To prevent pests, inspect your cuttings regularly and treat promptly if necessary. To improve rooting, ensure optimal temperature, light, and watering conditions.
By following these care tips, you can help your lavender cuttings develop strong roots and thrive. Remember to monitor your cuttings regularly and adjust the conditions as necessary to ensure the best possible results.

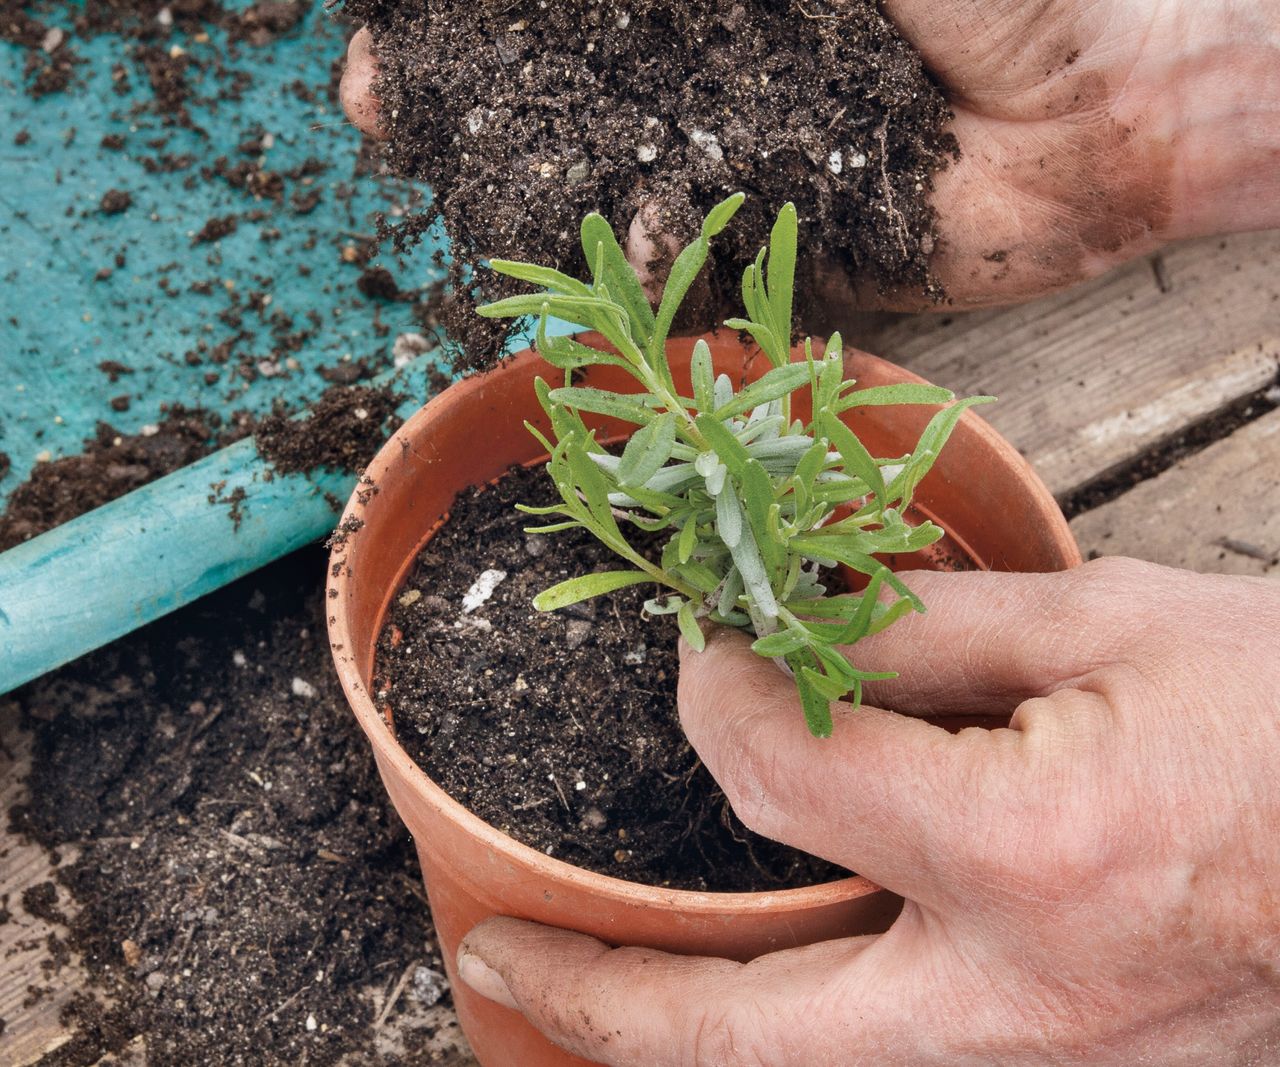
Transplanting Lavender Cuttings into Individual Pots
Once your lavender cuttings have developed a robust root system and are growing new leaves, it’s time to transplant them into individual pots. This will give the plants more room to grow and allow you to care for them more easily.
Selecting a Suitable Potting Mix
Choose a well-draining potting mix that is specifically designed for lavender plants. This type of mix will help prevent waterlogged soil and root rot, which can be detrimental to lavender plants.
Handling the Roots with Care
When transplanting the lavender cuttings, handle the roots with care to avoid damaging them. Gently remove the cuttings from the pot or tray, taking care not to disturb the roots. If the roots are tangled or circling, gently tease them apart with your fingers or a blunt instrument.
Providing Adequate Support
Lavender plants can grow quite tall, so provide adequate support for the plants as they grow. You can use stakes or a trellis to keep the plants upright and promote healthy growth.
Watering and Caring for the Transplanted Cuttings
After transplanting the lavender cuttings, water them thoroughly and provide the same care as you would for established lavender plants. Make sure the soil is consistently moist but not waterlogged, and provide full sun and good air circulation.
Timing is Everything
The best time to transplant lavender cuttings is in the spring or fall, when the weather is cooler and there is ample moisture in the soil. Avoid transplanting in the heat of summer, as this can cause stress to the plants and lead to poor growth.
By following these steps and providing the right care, you can successfully transplant your lavender cuttings into individual pots and enjoy the beauty and fragrance of these lovely plants for years to come.
Common Challenges and Troubleshooting
When taking lavender cuttings, you may encounter some common challenges that can affect the success of your propagation efforts. Here are some troubleshooting tips to help you overcome these challenges:
Poor Rooting
If your lavender cuttings are not rooting well, it may be due to a lack of humidity, inadequate light, or poor soil quality. To improve rooting, make sure to maintain high humidity, provide adequate light, and use a well-draining rooting medium.
Leaf Drop
Leaf drop can be a common problem when taking lavender cuttings. This can be caused by overwatering, underwatering, or sudden changes in temperature. To prevent leaf drop, make sure to water your cuttings carefully, and avoid sudden changes in temperature.
Pest Infestations
Pest infestations can be a major problem when taking lavender cuttings. To prevent pest infestations, make sure to inspect your cuttings regularly, and treat any infestations promptly with insecticidal soap or neem oil.
Fungal Diseases
Fungal diseases can be a common problem when taking lavender cuttings. To prevent fungal diseases, make sure to maintain good air circulation, avoid overwatering, and treat any infections promptly with fungicides.
Troubleshooting Tips
If you encounter any problems when taking lavender cuttings, here are some troubleshooting tips to help you overcome these challenges:
Check the rooting medium: Make sure the rooting medium is well-draining and not waterlogged.
Adjust the humidity: Make sure the humidity is high enough to promote rooting.
Provide adequate light: Make sure the cuttings are receiving adequate light to promote rooting.
Inspect the cuttings regularly: Regularly inspect the cuttings for signs of pests, diseases, or other problems.
Treat any problems promptly: Treat any problems promptly with insecticidal soap, neem oil, or fungicides.
By following these troubleshooting tips, you can overcome common challenges and achieve success when taking lavender cuttings.
