Unlocking the Secrets of Successful Stem Cuttings
Hydrangea propagation is a valuable skill for any gardener or horticulturist, allowing for the creation of new plants that can thrive and flourish. One of the most effective methods of hydrangea propagation is through stem cuttings, which offer a range of benefits including increased plant yields and reduced costs. By learning how to take hydrangea cuttings, gardeners can easily multiply their favorite varieties and share them with friends and family. This technique is particularly useful for hydrangea enthusiasts who want to propagate their favorite plants without relying on seed germination or division. With the right techniques and a little practice, anyone can master the art of taking hydrangea cuttings and enjoy the many benefits it has to offer.

Click Image to Find Garden Products
Choosing the Right Hydrangea Variety for Cuttings
When it comes to taking hydrangea cuttings, selecting the right variety is crucial for success. Not all hydrangeas are created equal, and some are more suitable for stem cuttings than others. Bigleaf hydrangeas, for example, are one of the most popular varieties for cuttings due to their large, showy flowers and ability to produce new growth quickly. Panicle hydrangeas, on the other hand, are also well-suited for cuttings, with their long, cone-shaped flowers and robust stems. Oakleaf hydrangeas, with their distinctive oak-shaped leaves, can also be propagated through stem cuttings, but may require more patience and care. By understanding the unique characteristics and needs of each variety, gardeners can increase their chances of successfully taking hydrangea cuttings and growing new, healthy plants.
How to Prepare Your Hydrangea Plant for Cuttings
Before taking hydrangea cuttings, it’s essential to prepare the parent plant to ensure optimal stem quality and increase the chances of successful propagation. One of the most critical steps is pruning, which helps to promote healthy growth and encourages the plant to produce new stems. Fertilizing the plant with a balanced fertilizer can also help to boost its overall health and vigor. Additionally, providing optimal growing conditions, such as plenty of sunlight, water, and nutrients, will help to strengthen the plant and make it more suitable for cuttings. By taking the time to properly prepare the parent plant, gardeners can increase their chances of taking healthy, vigorous cuttings that will thrive and grow into new plants. When learning how to take hydrangea cuttings, it’s crucial to remember that a healthy parent plant is the key to successful propagation.

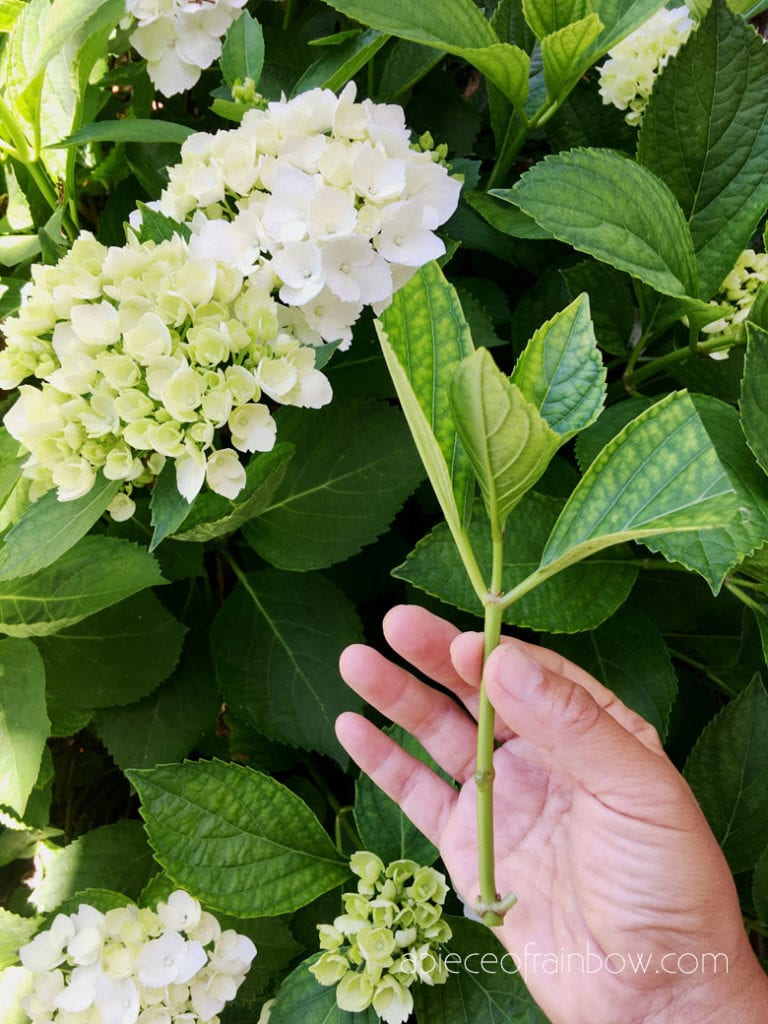
Identifying the Best Stem Sections for Cuttings
When it comes to taking hydrangea cuttings, selecting the right stem sections is crucial for successful propagation. The ideal stem section for cuttings should be around 3-5 inches long, with a thickness of about 1/4 inch. It’s also essential to choose stems with at least two nodes, which are the small, swollen areas on the stem where leaves meet the stem. Nodes are where roots are most likely to develop, so it’s vital to include at least two nodes in the cutting. Additionally, look for stems with a slightly woody base, as these tend to root more easily than soft, green stems. By identifying the best stem sections for cuttings, gardeners can increase their chances of successfully propagating new hydrangea plants. When learning how to take hydrangea cuttings, it’s crucial to understand the importance of selecting the right stem sections to ensure optimal results.
:max_bytes(150000):strip_icc()/Hydrangearootpowder-5851aac85f9b586e02478635.jpg)
The Art of Cutting and Preparing Hydrangea Stems
When it comes to taking hydrangea cuttings, the cutting and preparation process is a critical step in successful propagation. To begin, gather the necessary tools, including a sharp, clean knife or pruning shears, a pot filled with a well-draining rooting medium, and a rooting hormone powder or liquid. Next, identify the ideal stem section for cutting, as described earlier. Using a sharp, clean knife or pruning shears, cut the stem section from the parent plant, making a clean cut just above a node. Remove any lower leaves that will be below the soil line, leaving only a few leaves at the top of the cutting. Dip the cut end of the stem into the rooting hormone powder or liquid, following the manufacturer’s instructions. Finally, plant the cutting in the rooting medium, gently firming the soil around the stem to secure it in place. By following these steps and using the right tools and techniques, gardeners can increase their chances of successfully taking hydrangea cuttings and propagating new plants. When learning how to take hydrangea cuttings, it’s essential to master the art of cutting and preparing hydrangea stems to ensure optimal results.
Rooting Hydrangea Cuttings: Tips and Tricks
Once the hydrangea stems are cut and prepared, the next crucial step is to promote root growth. To increase the chances of successful rooting, it’s essential to provide the right conditions. Start by selecting a well-draining rooting medium, such as a mix specifically designed for cuttings. Water the medium gently but thoroughly, and then place the cuttings in a location with high humidity, such as a propagation dome or a clear plastic bag. Maintain a consistent temperature between 65-75°F (18-24°C) and ensure the cuttings receive bright, indirect light. Water the cuttings regularly, but avoid over-watering, which can lead to root rot. By following these tips and tricks, gardeners can create an ideal environment for hydrangea cuttings to develop strong, healthy roots. When learning how to take hydrangea cuttings, understanding the importance of proper rooting techniques is vital for successful propagation. By mastering the art of rooting hydrangea cuttings, gardeners can enjoy an abundance of new hydrangea plants, perfect for adding to their garden or sharing with friends and family.

Common Mistakes to Avoid When Taking Hydrangea Cuttings
While taking hydrangea cuttings can be a rewarding experience, it’s essential to be aware of common mistakes that can lead to failure. One of the most critical mistakes to avoid is over-handling the cuttings, which can cause damage to the stems and reduce the chances of successful propagation. Another common error is under-watering, which can lead to dehydration and poor root development. Additionally, using poor-quality soil or a rooting medium that is not well-draining can hinder root growth and increase the risk of root rot. When learning how to take hydrangea cuttings, it’s crucial to be mindful of these common mistakes and take steps to avoid them. By doing so, gardeners can increase their chances of success and enjoy an abundance of new hydrangea plants. Remember, mastering the art of taking hydrangea cuttings requires attention to detail and a willingness to learn from mistakes. By avoiding common pitfalls, gardeners can refine their skills and become proficient in the art of hydrangea propagation.

Aftercare and Transplanting: The Final Steps
Once the hydrangea cuttings have developed a robust root system, it’s time to transplant them into individual pots or directly into the garden. This final step requires careful attention to ensure the successful establishment of new hydrangea plants. When transplanting, handle the roots with care to avoid damaging them, and plant the cuttings at the same depth as they were previously rooted. Water thoroughly and provide adequate spacing to prevent overcrowding. For the first few weeks, maintain high humidity and provide partial shade to reduce stress. As the plants grow, gradually introduce them to full sun and normal watering schedules. By following these aftercare and transplanting techniques, gardeners can enjoy the fruits of their labor and watch their new hydrangea plants thrive. Remember, mastering how to take hydrangea cuttings is a skill that requires patience, practice, and attention to detail. By following these guidelines, gardeners can successfully propagate new hydrangea plants and add to their collection.
